%20500x1200.png?width=200&height=83&name=ALK%20Tech%20Logo%20(TransparentTextured)%20500x1200.png "ALK Tech Logo (TransparentTextured) 500x1200")
The Zalman P40 DS is a mid-tower ATX PC case with a fish tank-style aesthetic and a built-in 9.1" LCD screen for end-users looking to get in on the sensor panel bandwagon for their PC builds.
There's certainly no shortage of fish tank-style PC cases on the market today, where it's probably safe to say that most (if not all) major PC case manufacturers would have at least one fish tank-style PC case in their product line-up, and Zalman is no exception. Founded in 1999 and headquartered in South Korea, Zalman's claim to fame stems from its "flower CPU coolers" that were first launched in the early 2000s; since then, the brand has expanded its product line-up to include PC cases as well.
For today's review, we'll be taking a look at a mid-tower ATX PC case that comes with a built-in 9.1” LCD display screen and four pre-installed 120mm ARGB case fans, the Zalman P40 DS. Showcased at Computex 2025 back in May this year, the P40 DS is available in black or white, and is targeted at folks going for a fish tank-style aesthetic for their PC build, who would also like to get in on the trend of having a sensor panel as part of their PC build. Read on to learn more about the P40 DS, and to see it in action as part of a demo build that also utilises Zalman's new jet engine-inspired CPU cooler, the ZET 5!
Summary of Specifications
- Colour: Black (P40 DS Black) or white (P40 DS White)
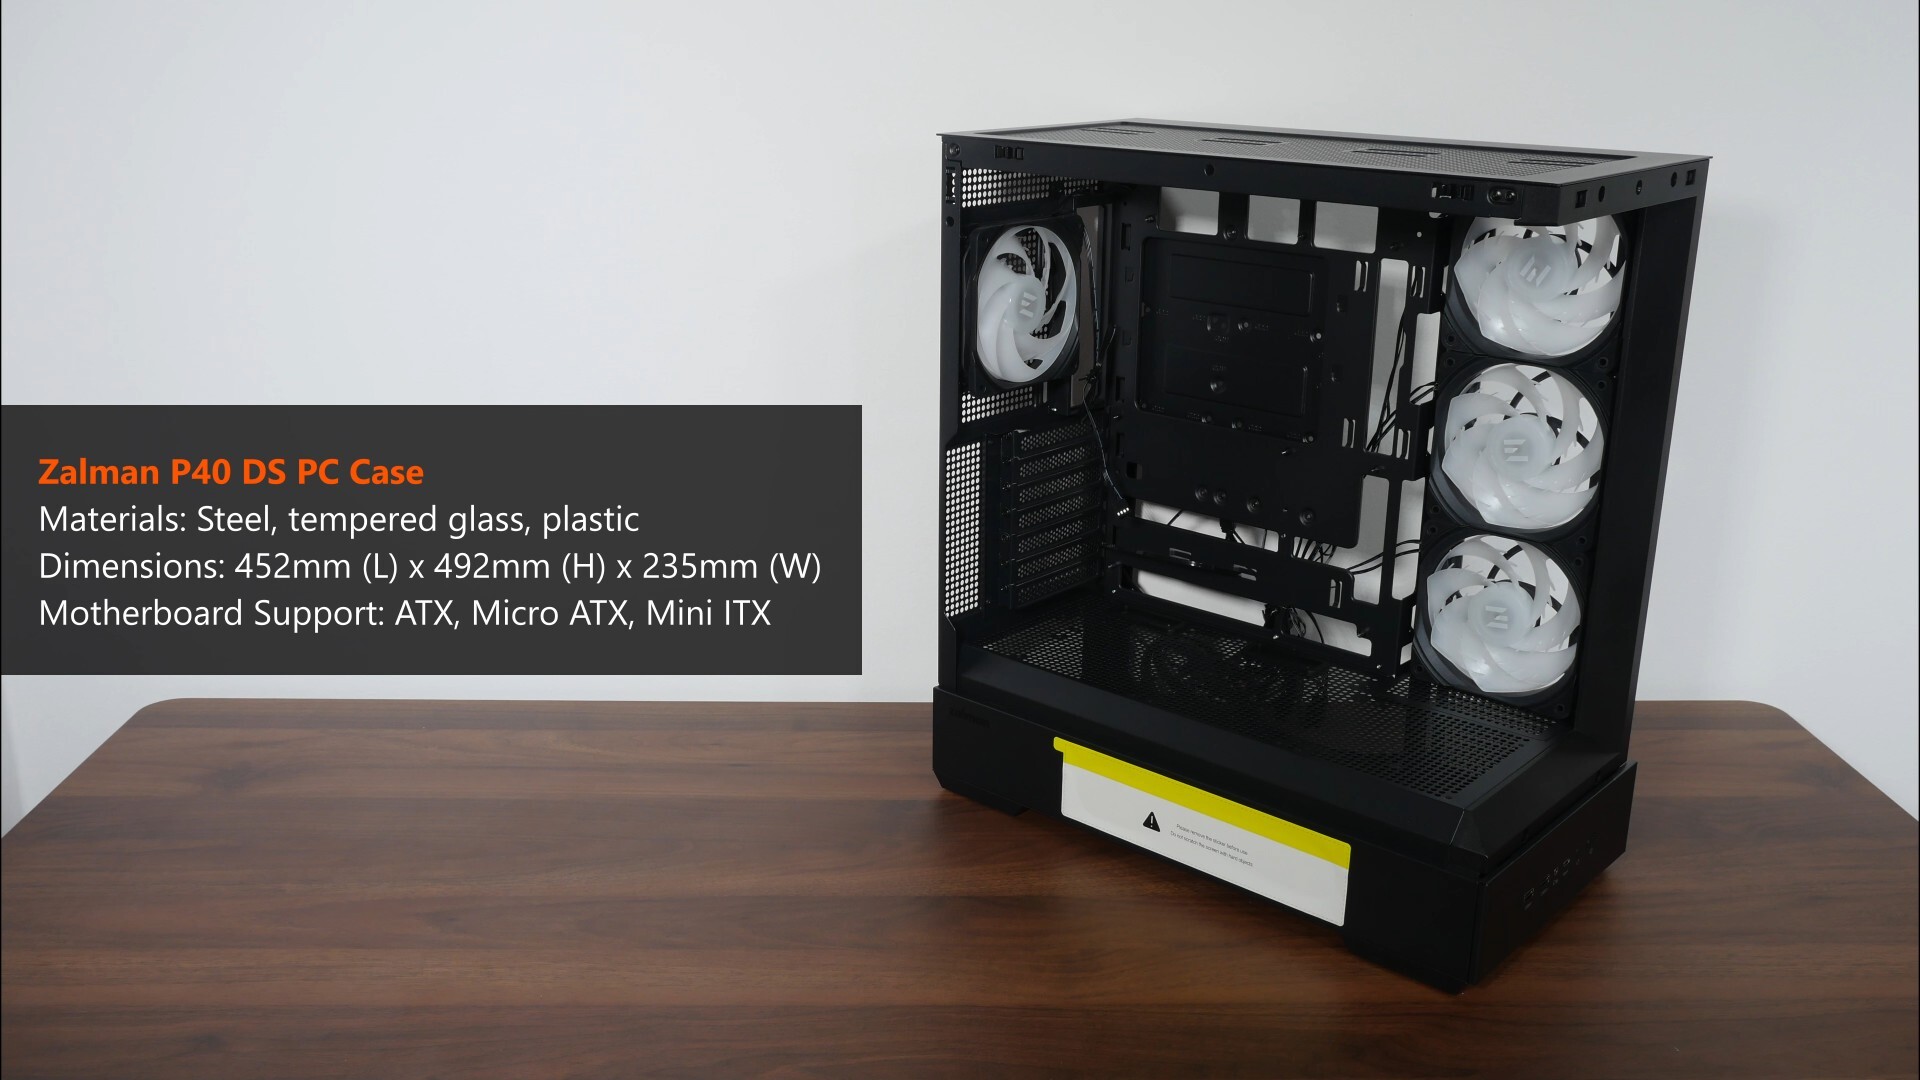
- Materials: Steel, plastic, tempered glass
- Dimensions: 452mm (L) x 235mm (W) x 492mm (H)
- Motherboard Support: ATX, Micro ATX, Mini ITX
- Expansion Slots: 7
- Drive Support: up to 2x 2.5" SSDs or 1x 3.5" hard drive on rear of motherboard tray, and 1x 2.5" SSD or 1x 3.5" hard drive in bottom chamber
- Front I/O: 2x USB 3.0 Type-A, 1x 3.5mm microphone/headphone combo jack, 1x USB 3.2 Gen 2 Type-C, reset button (pre-connected to included ARGB hub), power button
- Included Fans: 3x Zalman ZM-AF120R reverse blade 120mm fans, 1x Zalman ZM-AF120 normal blade 120mm fan
- Top Panel Cooling Support: up to 3x 120mm case fans or 2x 140mm case fans, or up to 1x 360mm/280mm/240mm/120mm AIO radiator
- Front Panel Cooling Support: N/A
- Side Panel Cooling Support: up to 3x 120mm case fans. or up to 1x 360mm/240mm/120mm AIO radiator
- Bottom Panel Cooling Support: up to 3x 120mm case fans
- Rear Panel Cooling Support; up to 1x 120mm case fan or 1x 120mm AIO radiator
- Official Product Page: https://www.zalman.com/EN/Product/ProductDetail.do?pageIndex=1&pageSize=10&productSeq=1648&searchCategory1=5&searchCategory2=59&searchCategory3=-99&searchKey=&searchWord=&active=pro_featureTab#pro_detail_tab
Packaging & Accessories
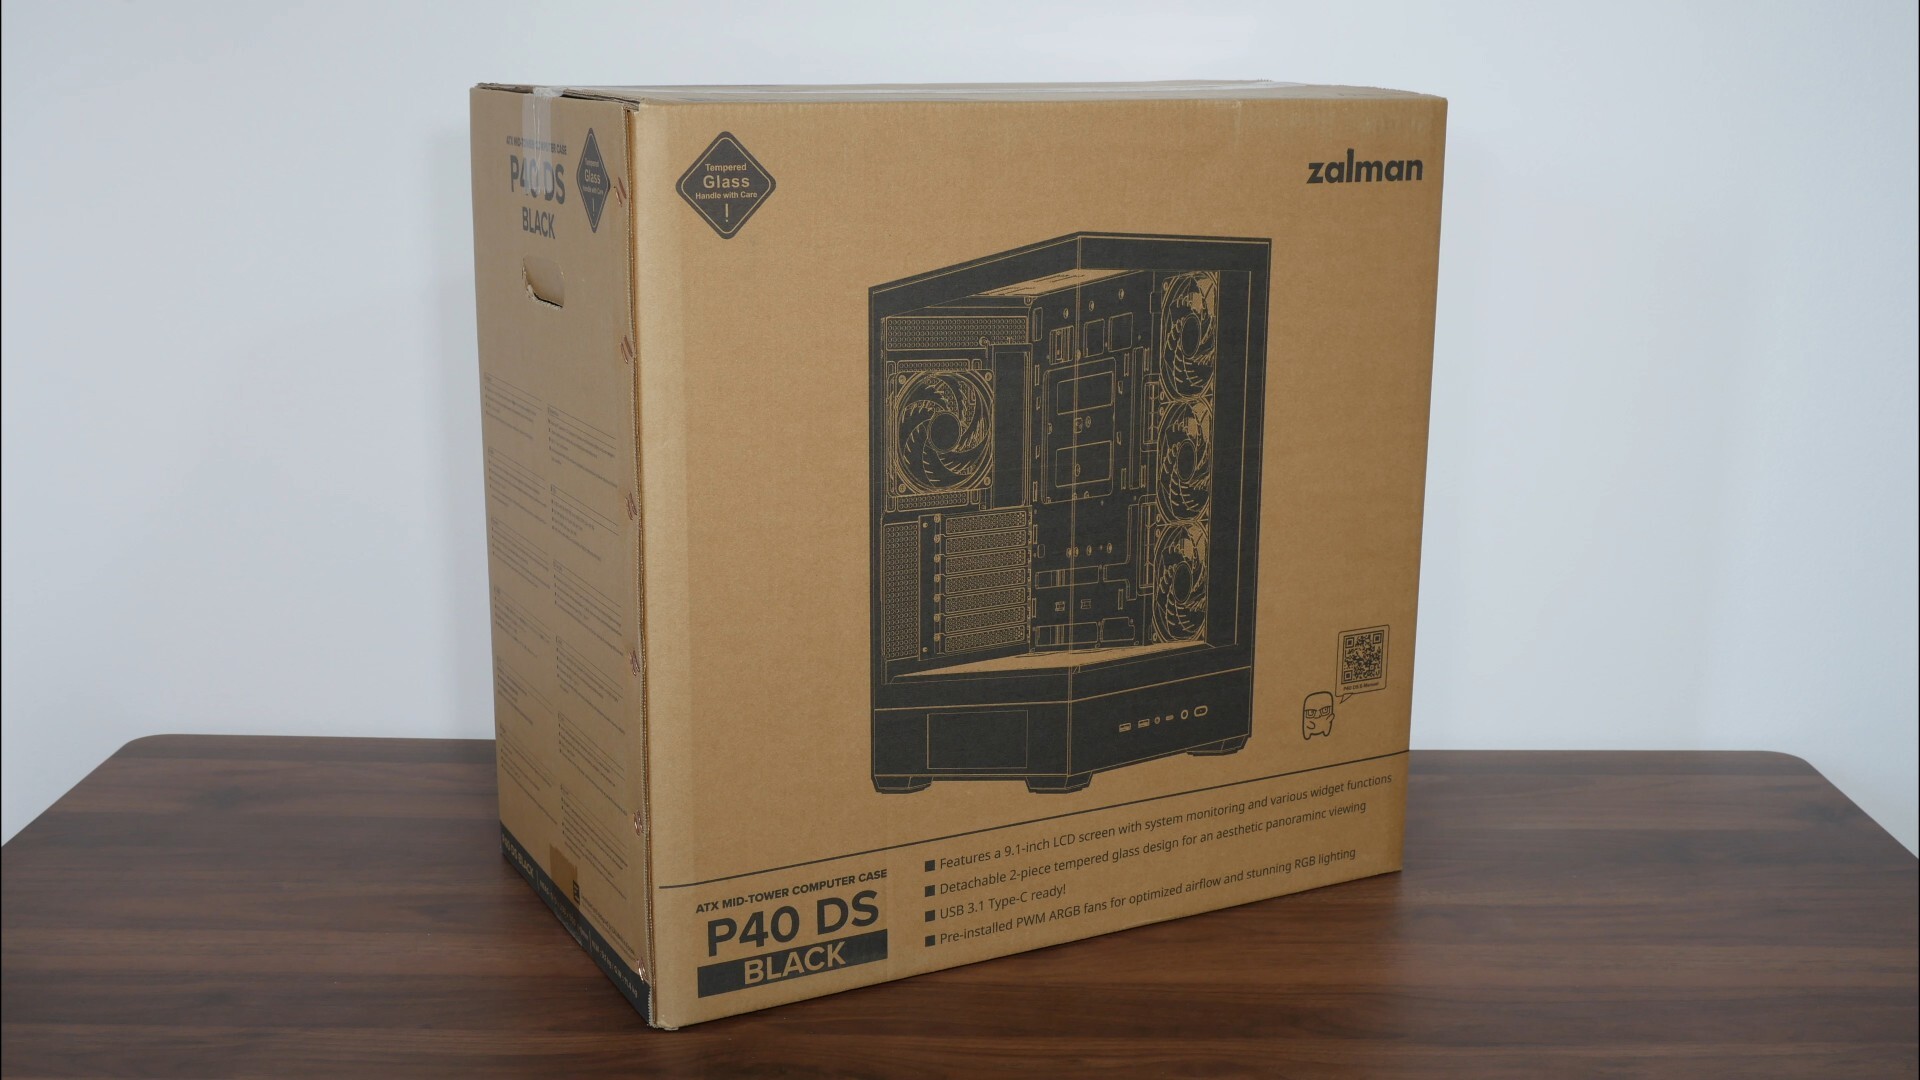
In terms of packaging, the P40 DS ships in a run-of-the-mill brown cardboard box with product illustrations and descriptions on all sides.
.jpg)
With the case removed from the box, we see that the P40 DS comes with a cardboard box of accessories secured to the motherboard tray with a cable tie, along with a sheet of stickers featuring Zalman’s brand mascots, Mansu and Mansters.
.jpg)
Within the cardboard box, we get a clear plastic box containing a whole bunch of accessories, where Zalman's included a microfiber cleaning cloth for the tempered glass panels, as well as a height-adjustable standalone GPU support bracket. We also get cable ties, a whole bunch of assorted screws as well as spare friction clips for the panels of the case.
Exterior Walkthrough
.jpg)
For this review, I have on hand the black variant of the P40 DS that’s simply called, you guessed it right, the P40 DS Black - the P40 DS is also available in a white colourway and is aptly named the P40 DS White.
.jpg?width=1920&height=1080&name=Aesthetics%20(Tempered%20Glass%20Side%20Panel).jpg)
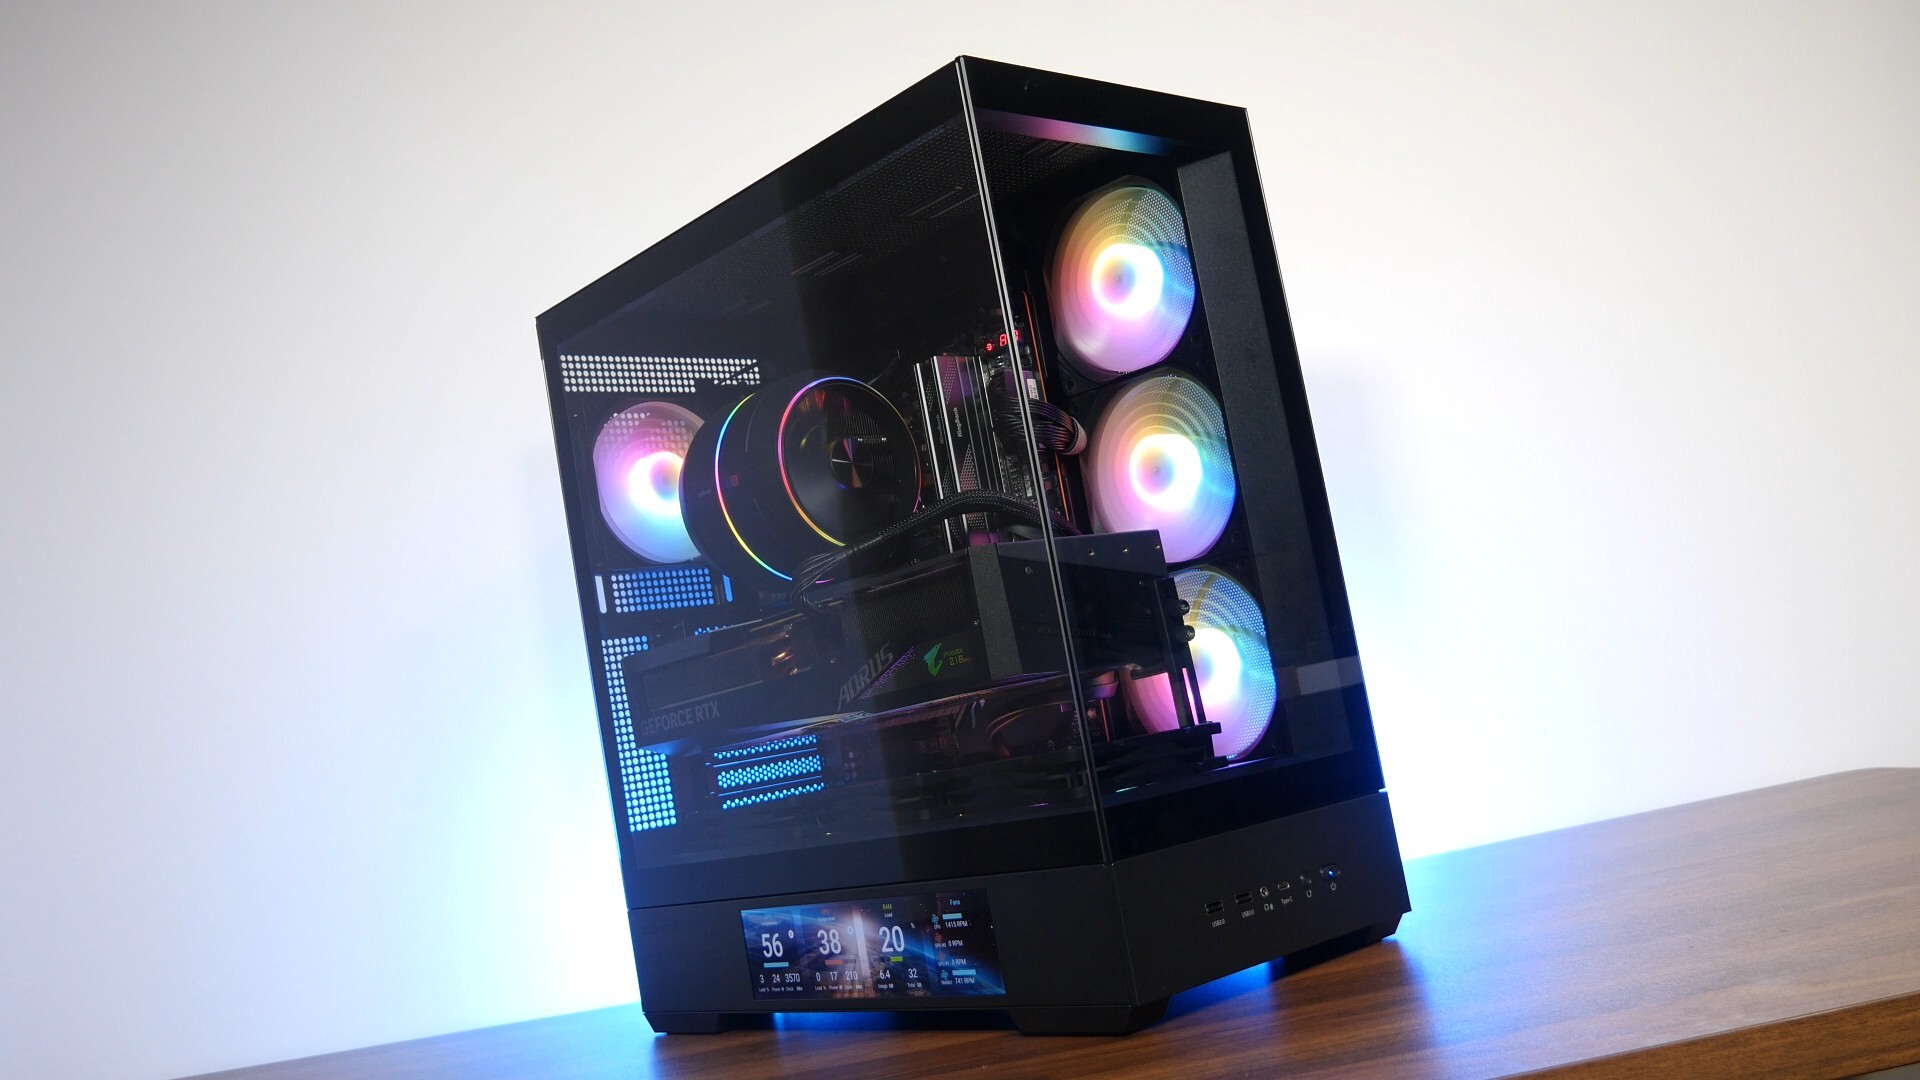
The case comes with four pre-installed fans, and features a traditional mid-tower ATX layout with a chamber at the bottom for your power supply and a storage drive. As a fish tank-style case, the P40 DS comes with a front and side tempered glass panel that pretty much serves up an unobstructed view of your PC hardware components. We get the P40 DS’s core feature over on the left side panel – a built-in 9.1” LCD sensor panel screen right beneath the tempered glass side panel, we’ll take a closer look at this screen later in this review when I’ve done up a demo build with this case.
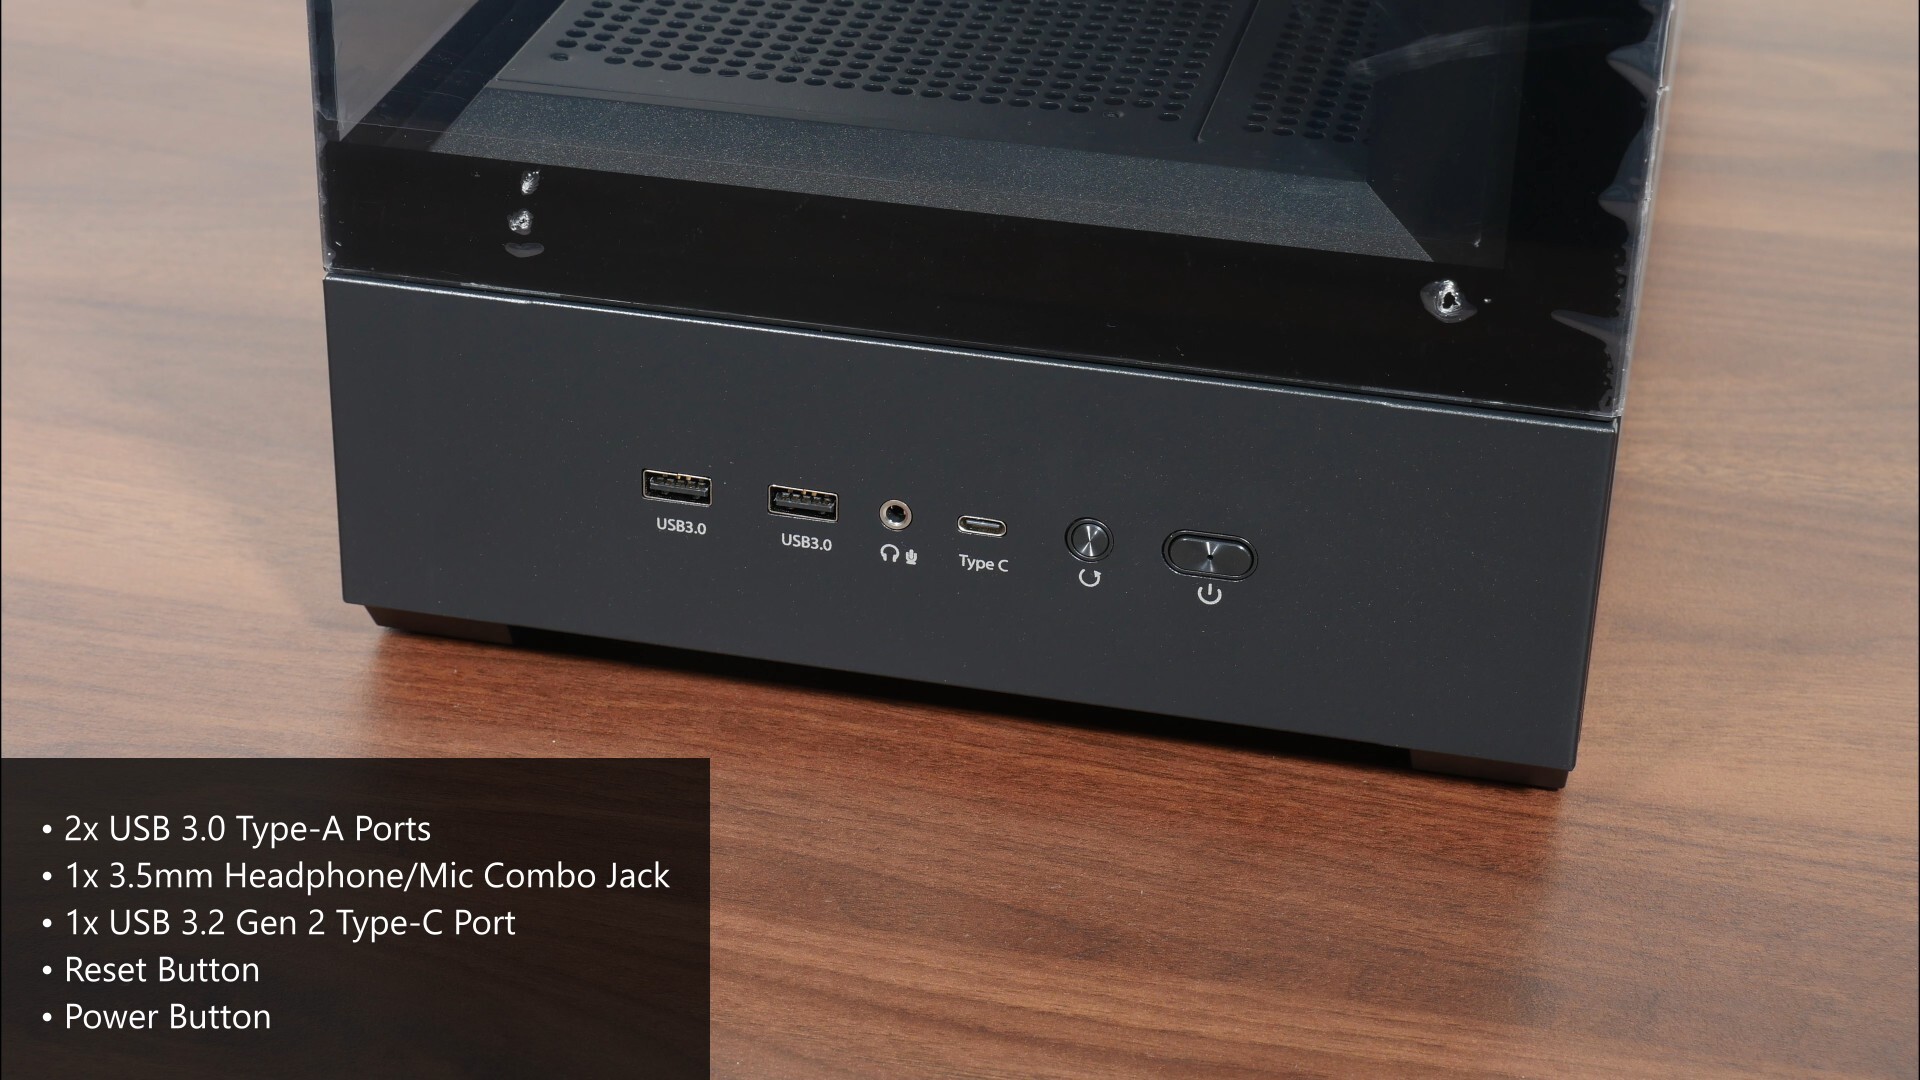
As you might have surmised, the front panel connectors of the case are located right below the lower edge of the front tempered glass panel, where we get two USB 3.0 Type-A ports, a 3.5mm microphone and headphone combo jack, a USB 3.2 Gen 2 Type-C port, a reset button as well as a power button with a built-in blue power LED. Do note that the case does not come with a hard disk activity indicator light.
.jpg)
The other side panel of the P40 DS is a simple steel panel with ventilation openings right above where the side intake fan openings would be.
.jpg)
The top panel of the case is not removable, where it has ventilation openings for the cooling hardware that you’d be installing up top. We do get a removable dust filter that’s held in place magnetically, which is a nice feature to have.
.jpg)
The bottom panel of the case has a full length’s worth of ventilation openings for the hardware that you’d mount in the bottom chamber of the case, such as your power supply unit and perhaps a hard drive, where Zalman’s also included a removable dust filter that’s held in place magnetically. As can be seen, the case comes with four plastic feet with foam-like inserts.
.jpg)
The rear of the case is a pretty standard affair, where we get lots of ventilation openings. It's great to see that the expansion slot covers of the P40 DS are of the reusable variety.
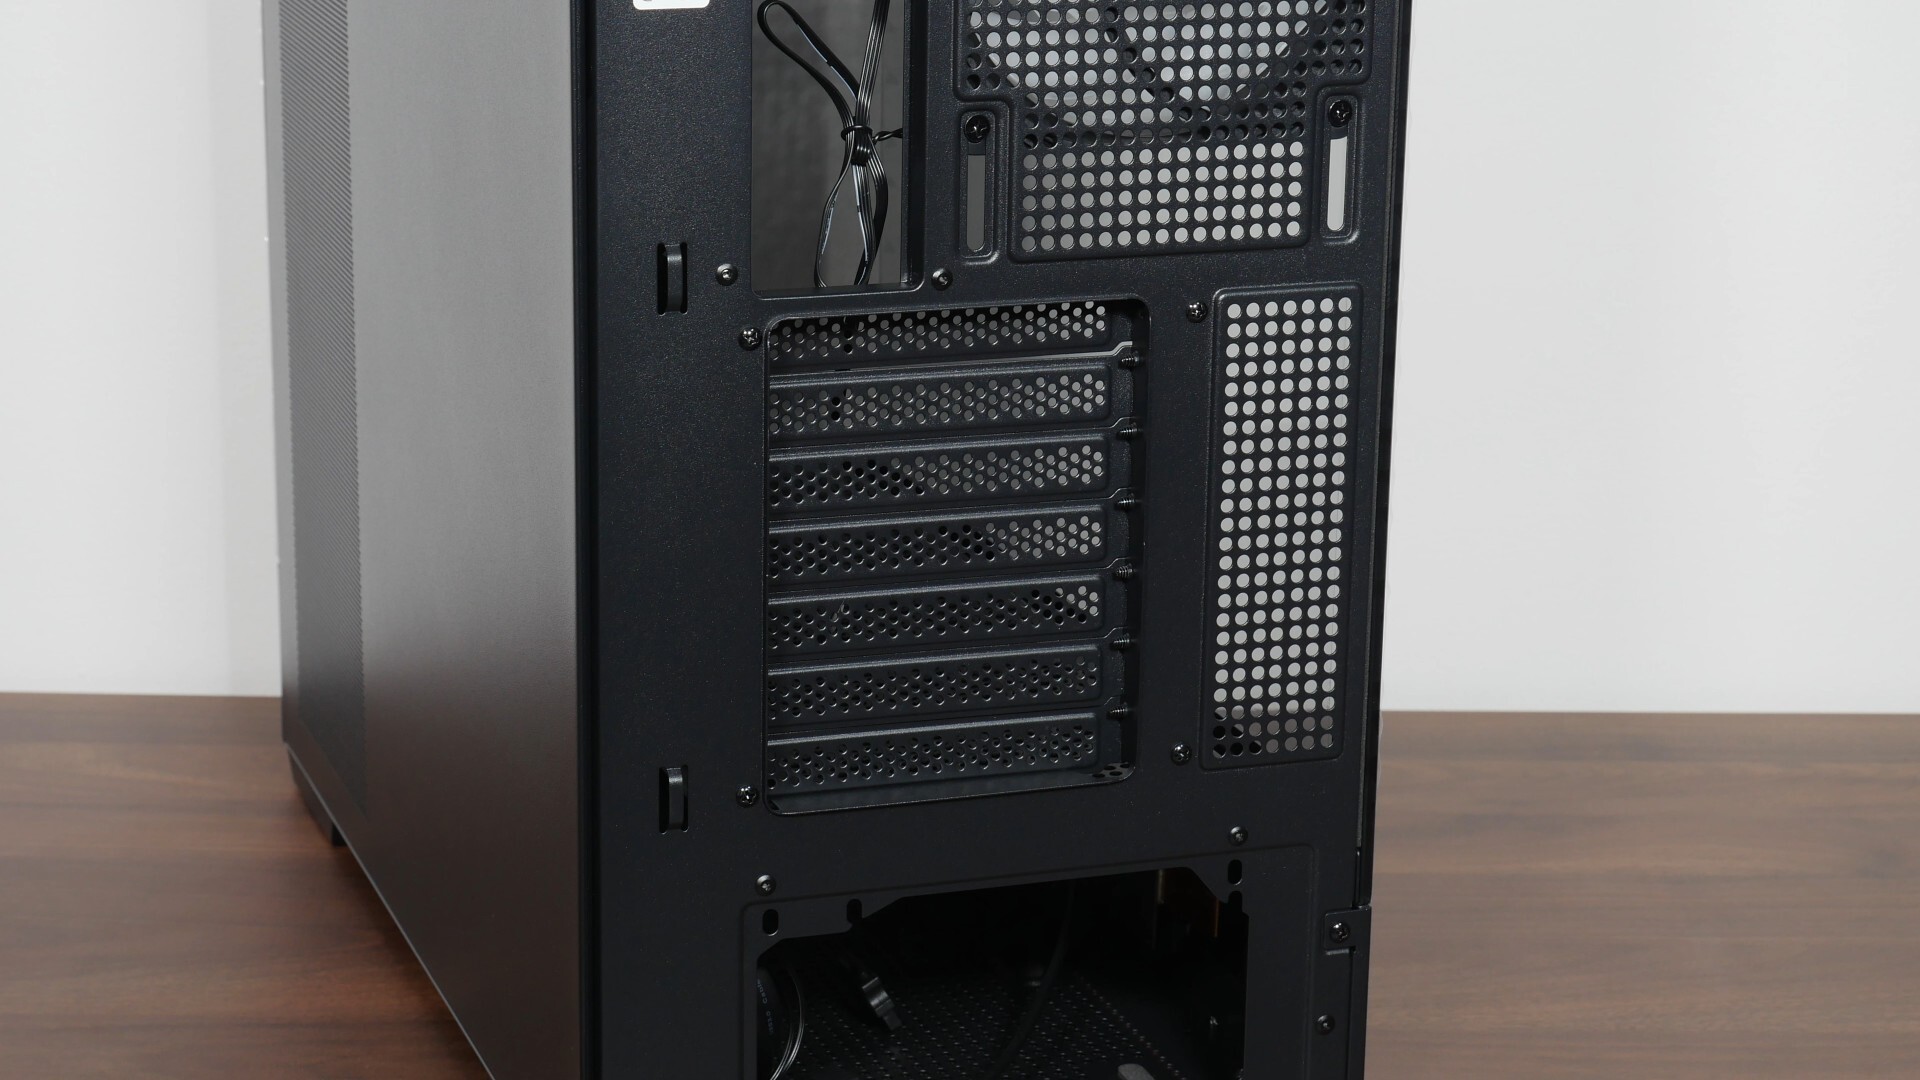
It’s worth pointing out that the P40 DS comes with a repositionable expansion slot bracket, where you can simply remove and rotate the expansion slot bracket if you’re intending to install your graphics card in the vertically-mounted position.
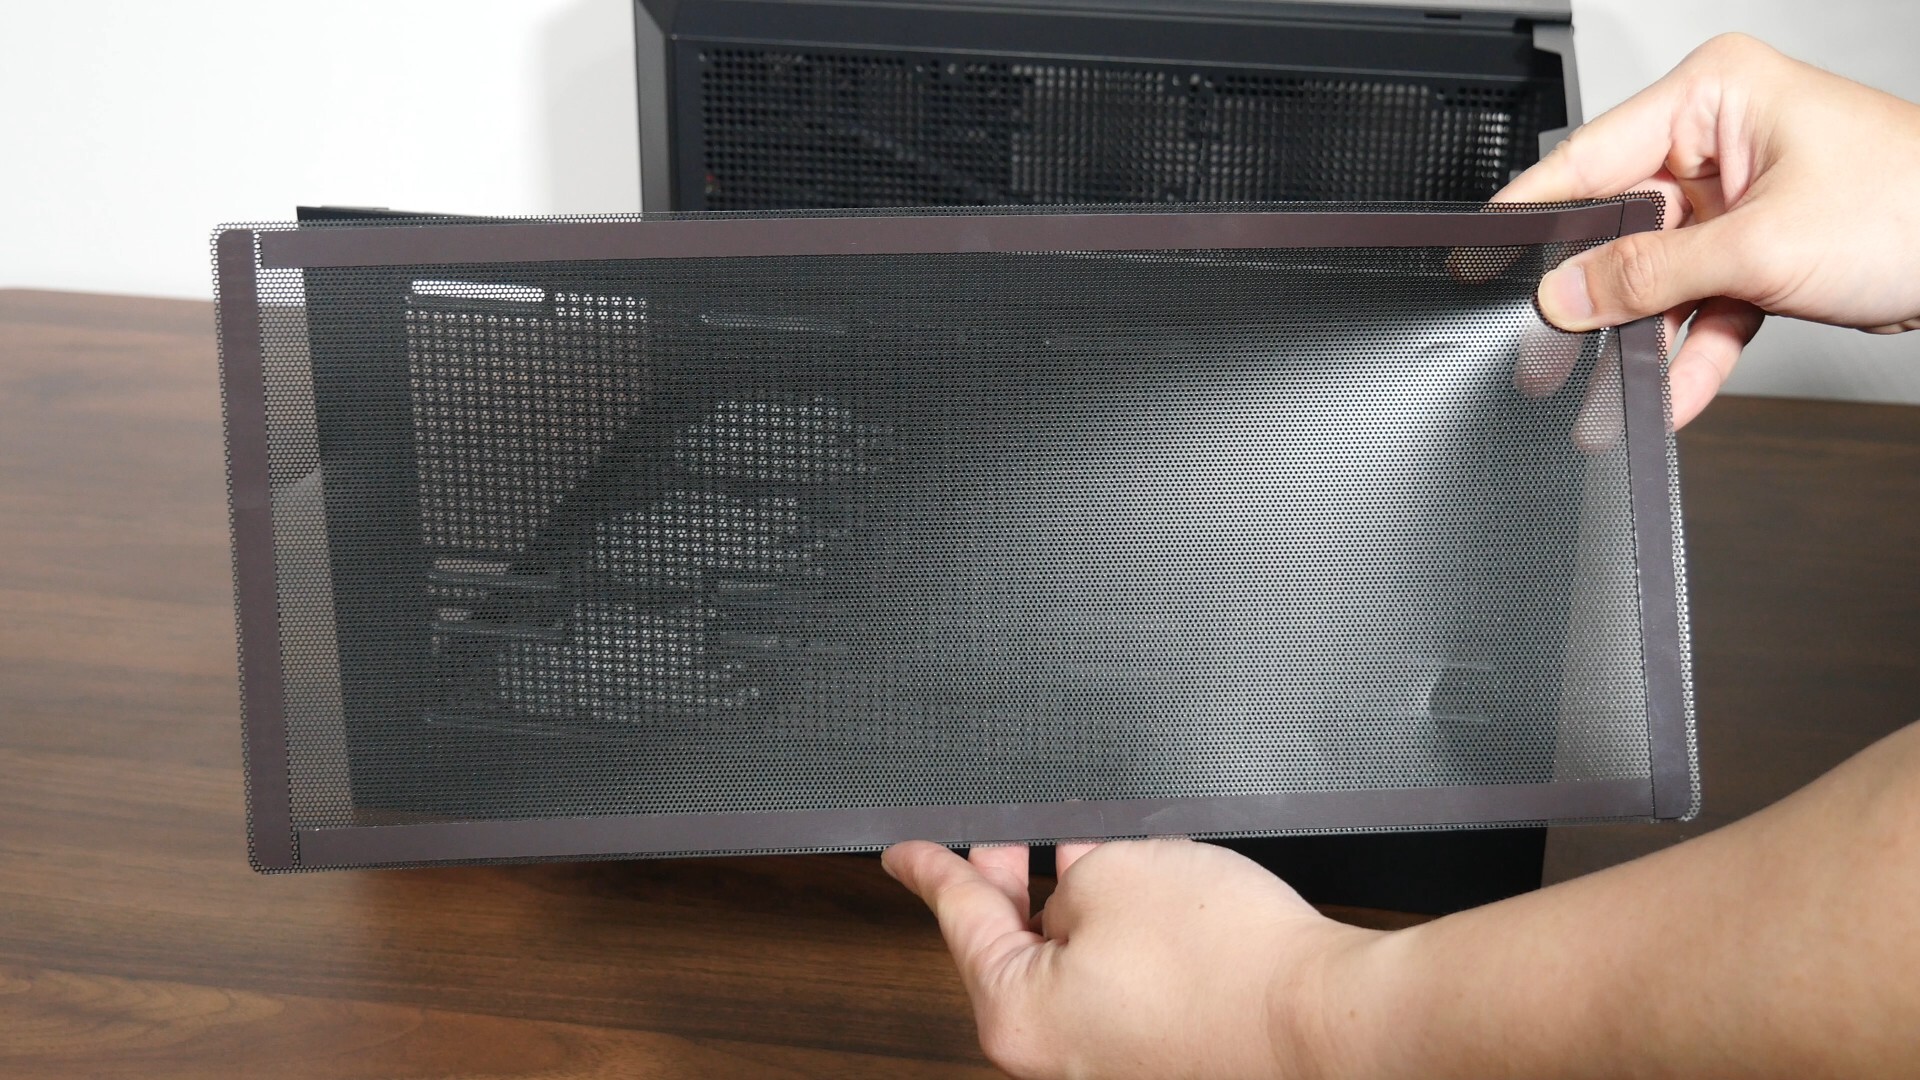

Getting the panels off the P40 DS's a breeze, all thanks to the fact that Zalman’s gone with a tool-less design for all of the case’s panels, where they can be pried off very easily from the chassis. You’ll have to first remove the tempered glass side panel, front tempered glass panel and finally, the side steel panel. As pictured above, we get magnetic dust filters for both the top and bottom panels of the PC case, where they can be removed and reattached really easily.
Cooling Hardware Support
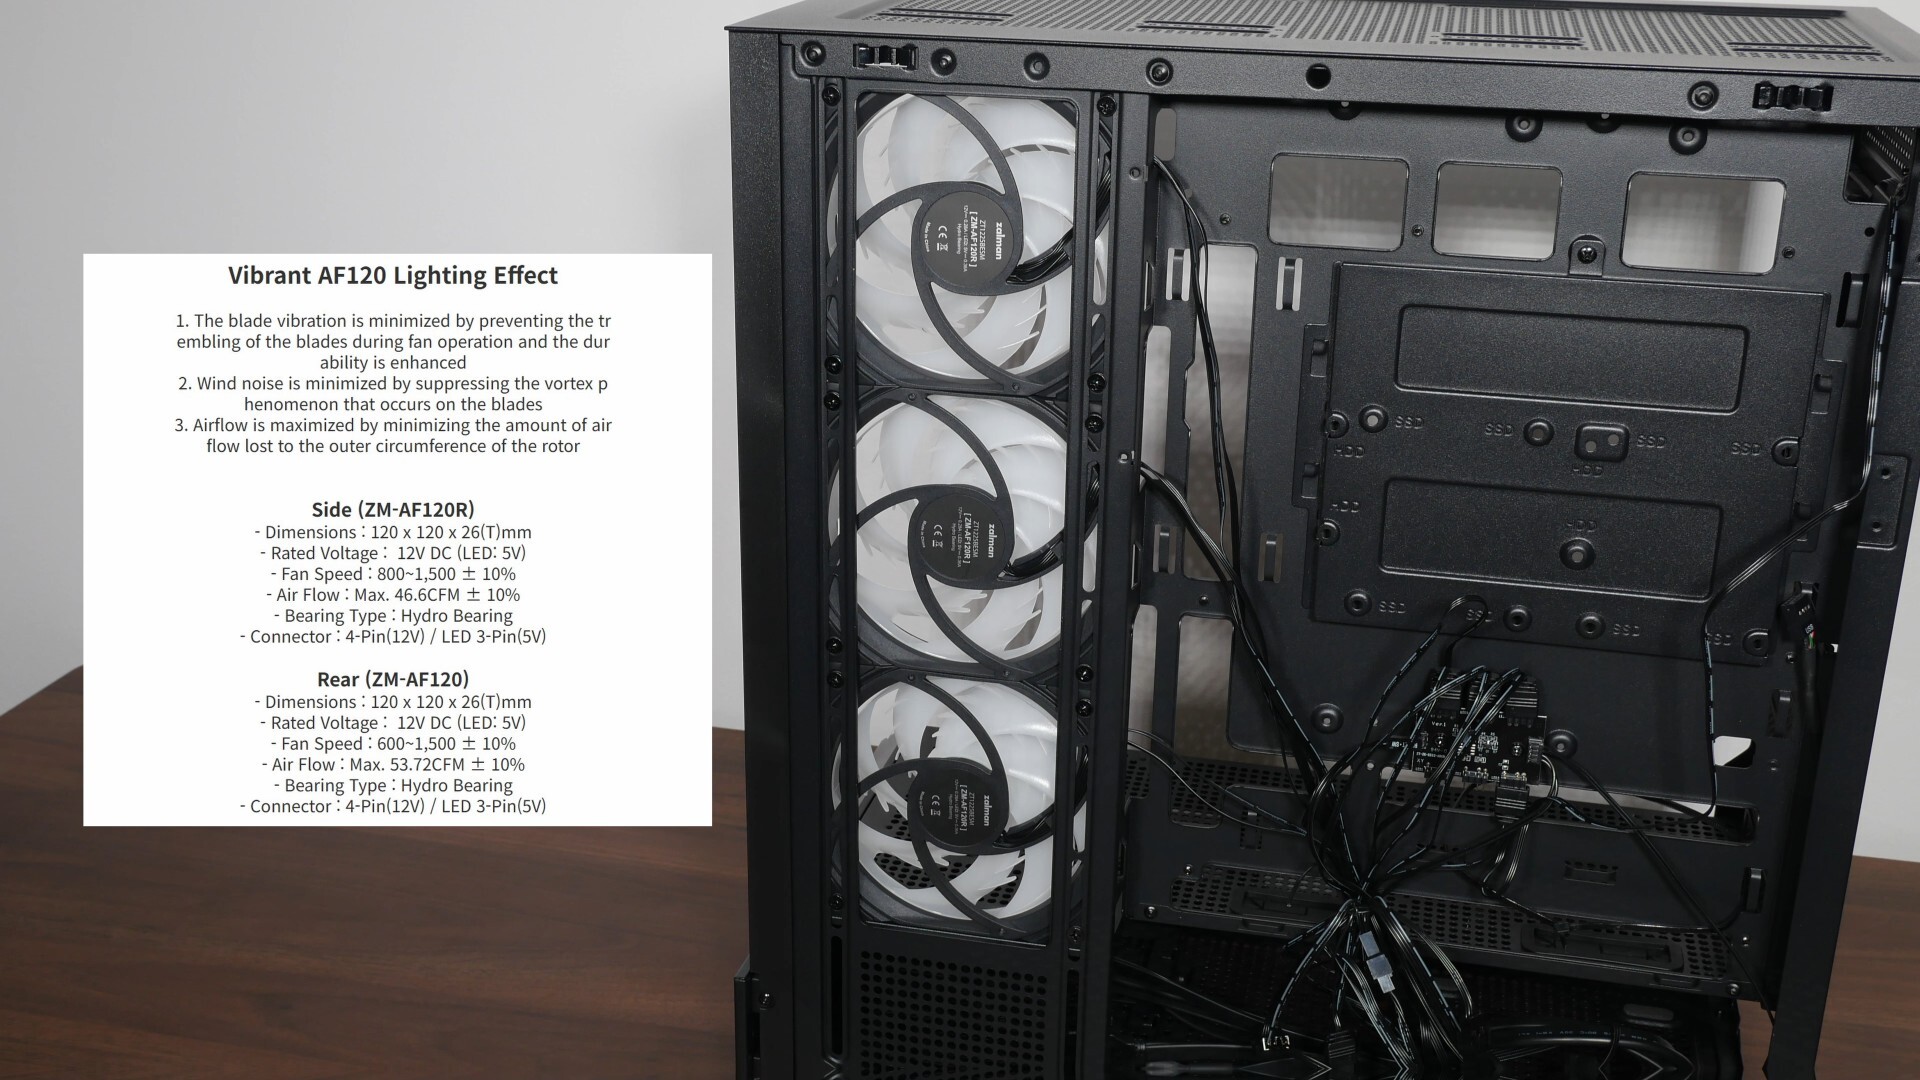
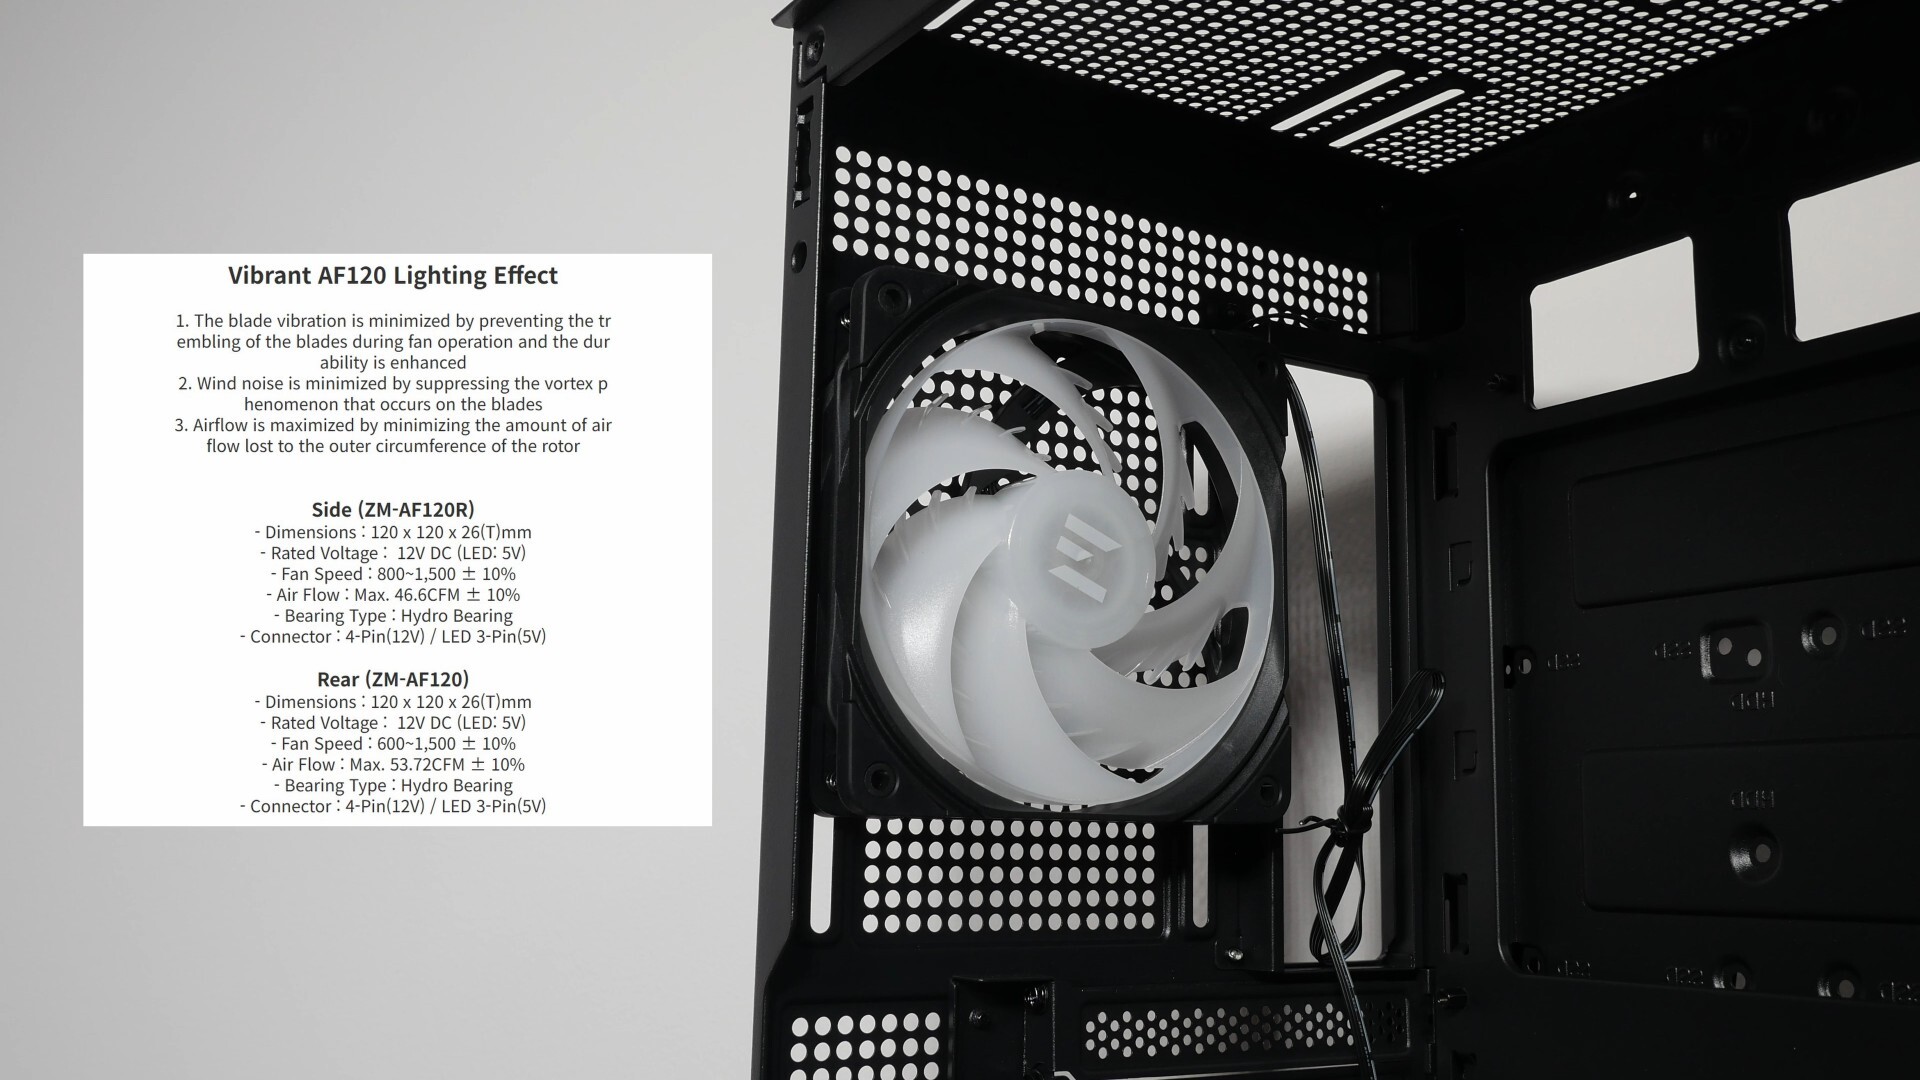
The P40 DS comes with four pre-installed ARGB fans, where we get three reverse blade Zalman ZM-AF120R fans on the side panel that serve as side intakes, and a single normal blade Zalman ZM-AF120 fan installed on the rear panel that's on rear exhaust duty.
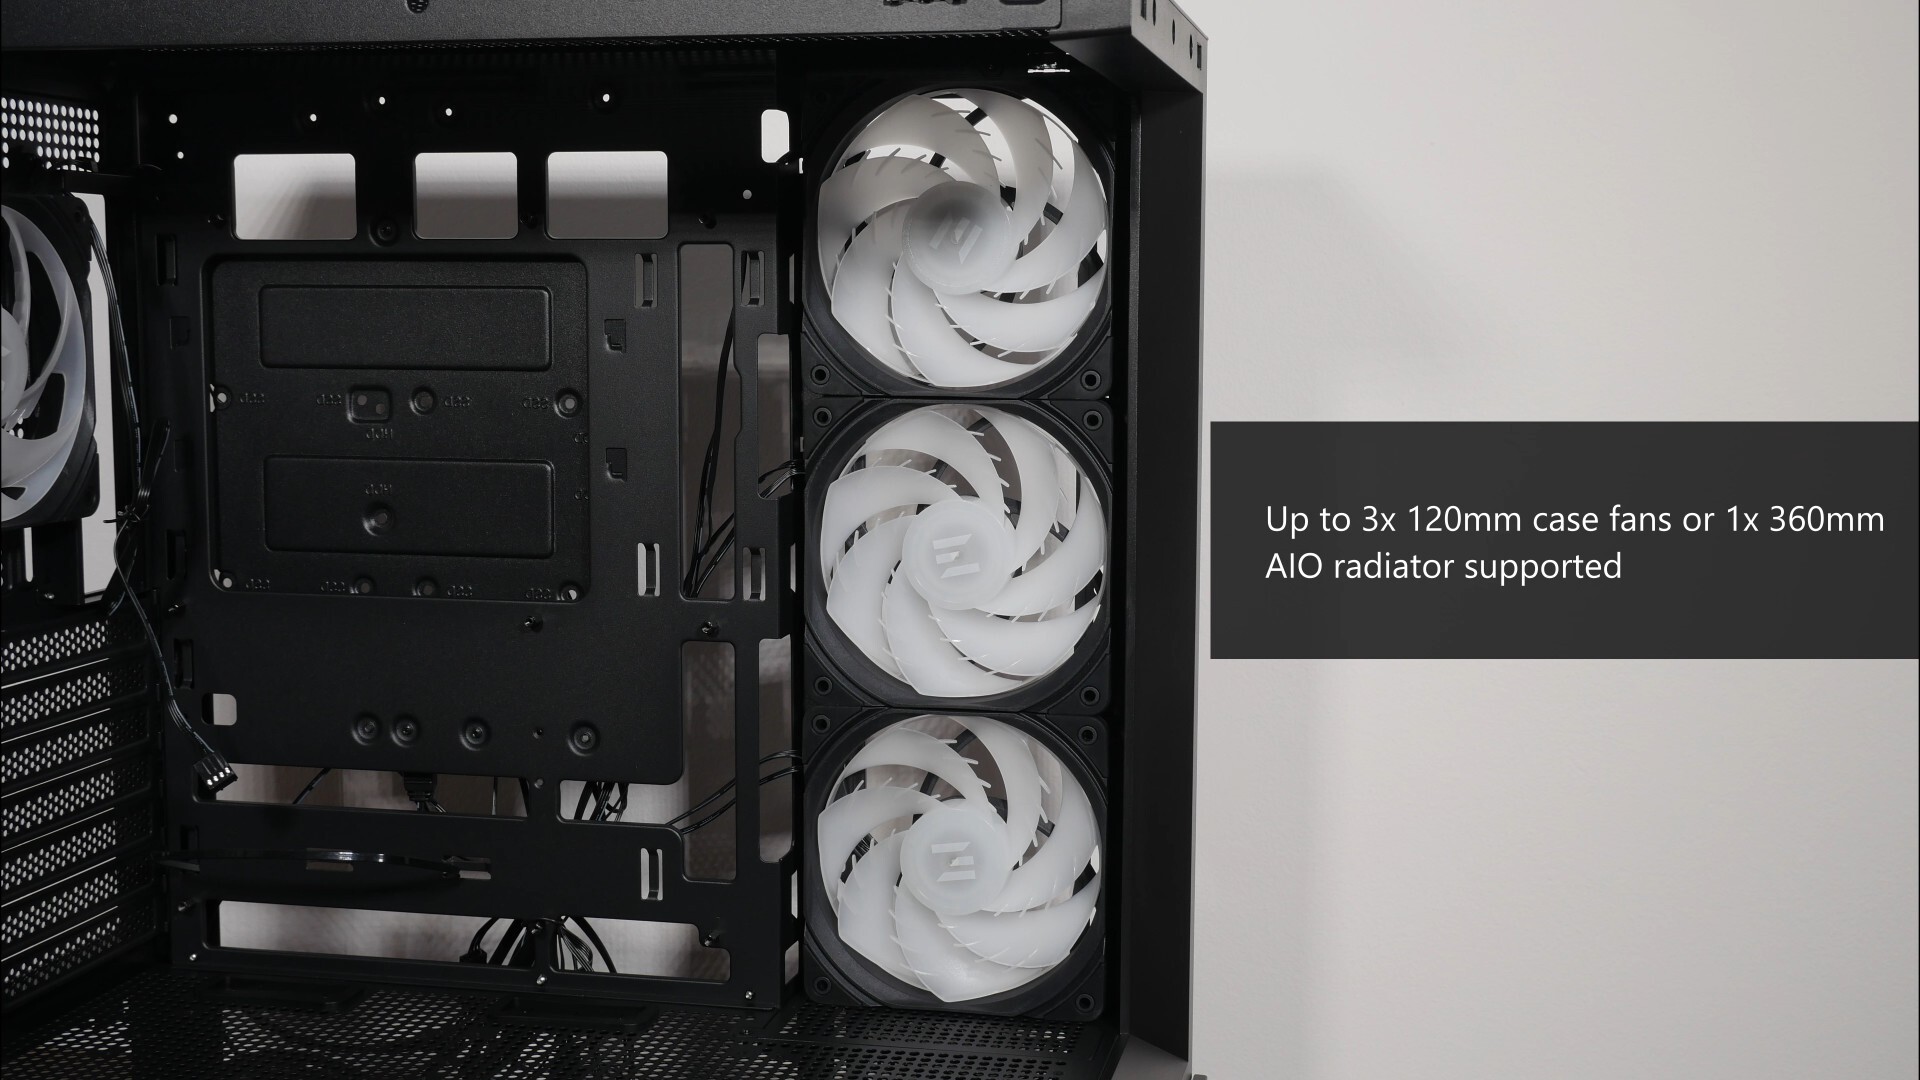
If you’re looking to swap out the side case fans, you’ll want to note that the case supports up to three side-mounted 120mm case fans or up to a 360mm/240mm/120mm AIO radiator.
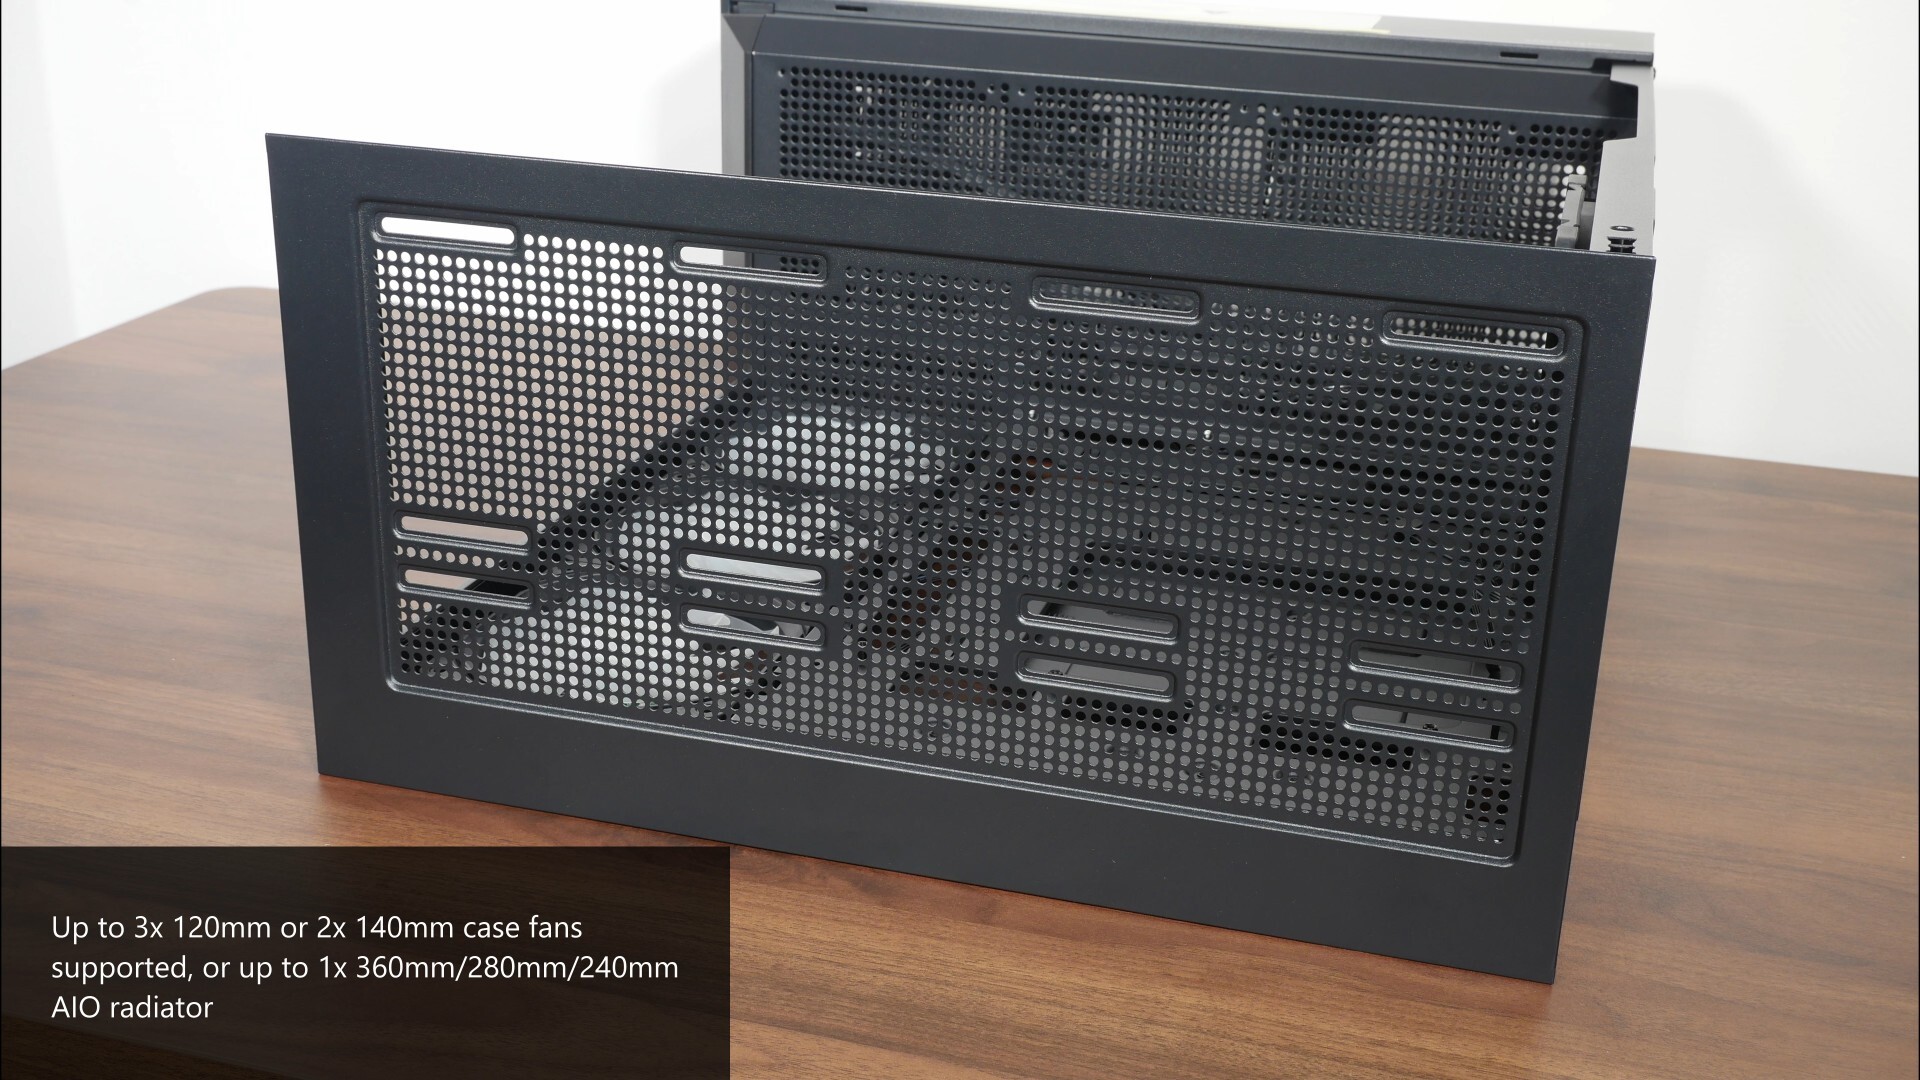
Over on the top panel, we get support for either two 140mm case fans, three 120mm case fans or up to a 360mm/280mm/240mm/120mm AIO radiator.
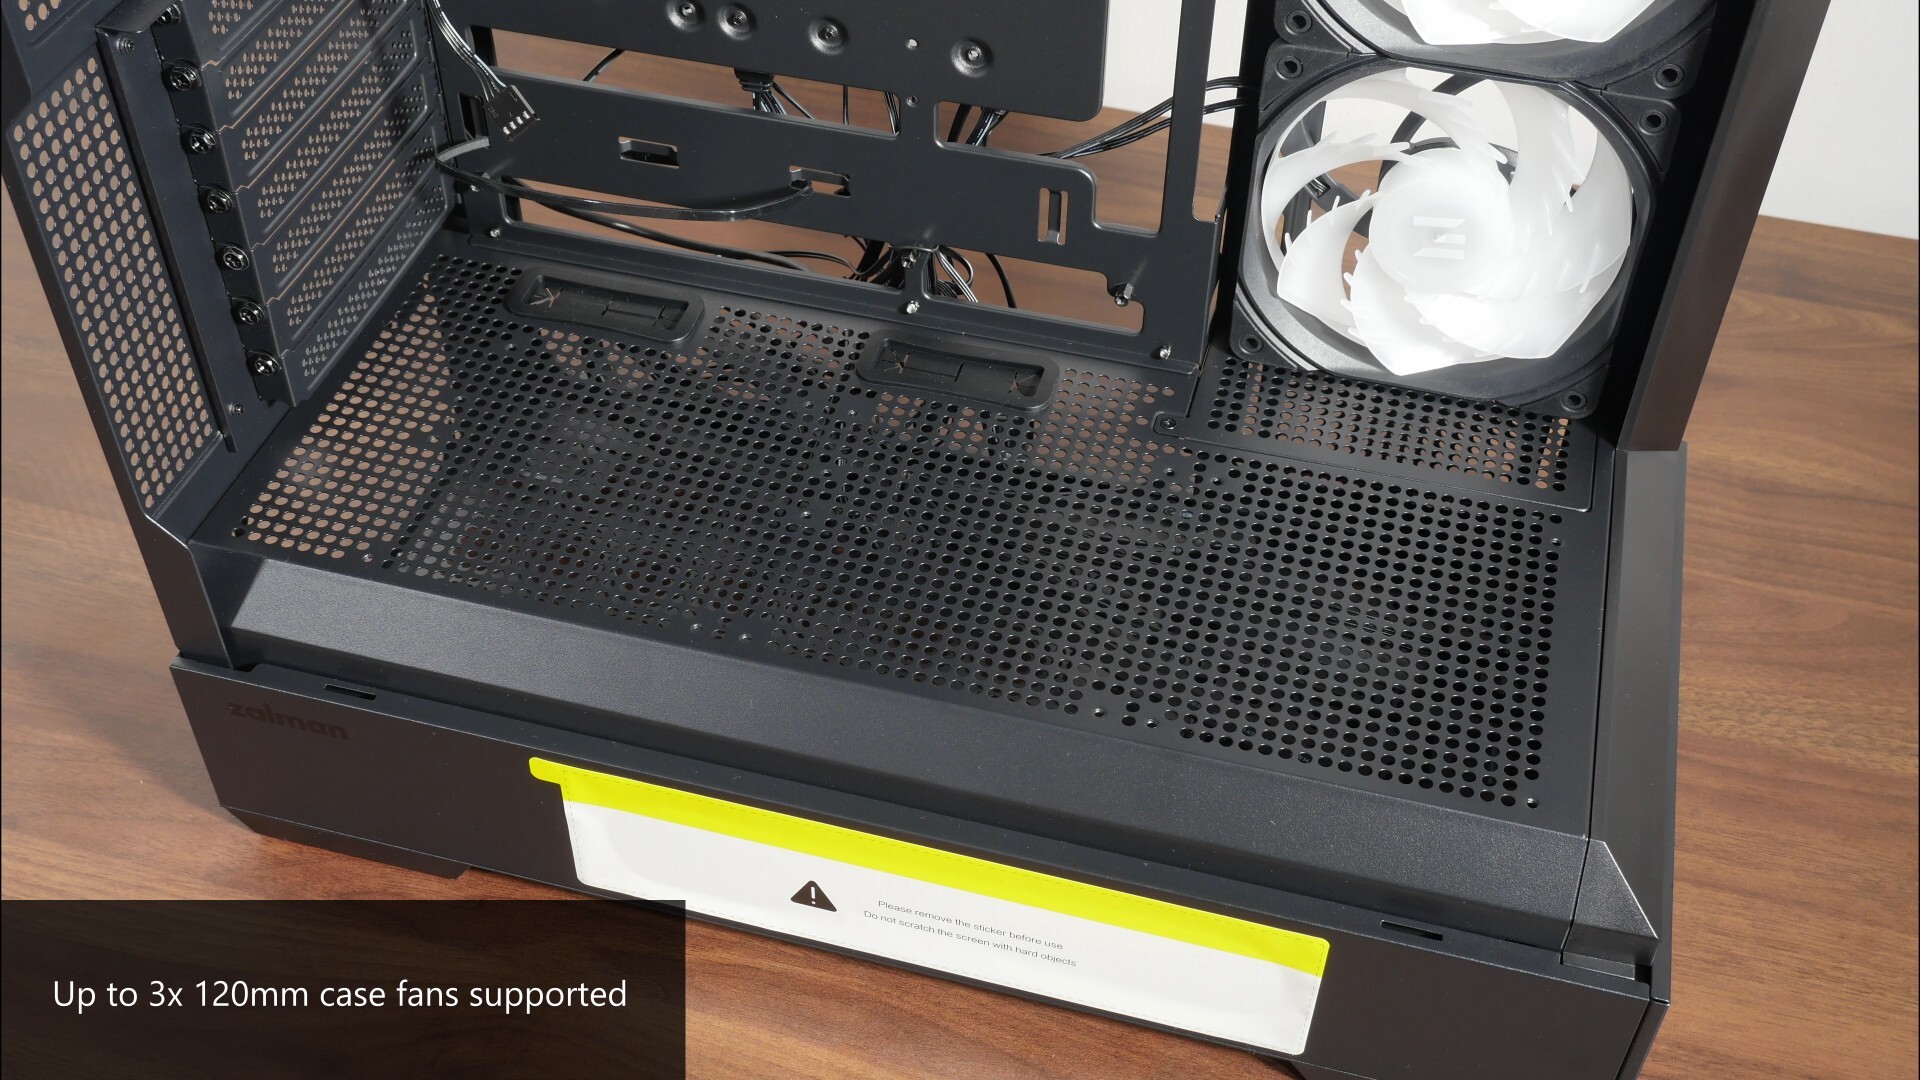
Moving over to the bottom panel right above the lower chamber of the case, we get support for up to three 120mm case fans.
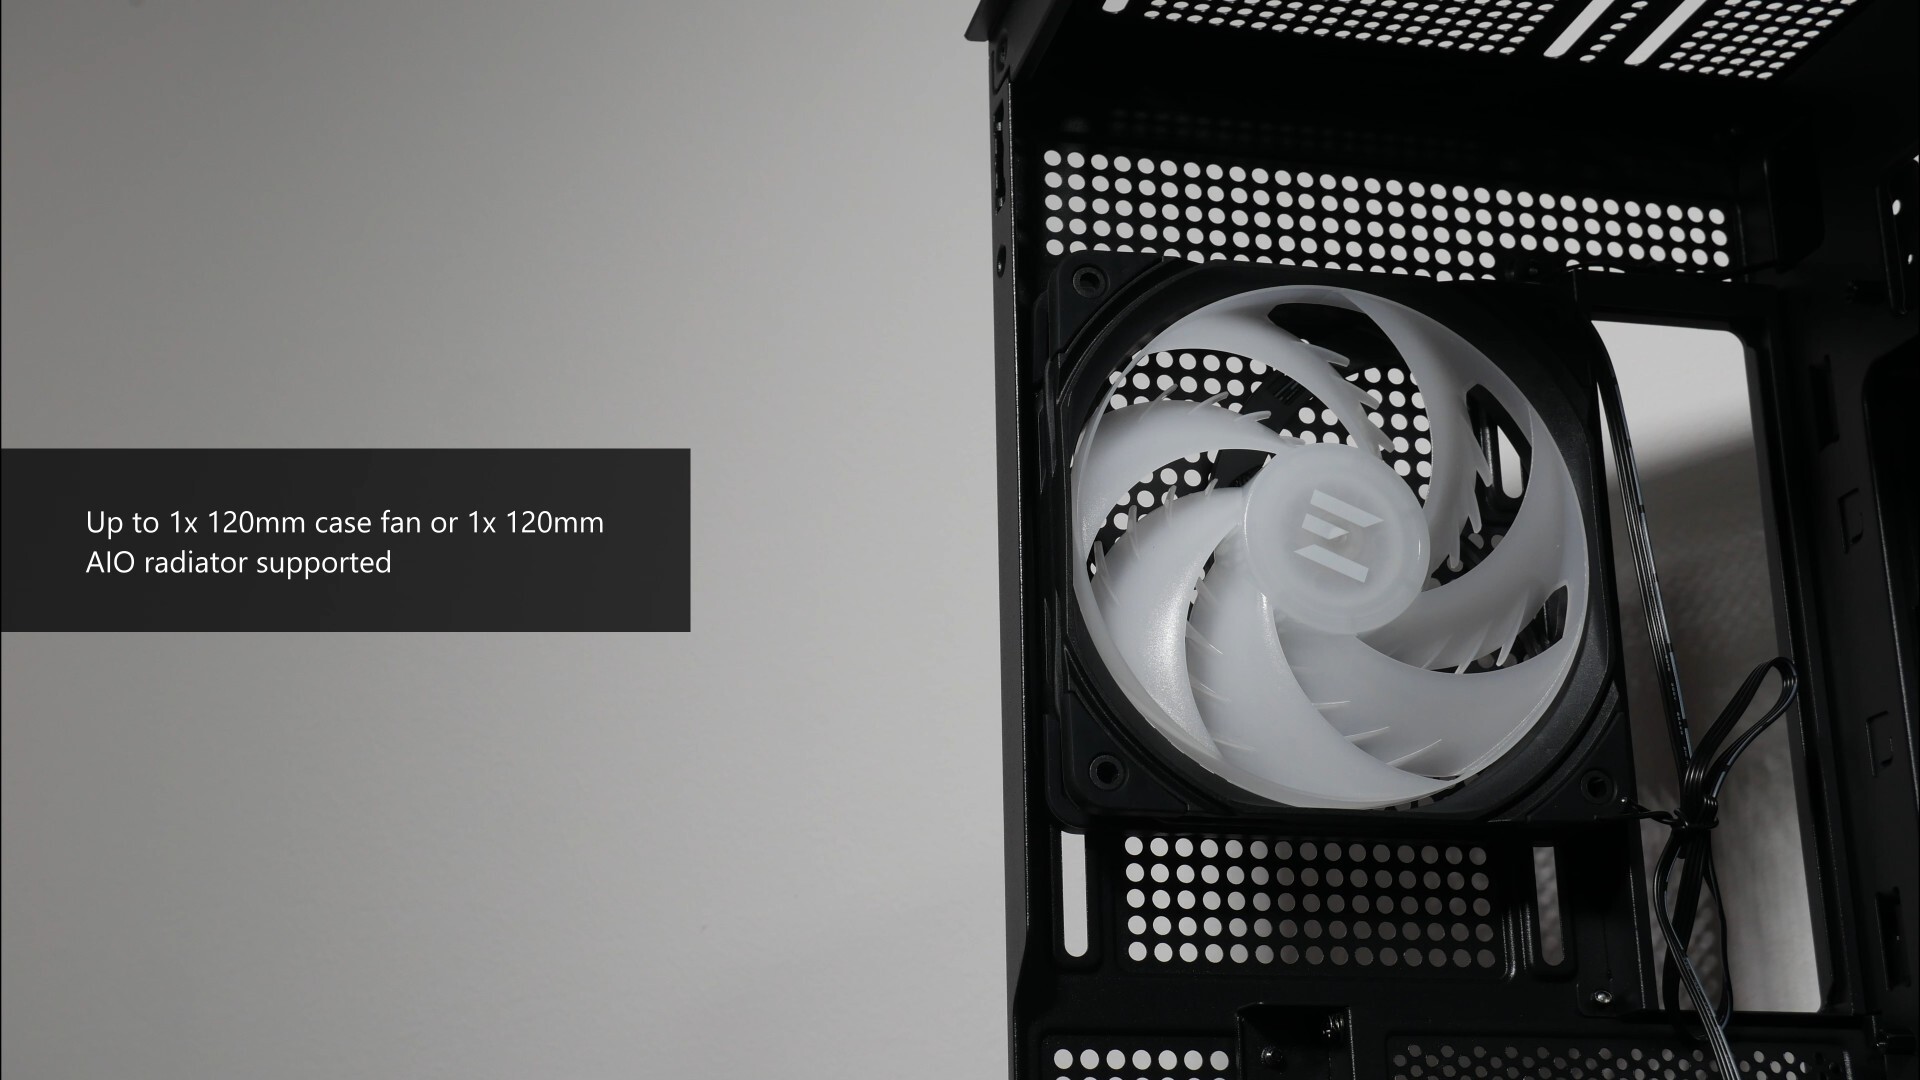
Finally, over on the rear, if you’re intending to swap out the pre-installed 120mm case fan, you can swap it out for, you guessed it right, another 120mm case fan, or a 120mm AIO radiator.
Physical Dimensions & Clearances
In terms of physical dimensions, the P40 DS has pretty standard dimensions for a mid-tower ATX PC case, where it measures in at 452mm (L) x 235mm (W) x 492mm (H).
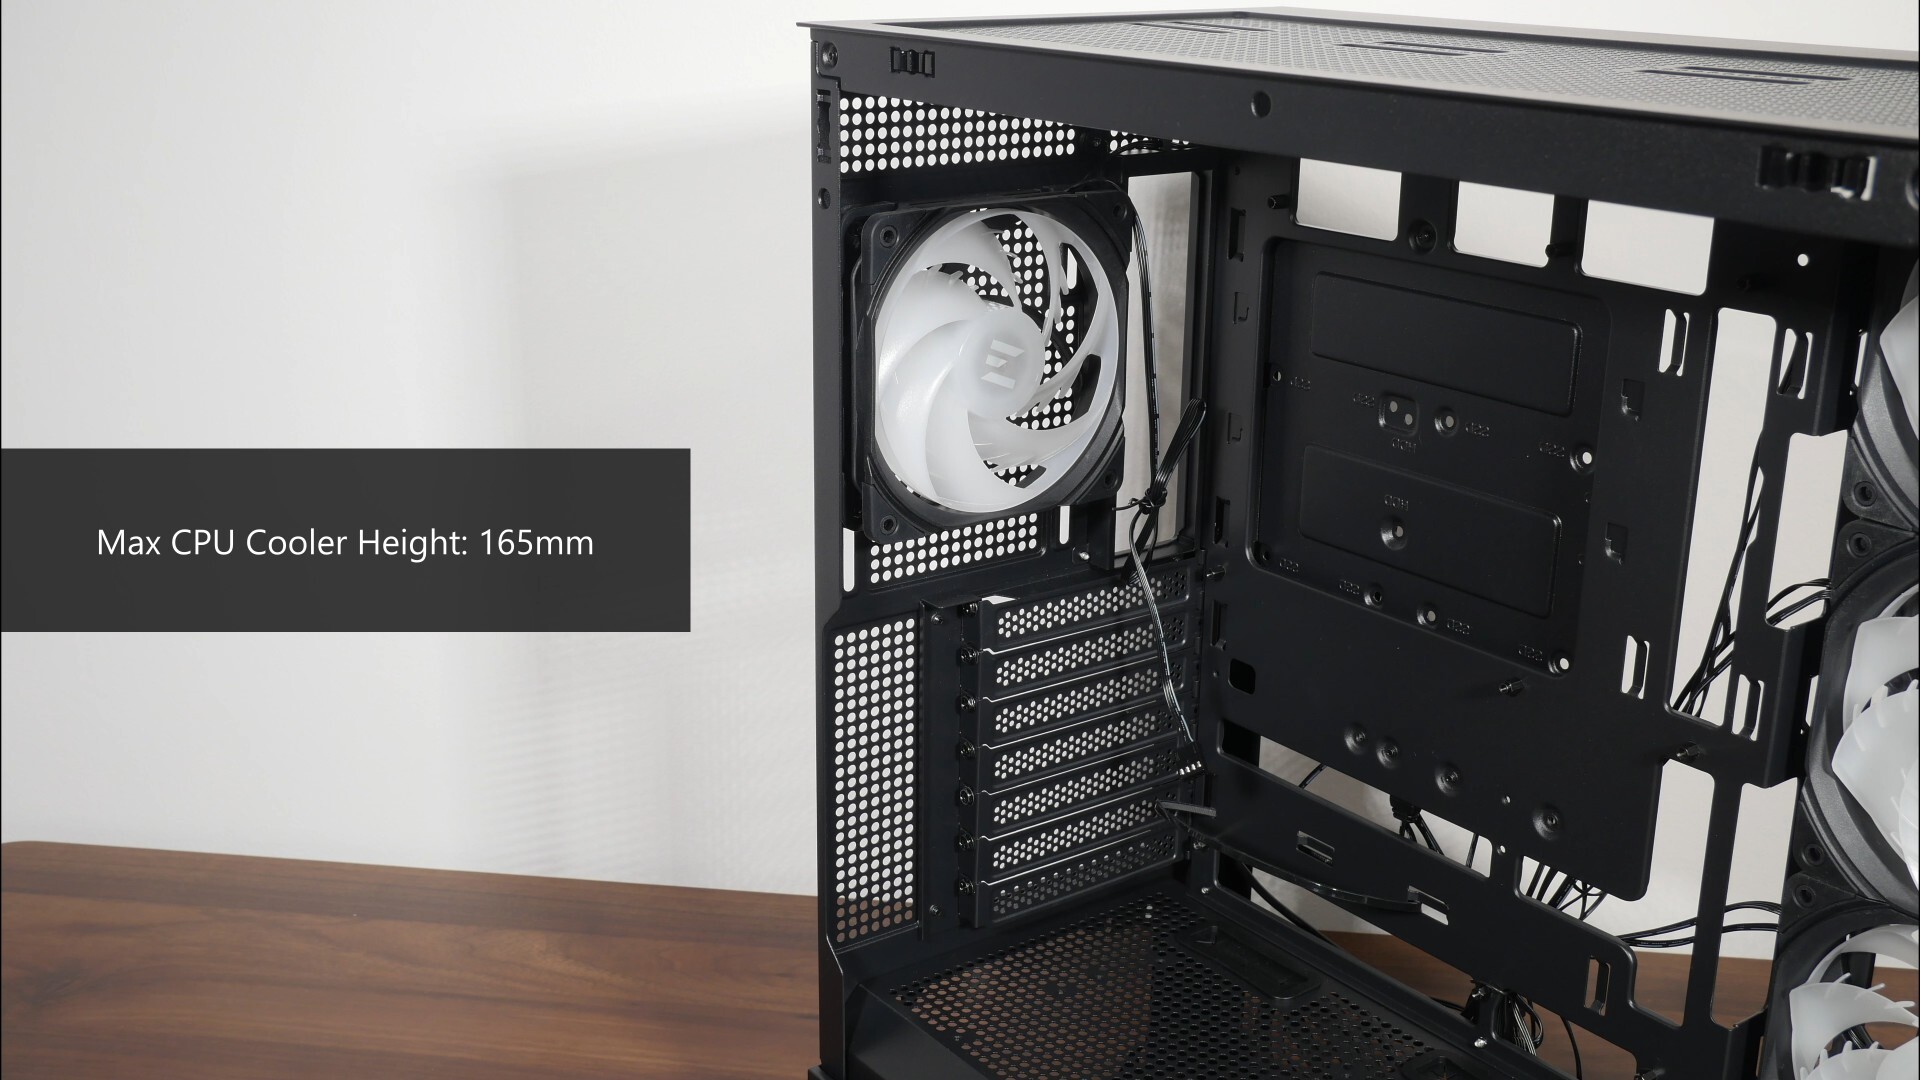
For you folks intending to use an air cooler for your processor, do note that the case supports CPU coolers of heights no more than 165mm according to the spec sheet for the P40 DS.
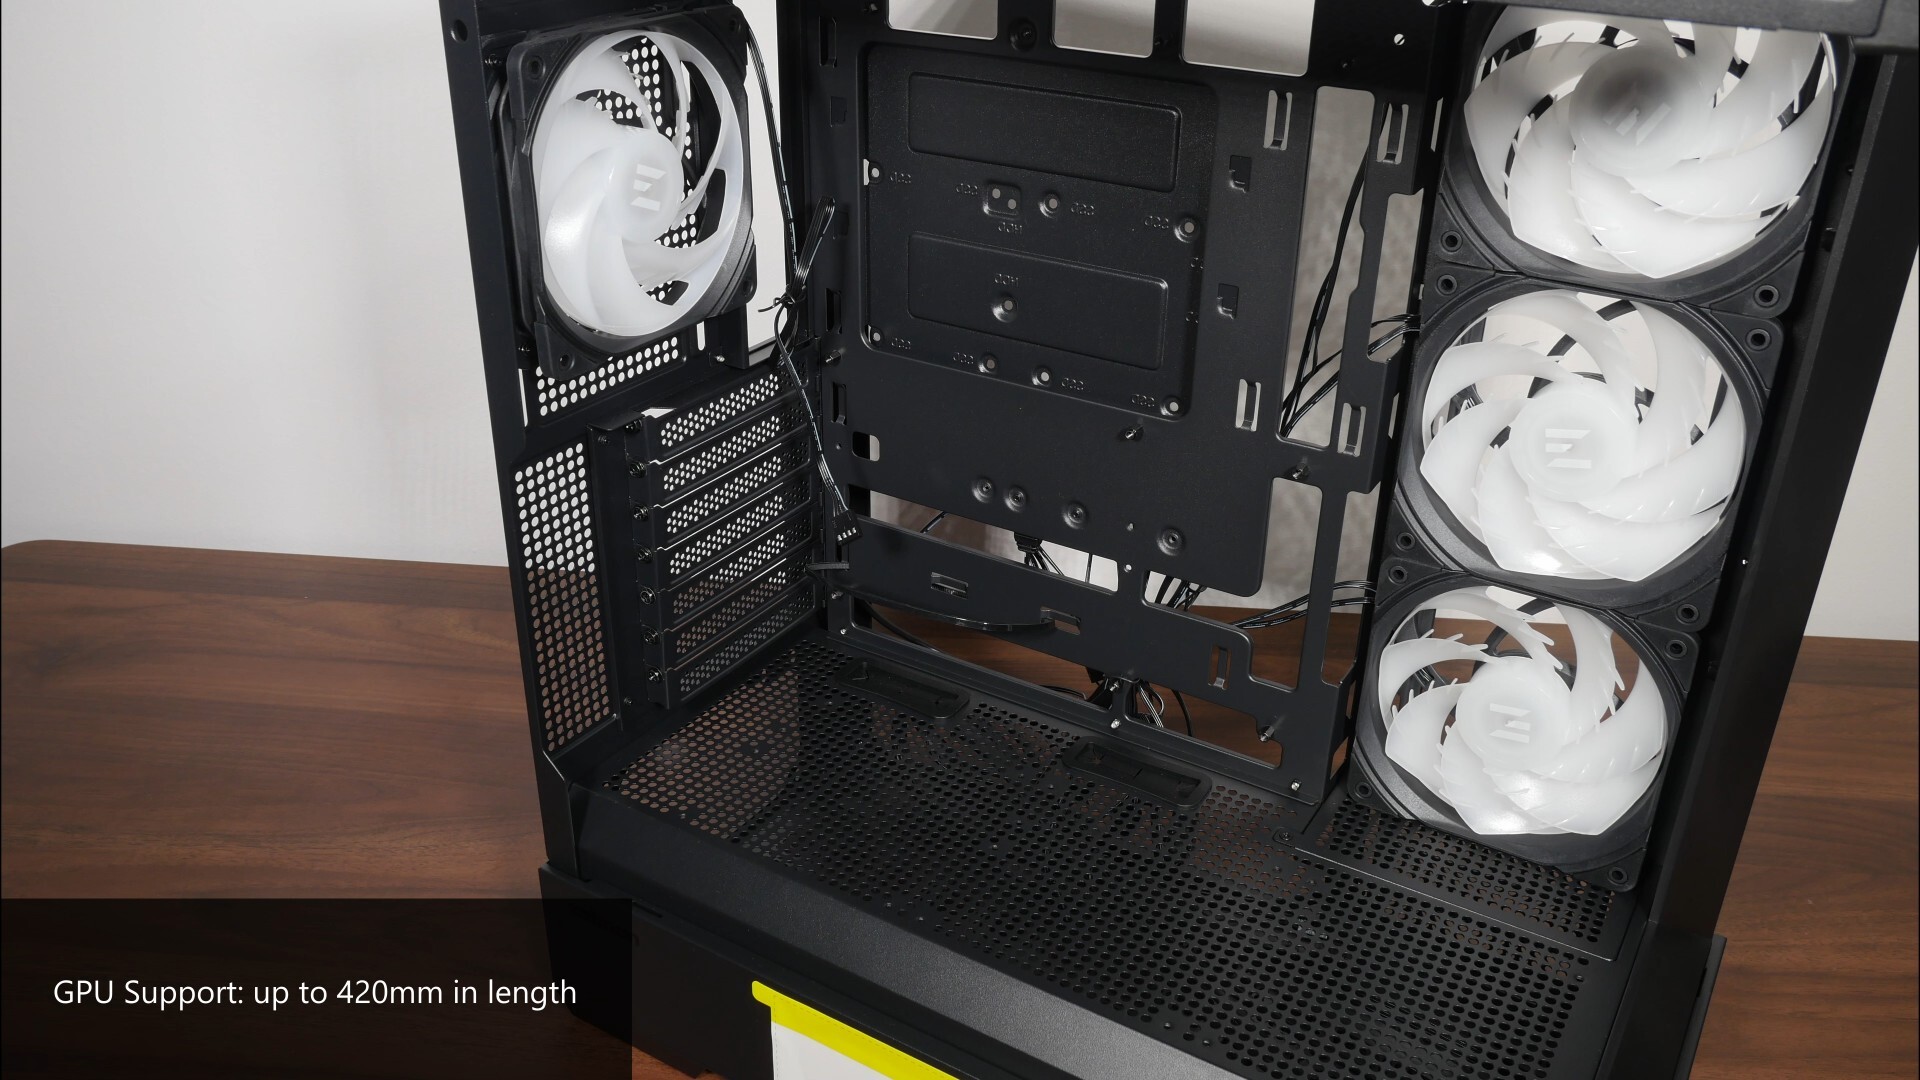
For your graphics card, the case supports both horizontal and vertical GPU mounting, and comes with support for graphics cards with lengths of up to 420mm. Do note that if you’re intending to mount your GPU in the vertically mounted position, you’ll need to get a PCIe riser cable that’s sold separately.
.jpg)
.jpg)
Changing the orientation of the expansion slot openings to suit a vertically mounted GPU is pretty straightforward, all you’ve got to do is to undo four screws on the rear so as to remove the expansion slot bracket, change its orientation accordingly and thereafter, reinstate the screws.
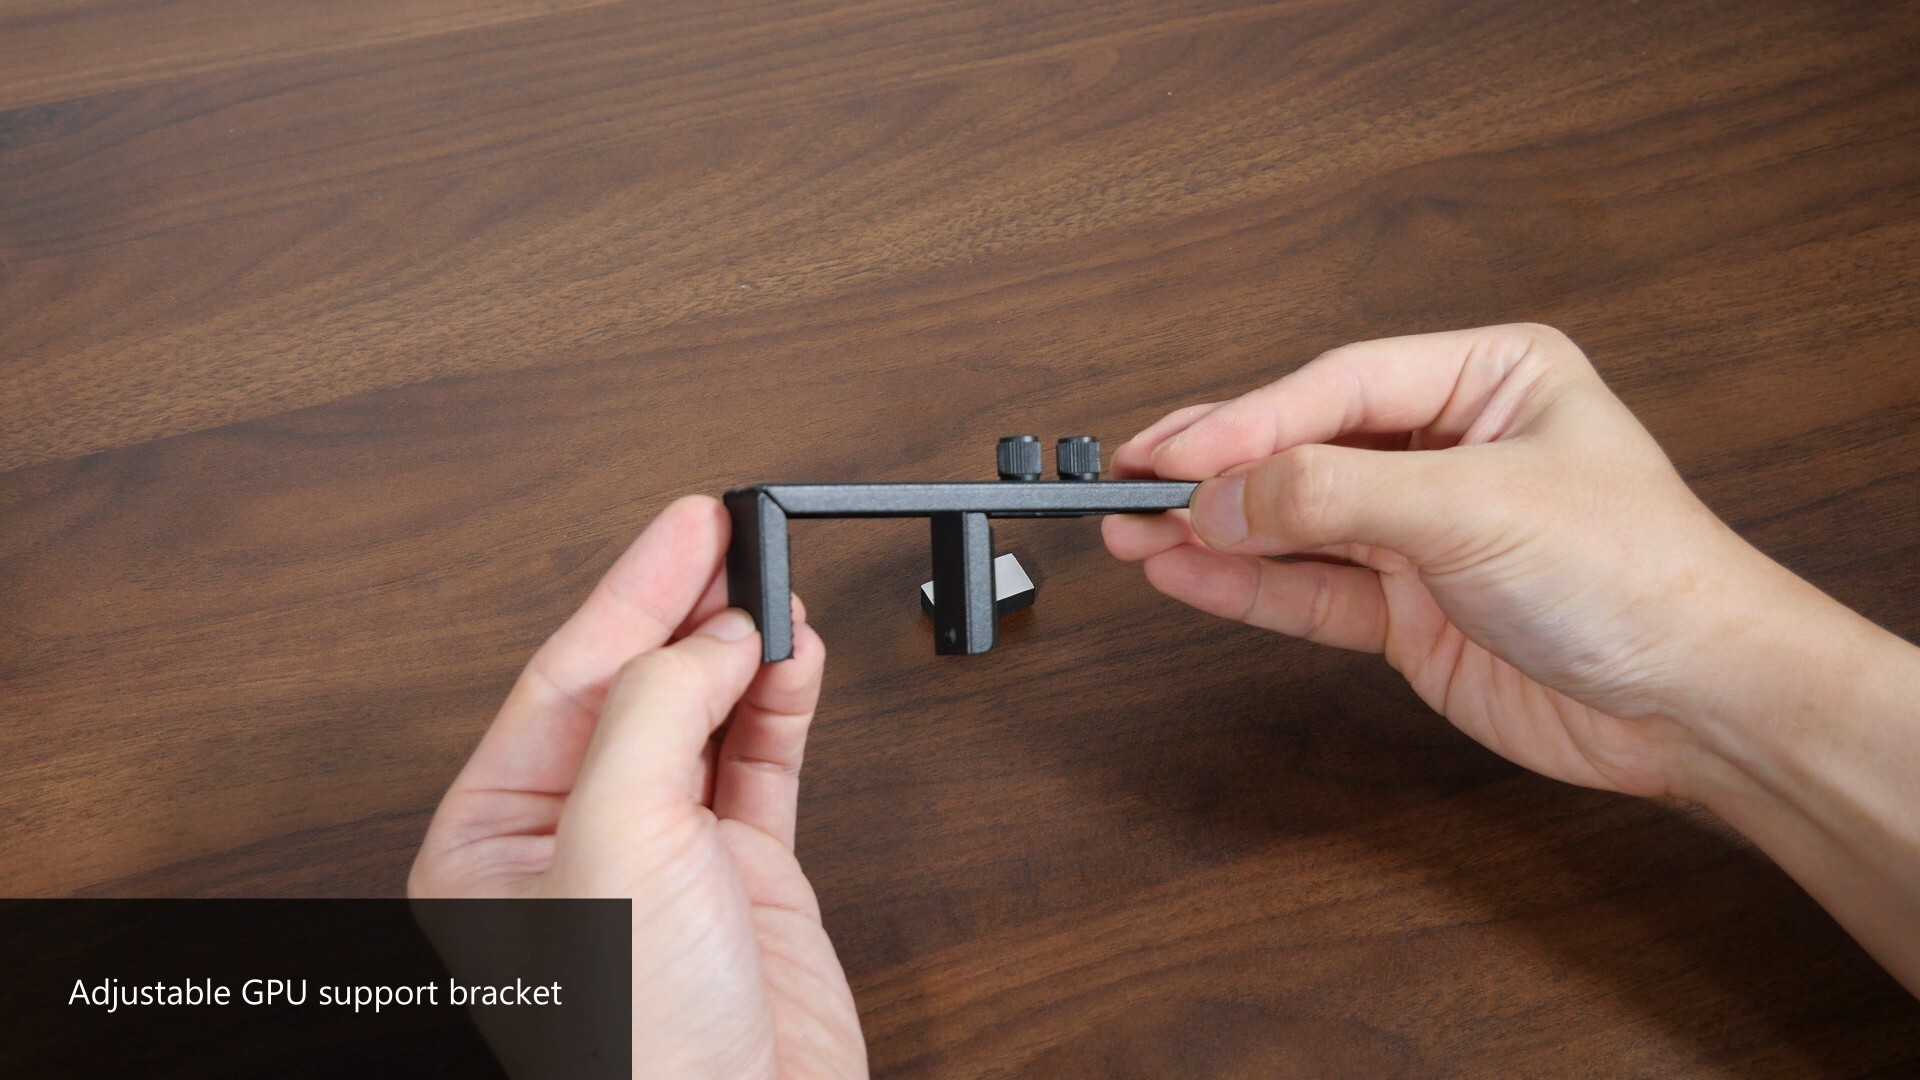
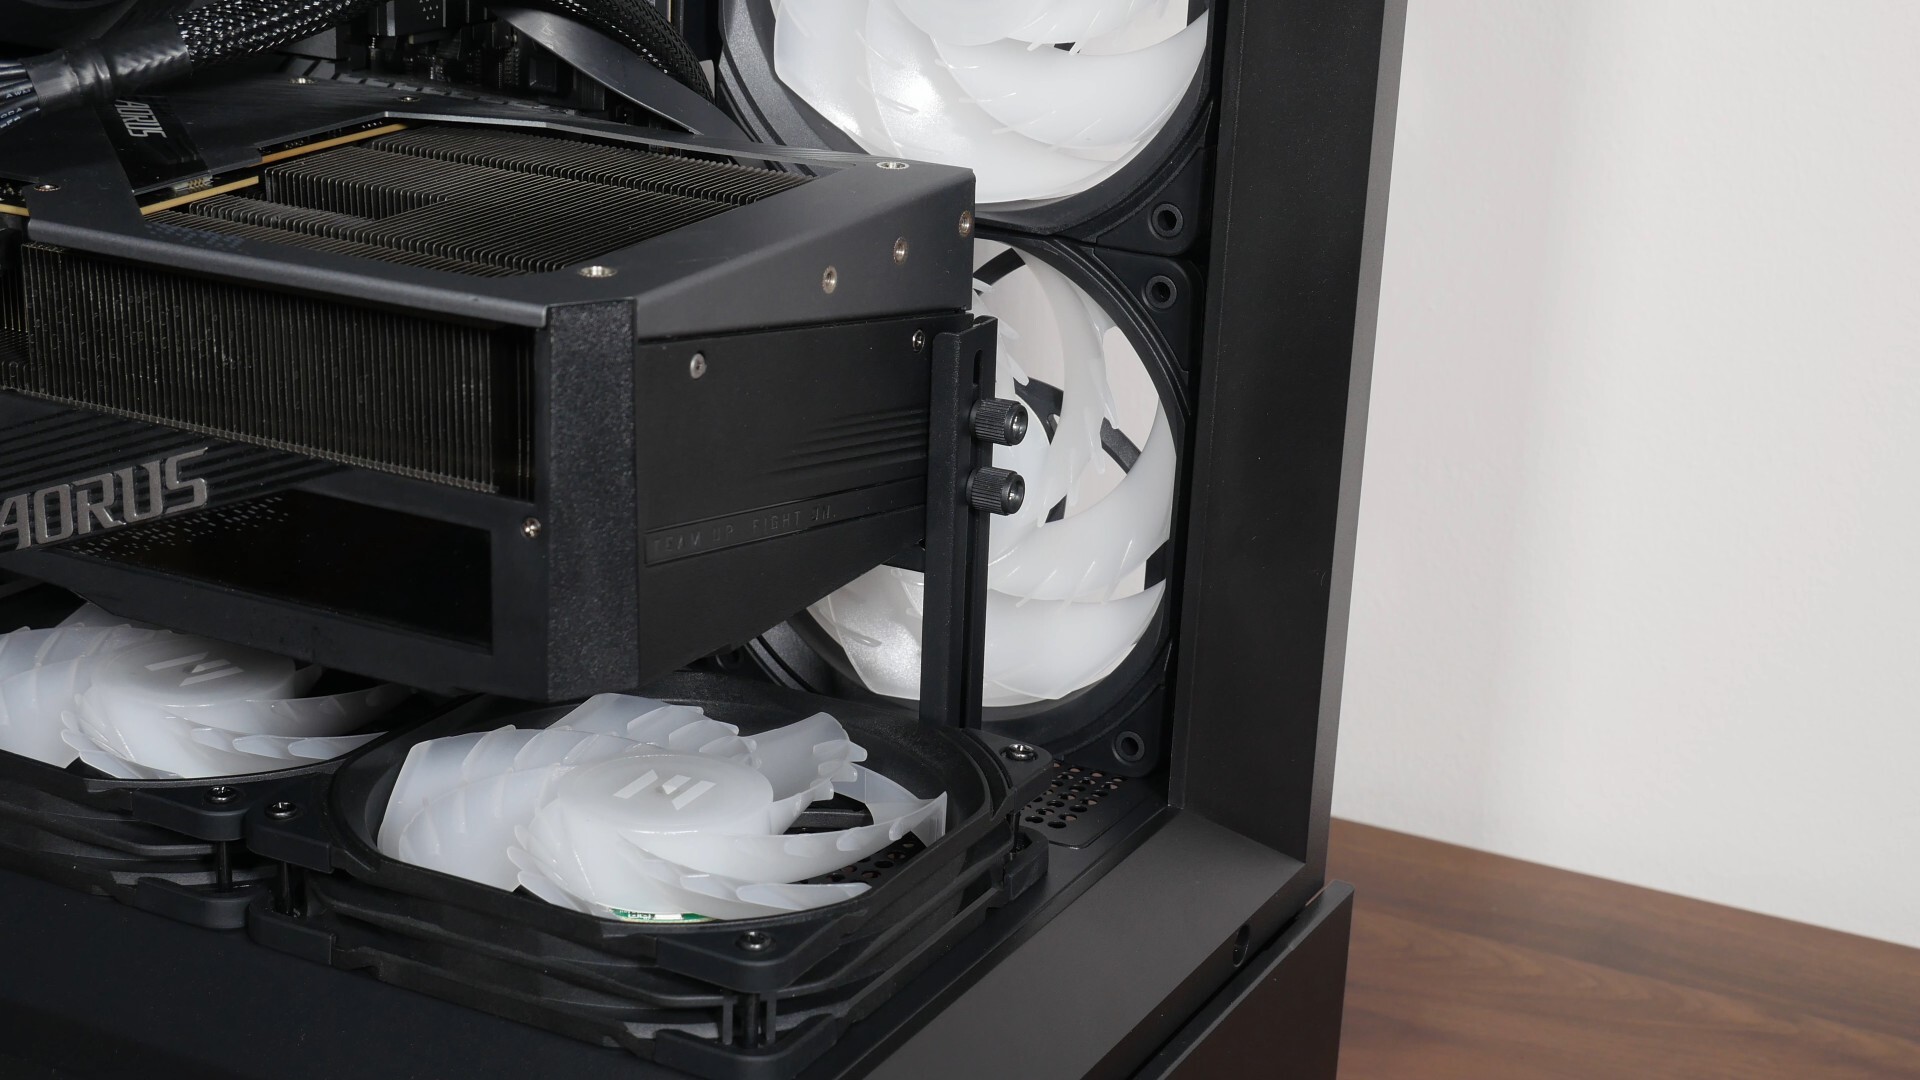
While still on the topic of your graphics card, the P40 DS comes with a height-adjustable GPU support bracket that’s of the standalone sort and can be used freely within the case without needing to be secured by screws to the case – I do prefer such a design of GPU support bracket, as it does give end-users more flexibility in how they can deploy it for use.
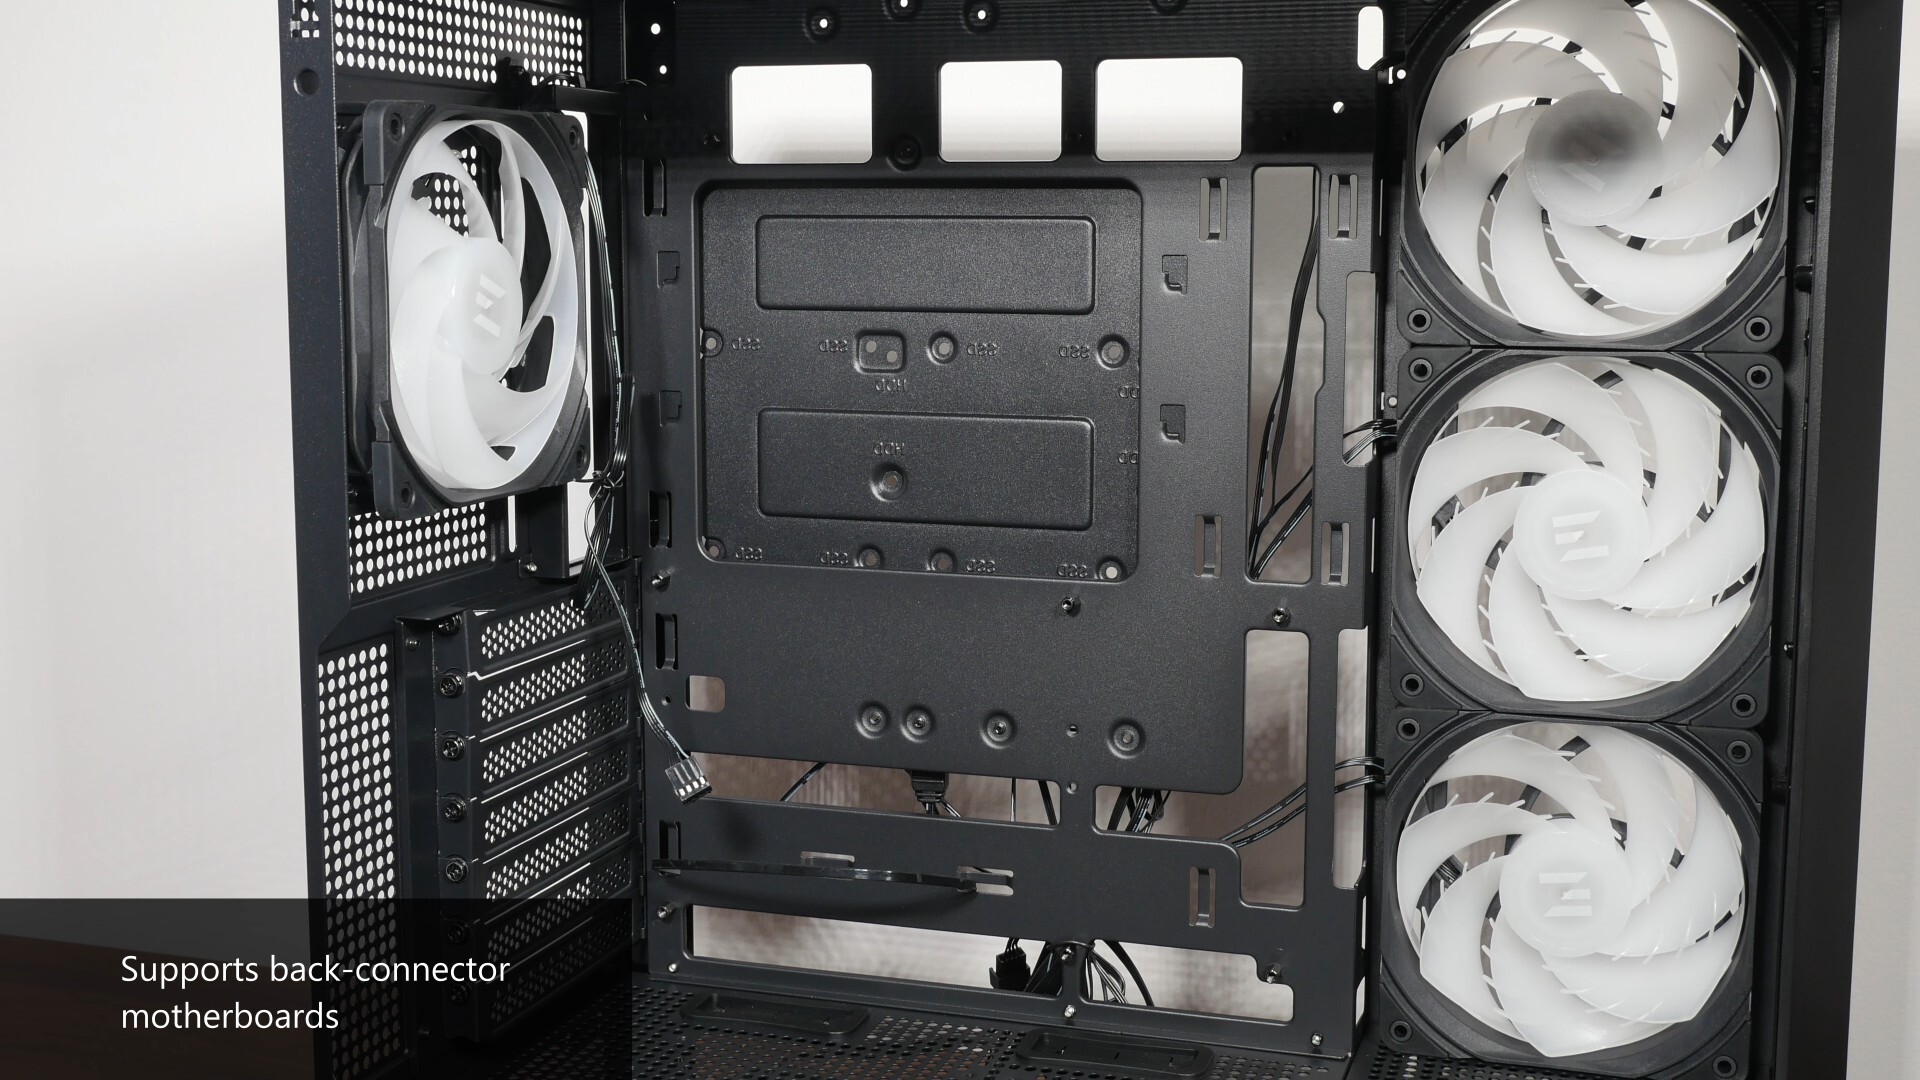
On to the motherboard tray, the P40 DS comes with support for motherboards with rear connectors, so motherboards from say, ASUS’s BTF line-up, Gigabyte’s Project Stealth series or MSI’s Project Zero line-up will be compatible with this case.
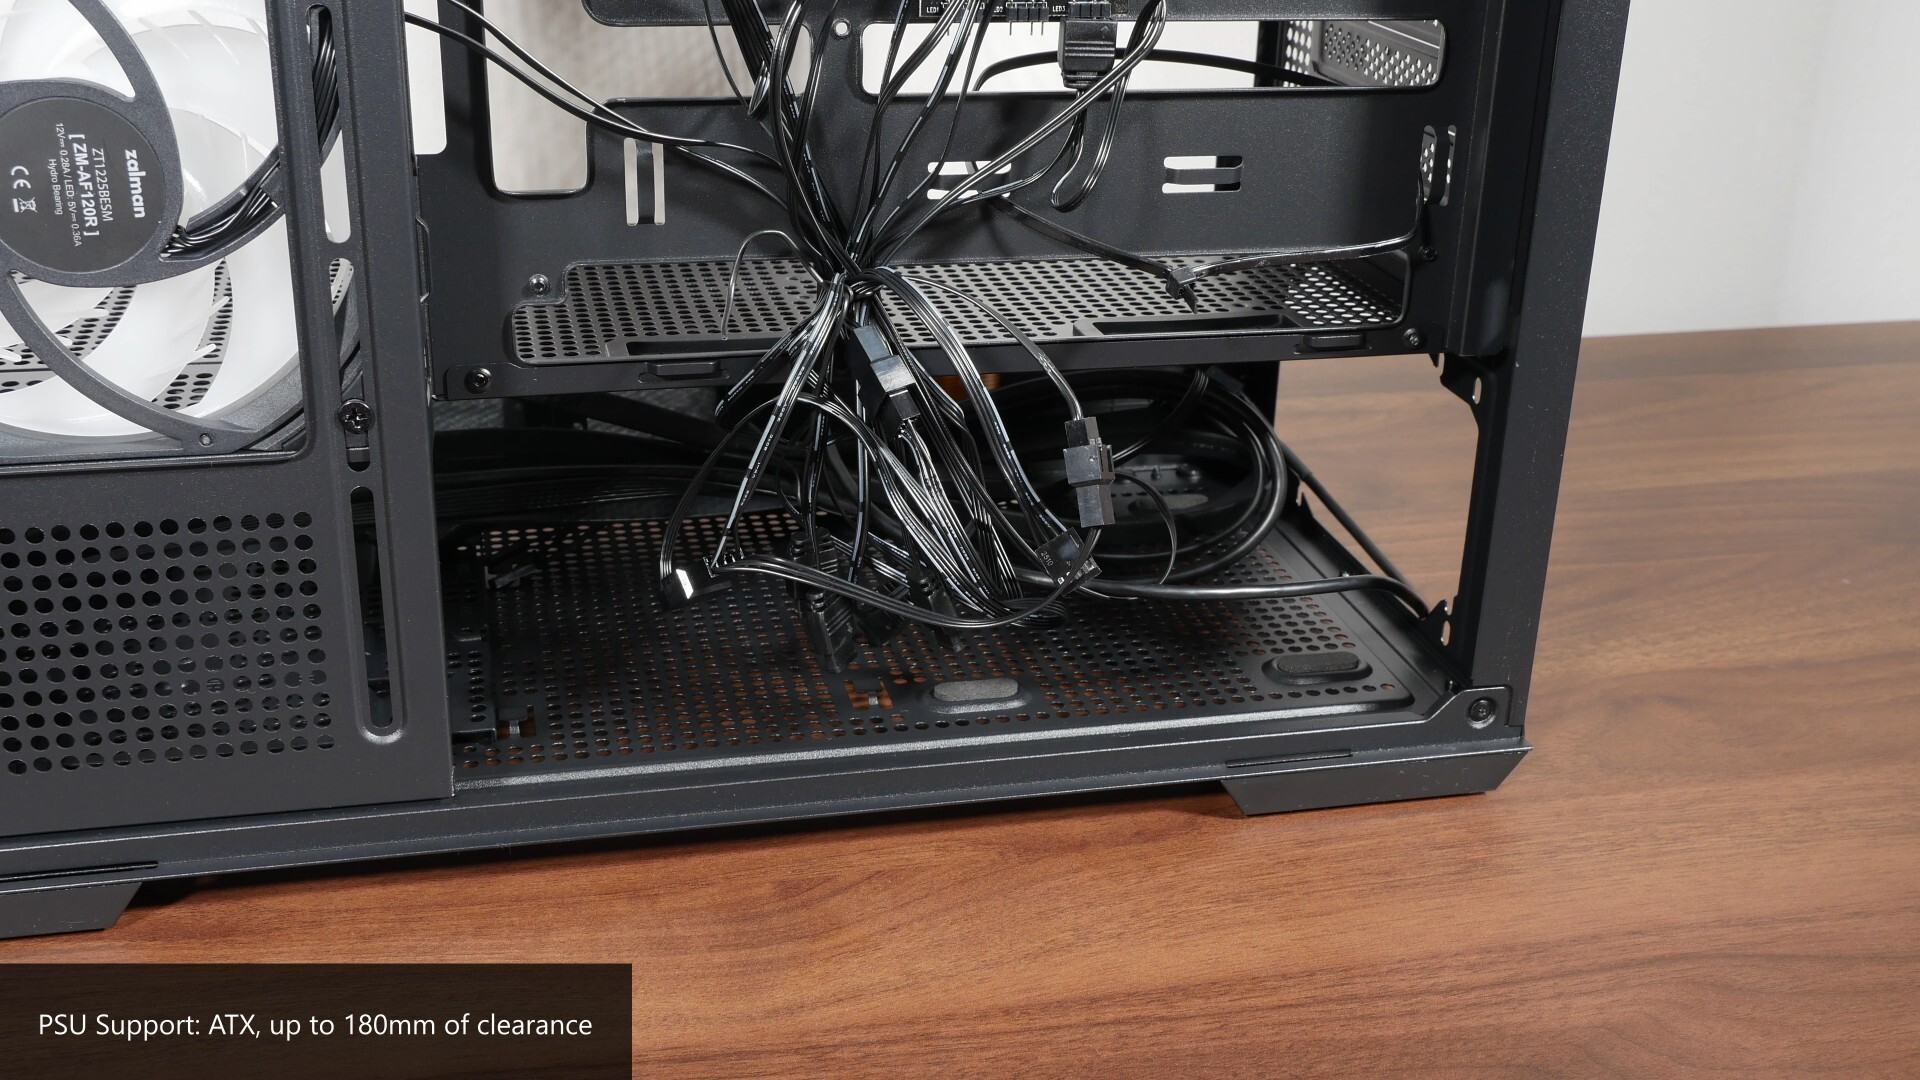
In terms of power supply dimensions, the P40 DS comes with 180mm of length clearance for a power supply, which is mounted in the bottom chamber of the PC case.
Storage Drive Support
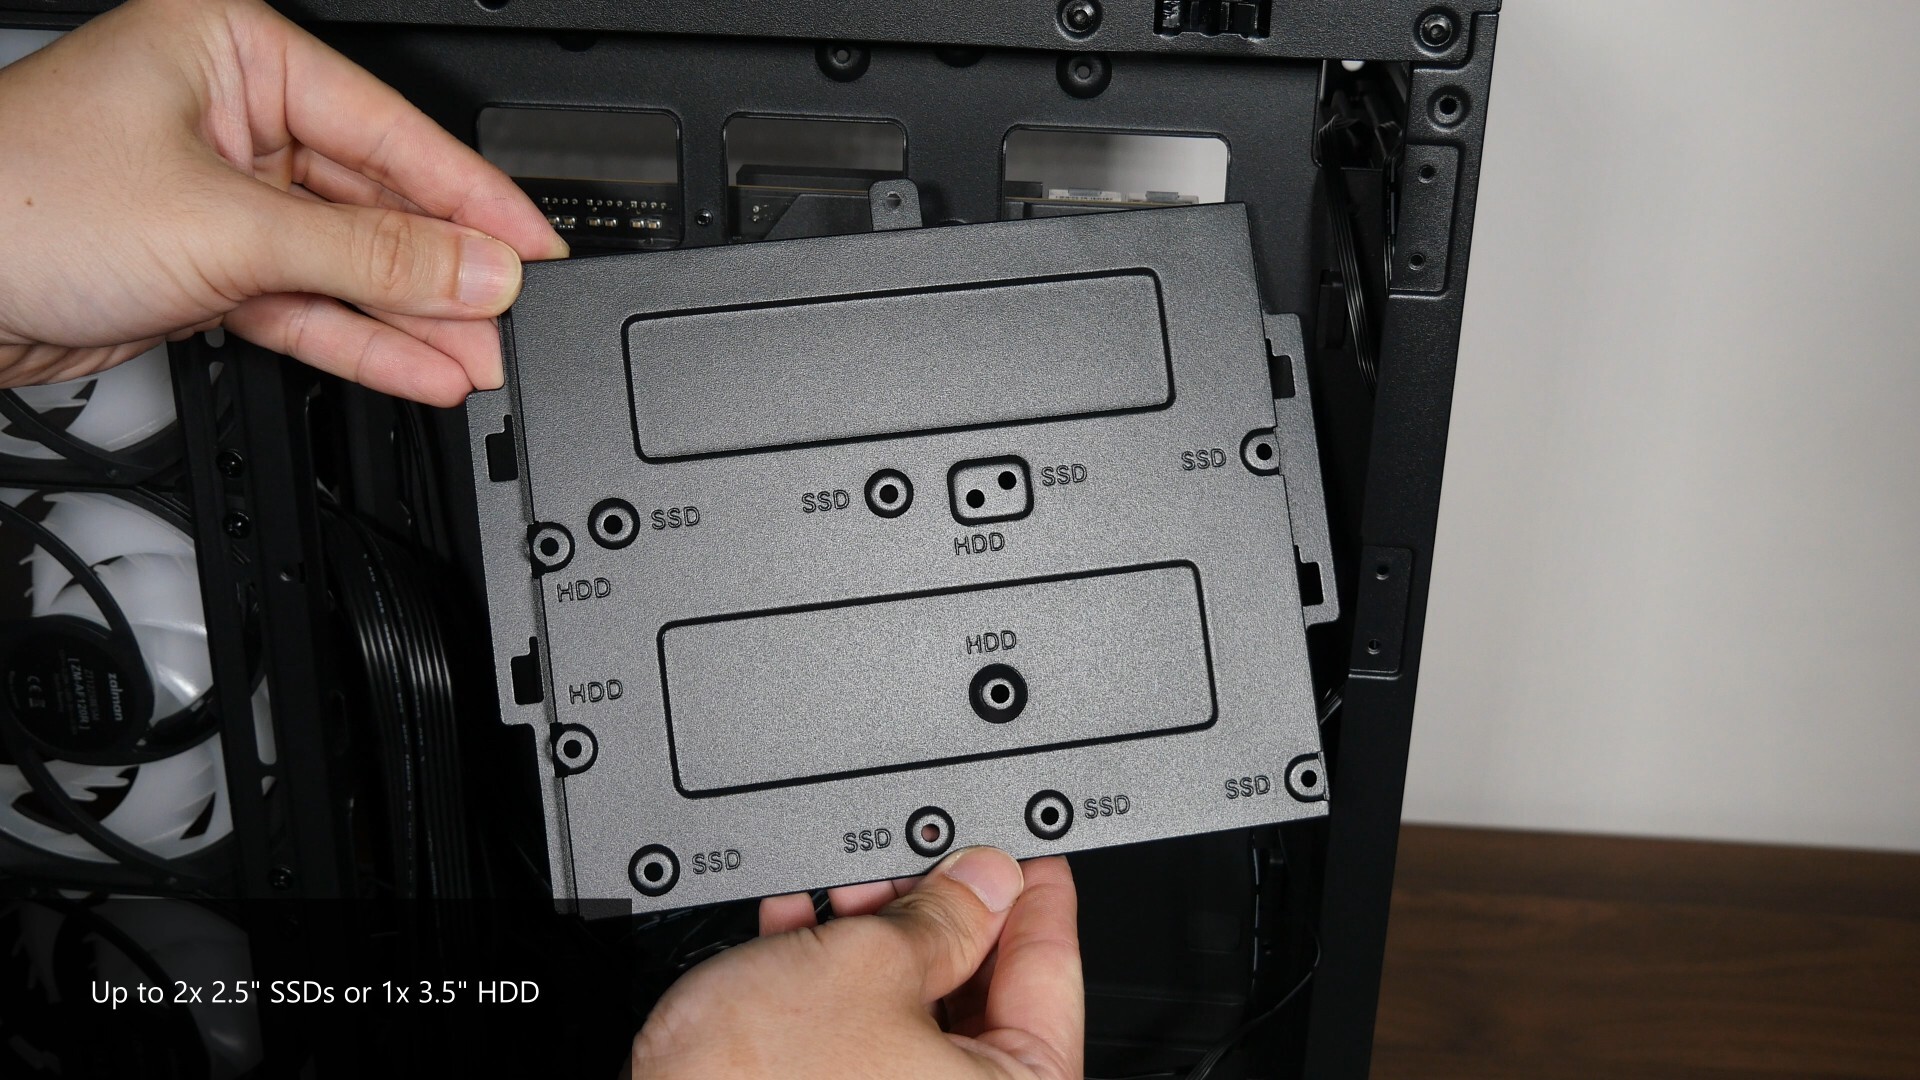
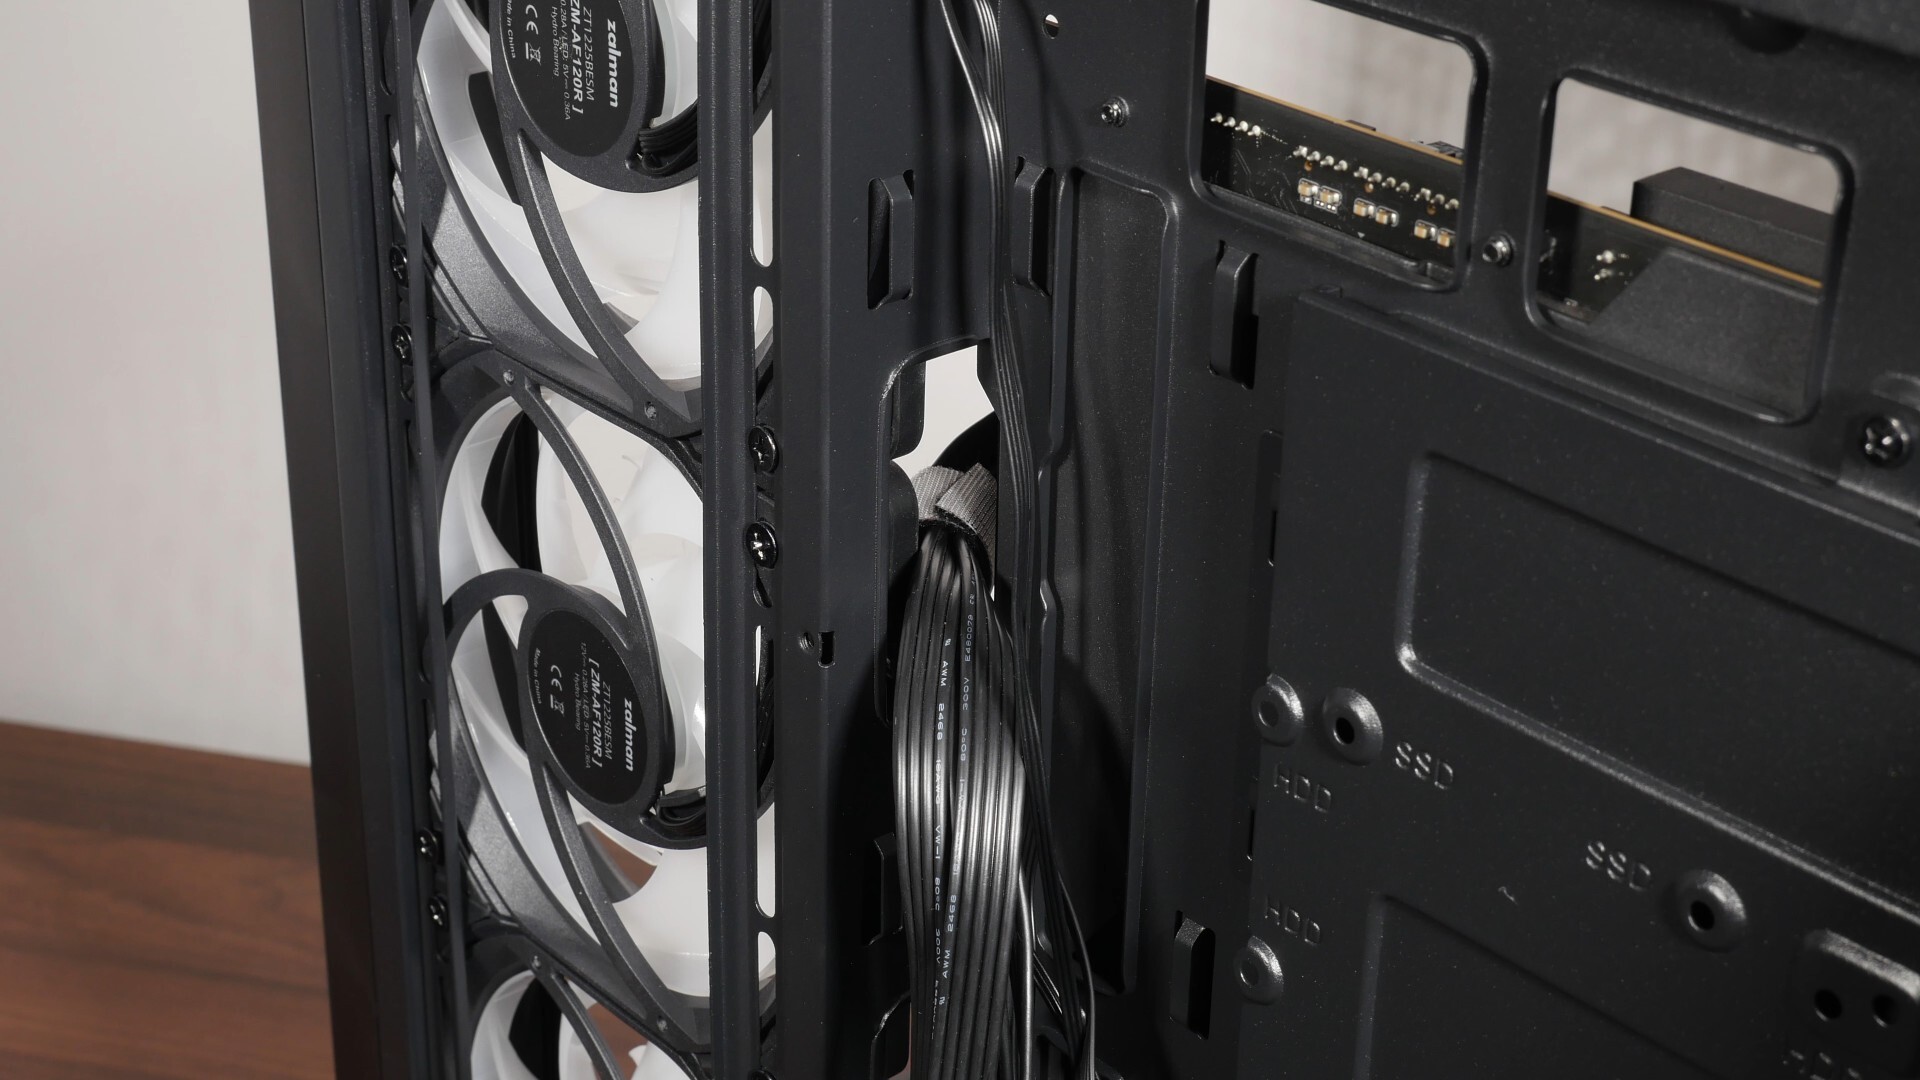
For those of you intending to install 2.5” and 3.5” drives for your PC build with the P40 DS, Zalman's included a drive bracket on the rear of the motherboard tray that supports either up to two 2.5” SSDs or a single 3.5” hard disk.
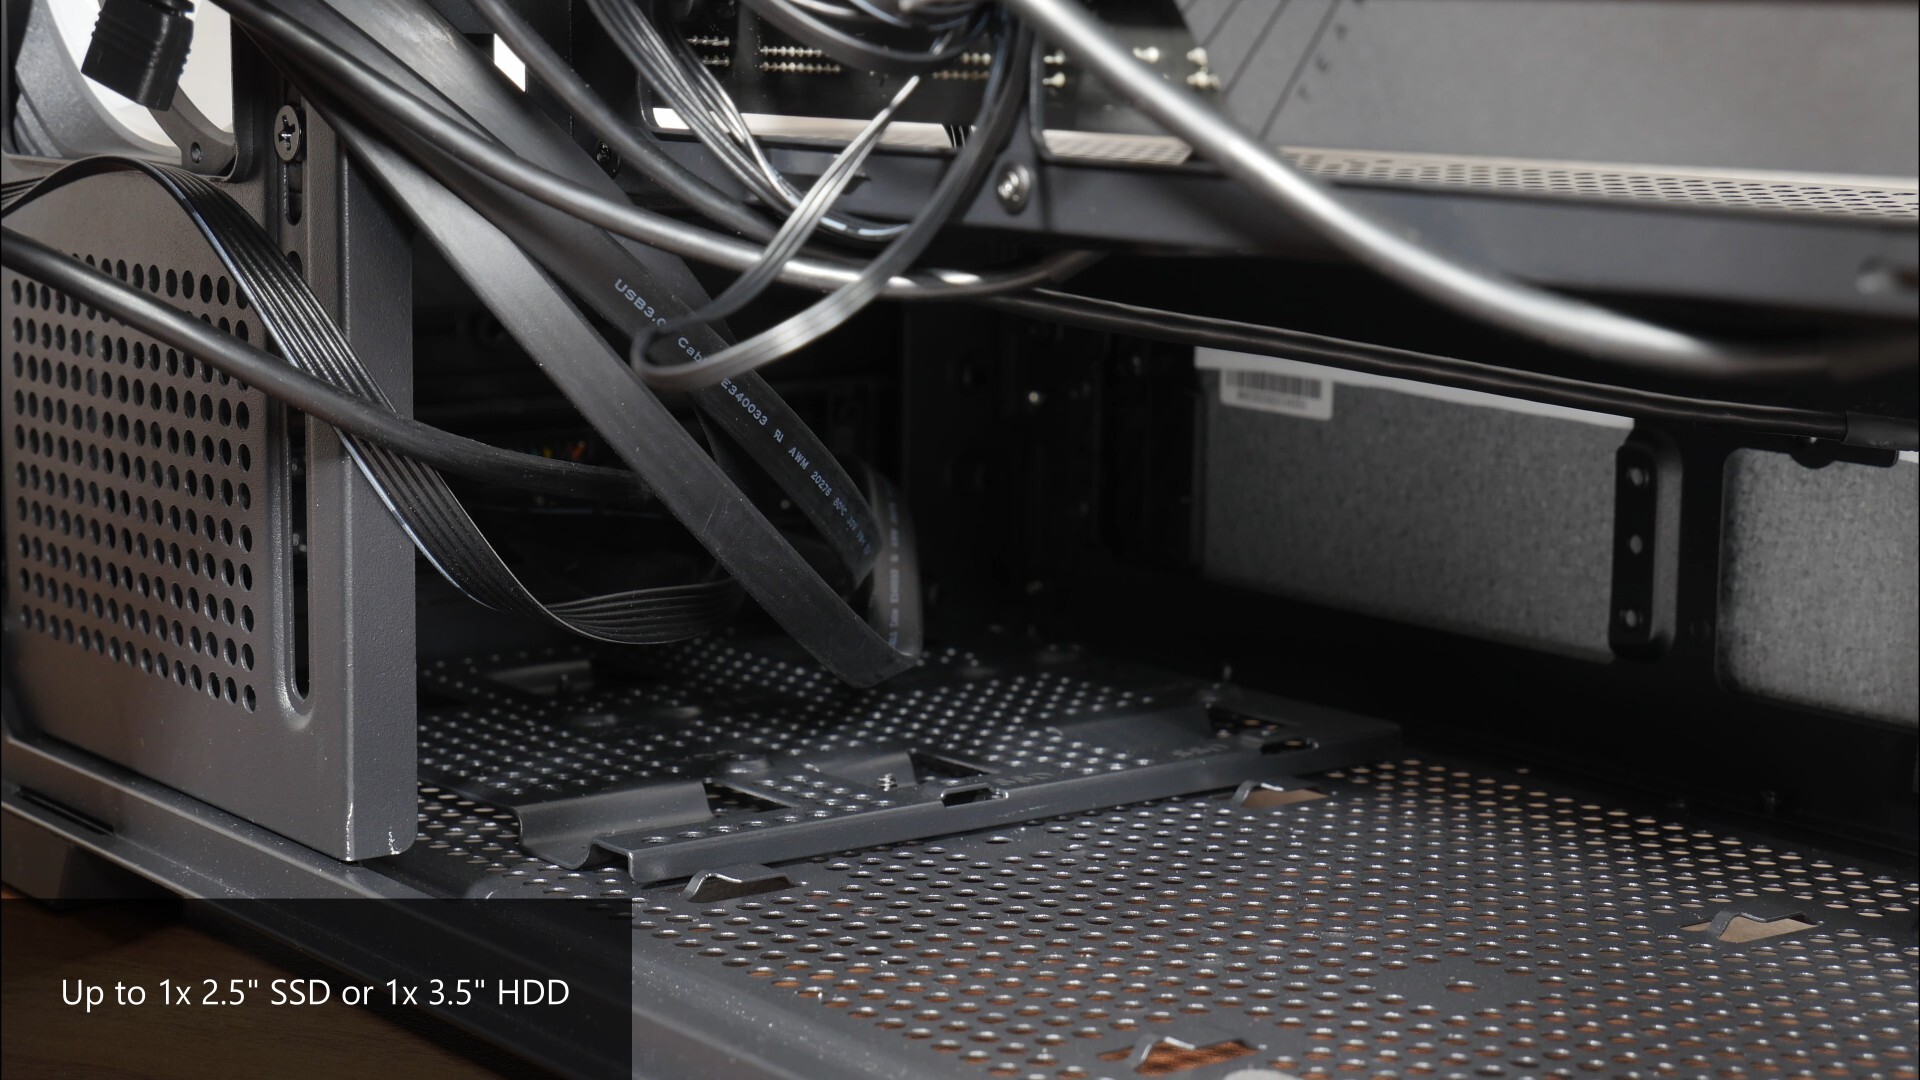
This is accompanied by a drive bracket in the bottom chamber of the case for either a single 2.5” or a single 3.5” storage drive.
Building a PC with the Zalman P40 DS
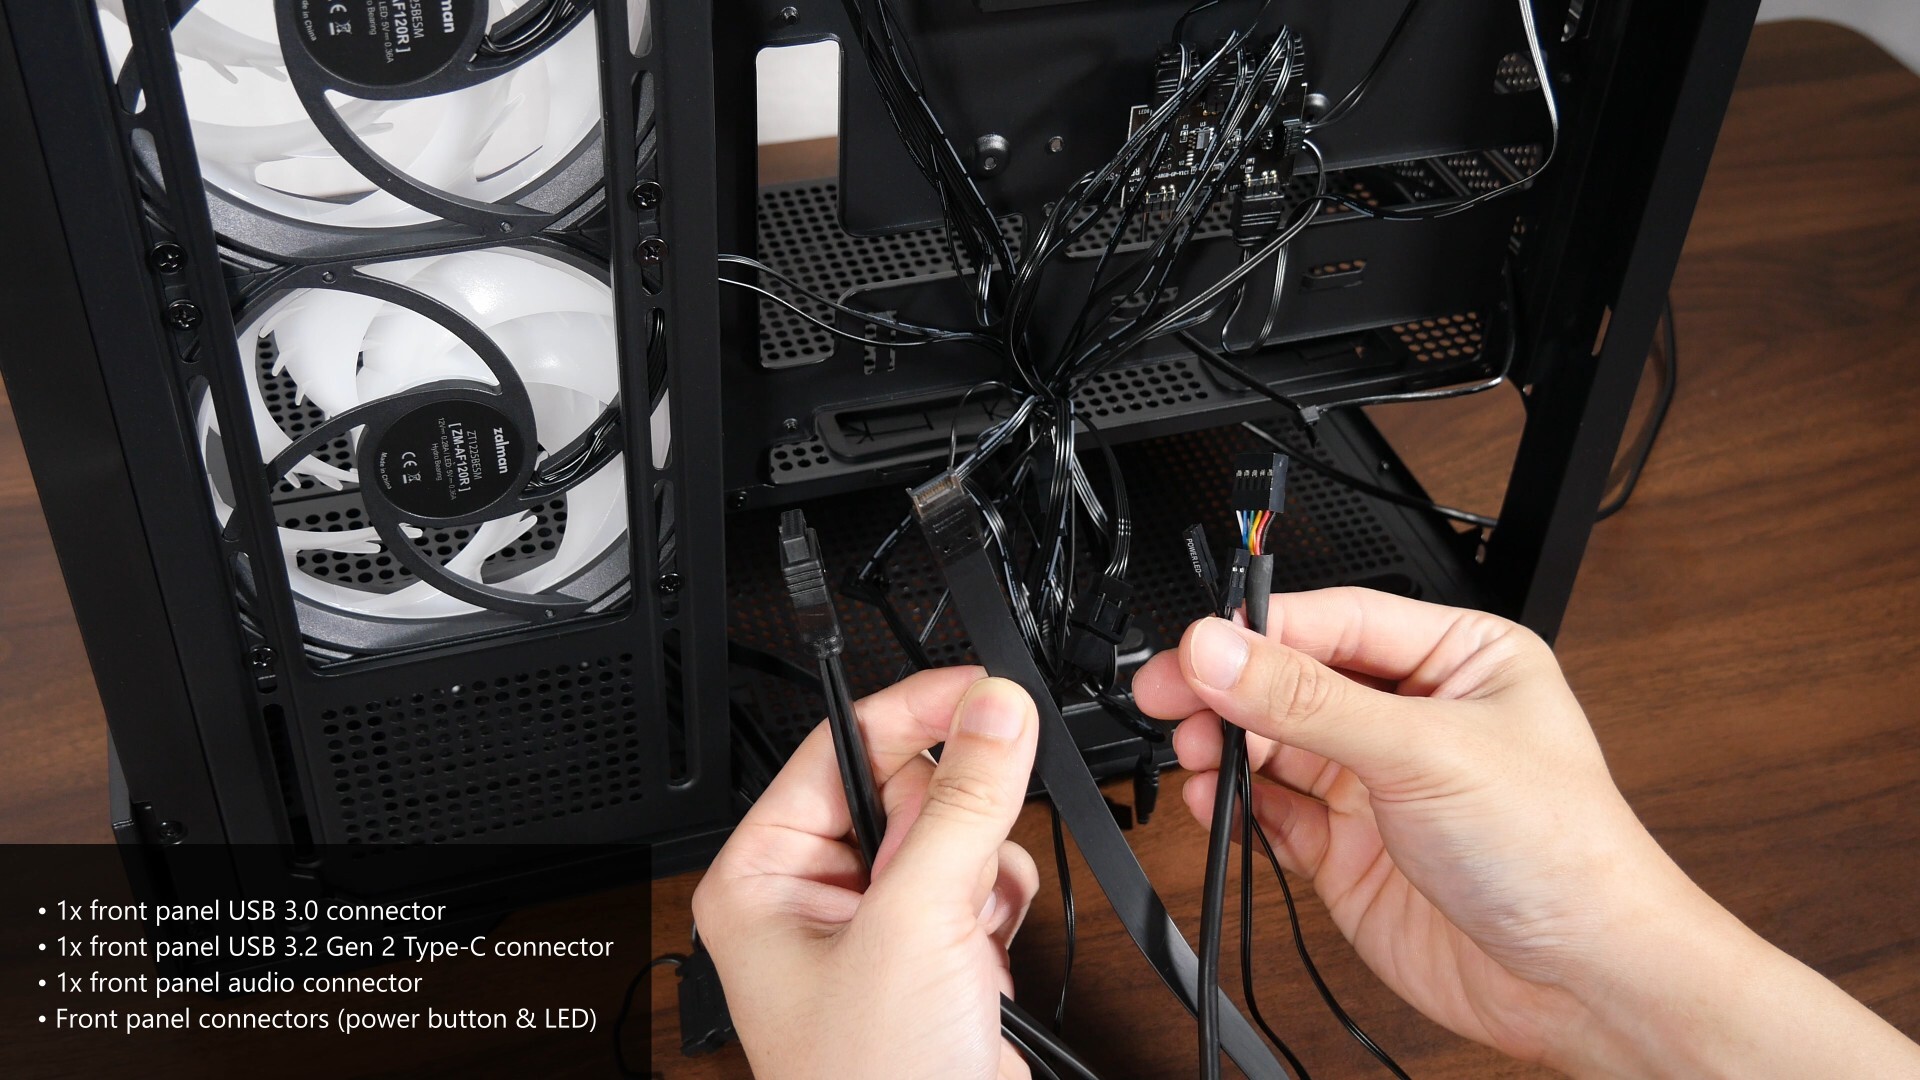
The front panel connectors of the case are a pretty straightforward affair, where we get the usual front panel USB 3.0 Type-A connector, a front panel USB 3.2 Gen 2 Type-C connector, a front panel audio connector as well as front panel connectors for the power button and power LED.
.jpg)
The case also comes with an ARGB controller hub with a total of six ARGB channels, with four channels pre-populated by the pre-installed fans. Do note that the front panel reset switch comes pre-connected to the ARGB controller hub, such that the reset switch can be used to manually control the ARGB lighting effects of devices connected to the said hub. If you’d like to have your ARGB lighting effects controlled directly by your motherboard instead, you can press and hold the reset switch for three seconds to toggle the ARGB mode accordingly.
.jpg)
You can of course, disconnect the reset switch from the hub and connect it to your motherboard, so that you can use it as a proper reset switch instead.

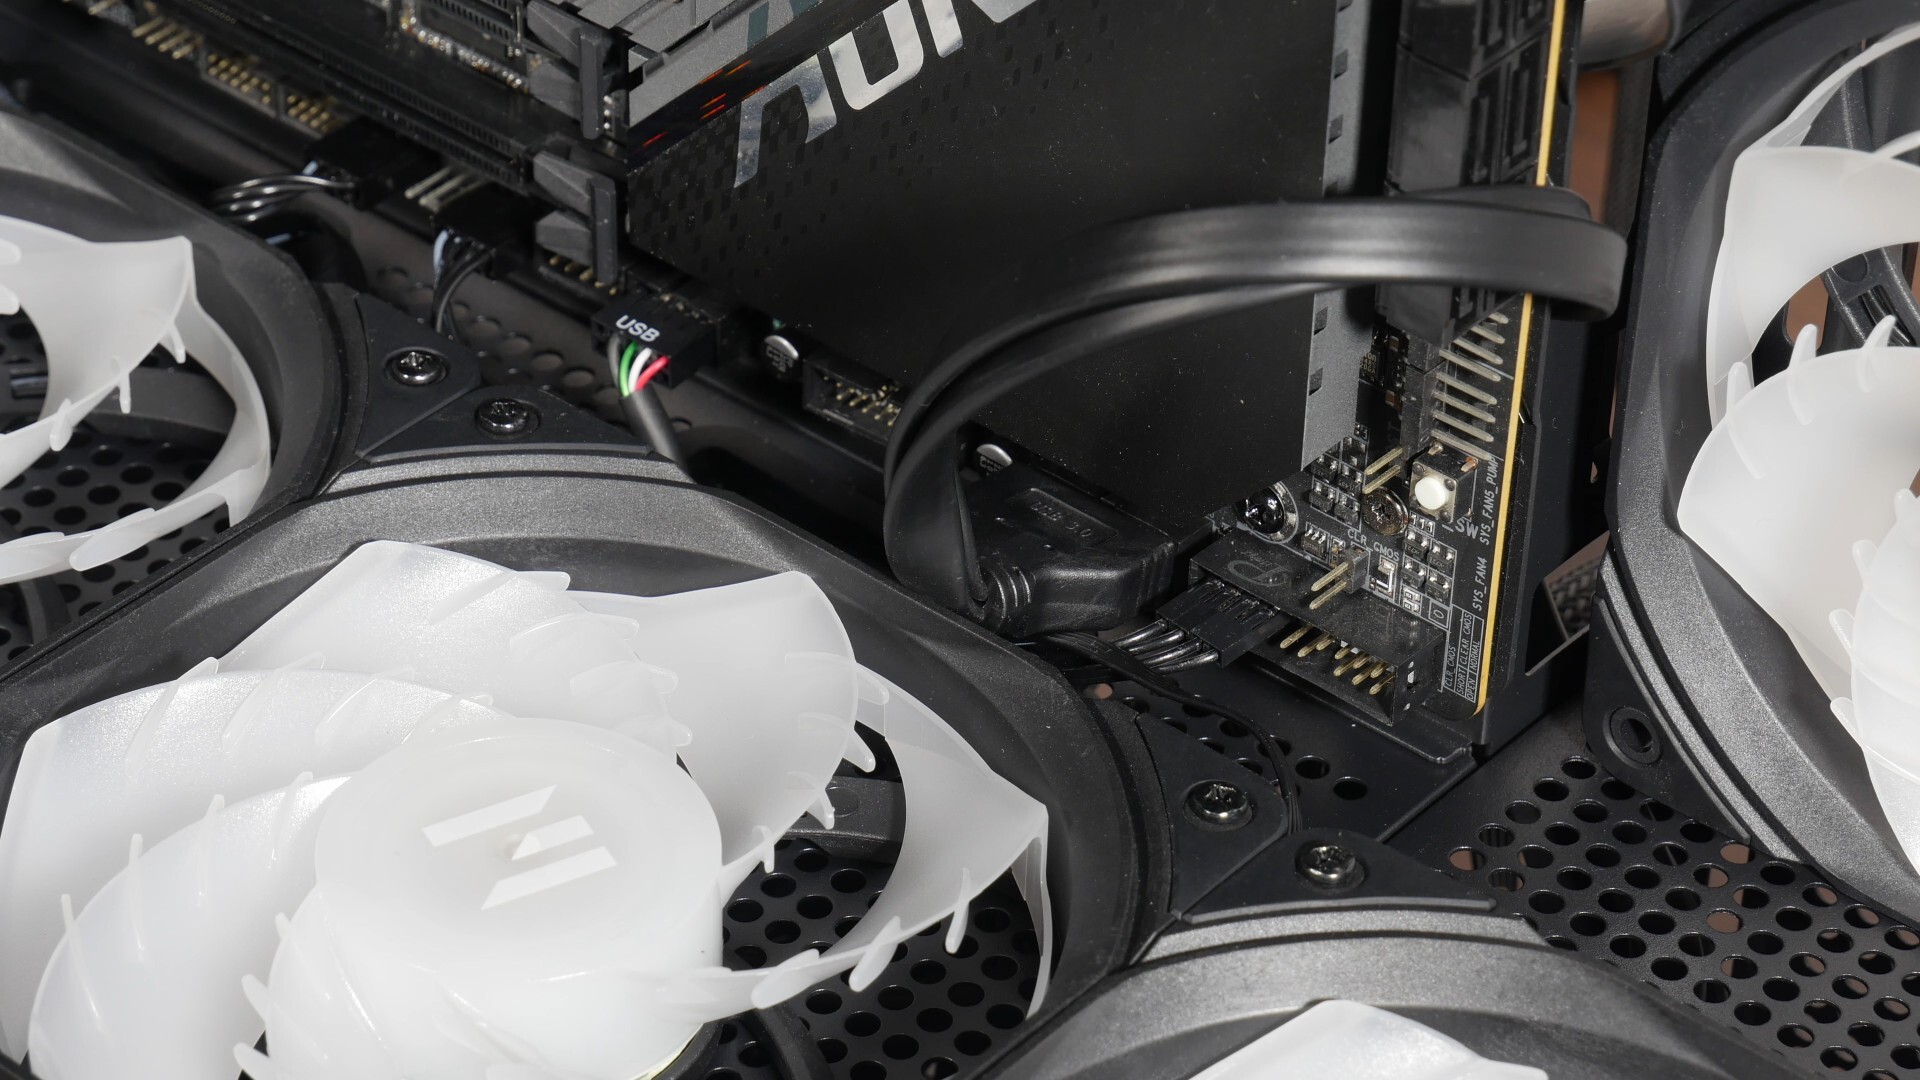
The built-in 9.1” LCD screen connects to your PC via a nine-pin USB 2.0 connector, where you’ll have to hook it up to a free USB 2.0 header on your motherboard.
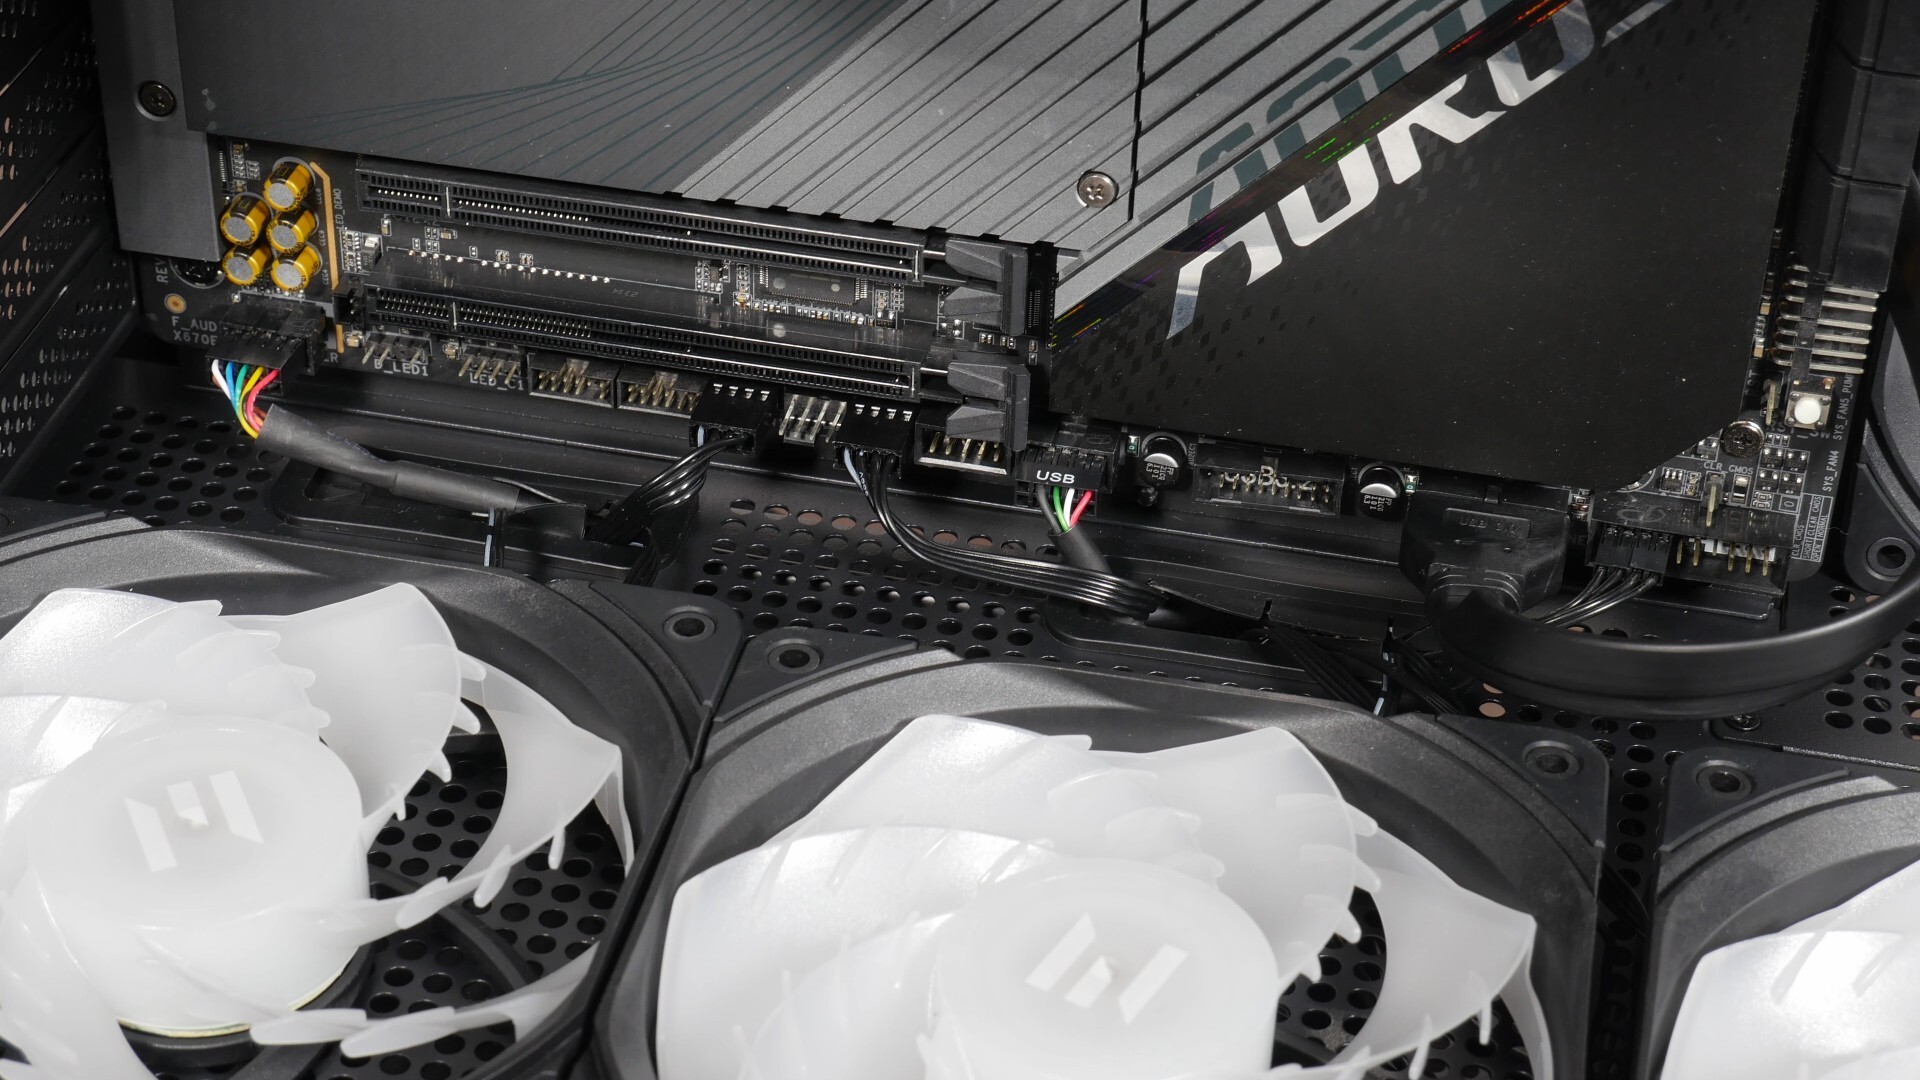
Although Zalman doesn’t explicitly mention support for EATX boards, I had no issues getting an EATX motherboard (a Gigabyte X670E AORUS MASTER) into the case, where we get ample space to manoeuvre things around.
To make the PC building process with the P40 DS as seamless as possible, you’ll want to make sure to run all the cables that you would like to run through the bottom rubber grommets first before installing the PSU, as running the cables through the said grommets would be nearly impossible due to limited space (as pictured above) once the PSU’s been installed.
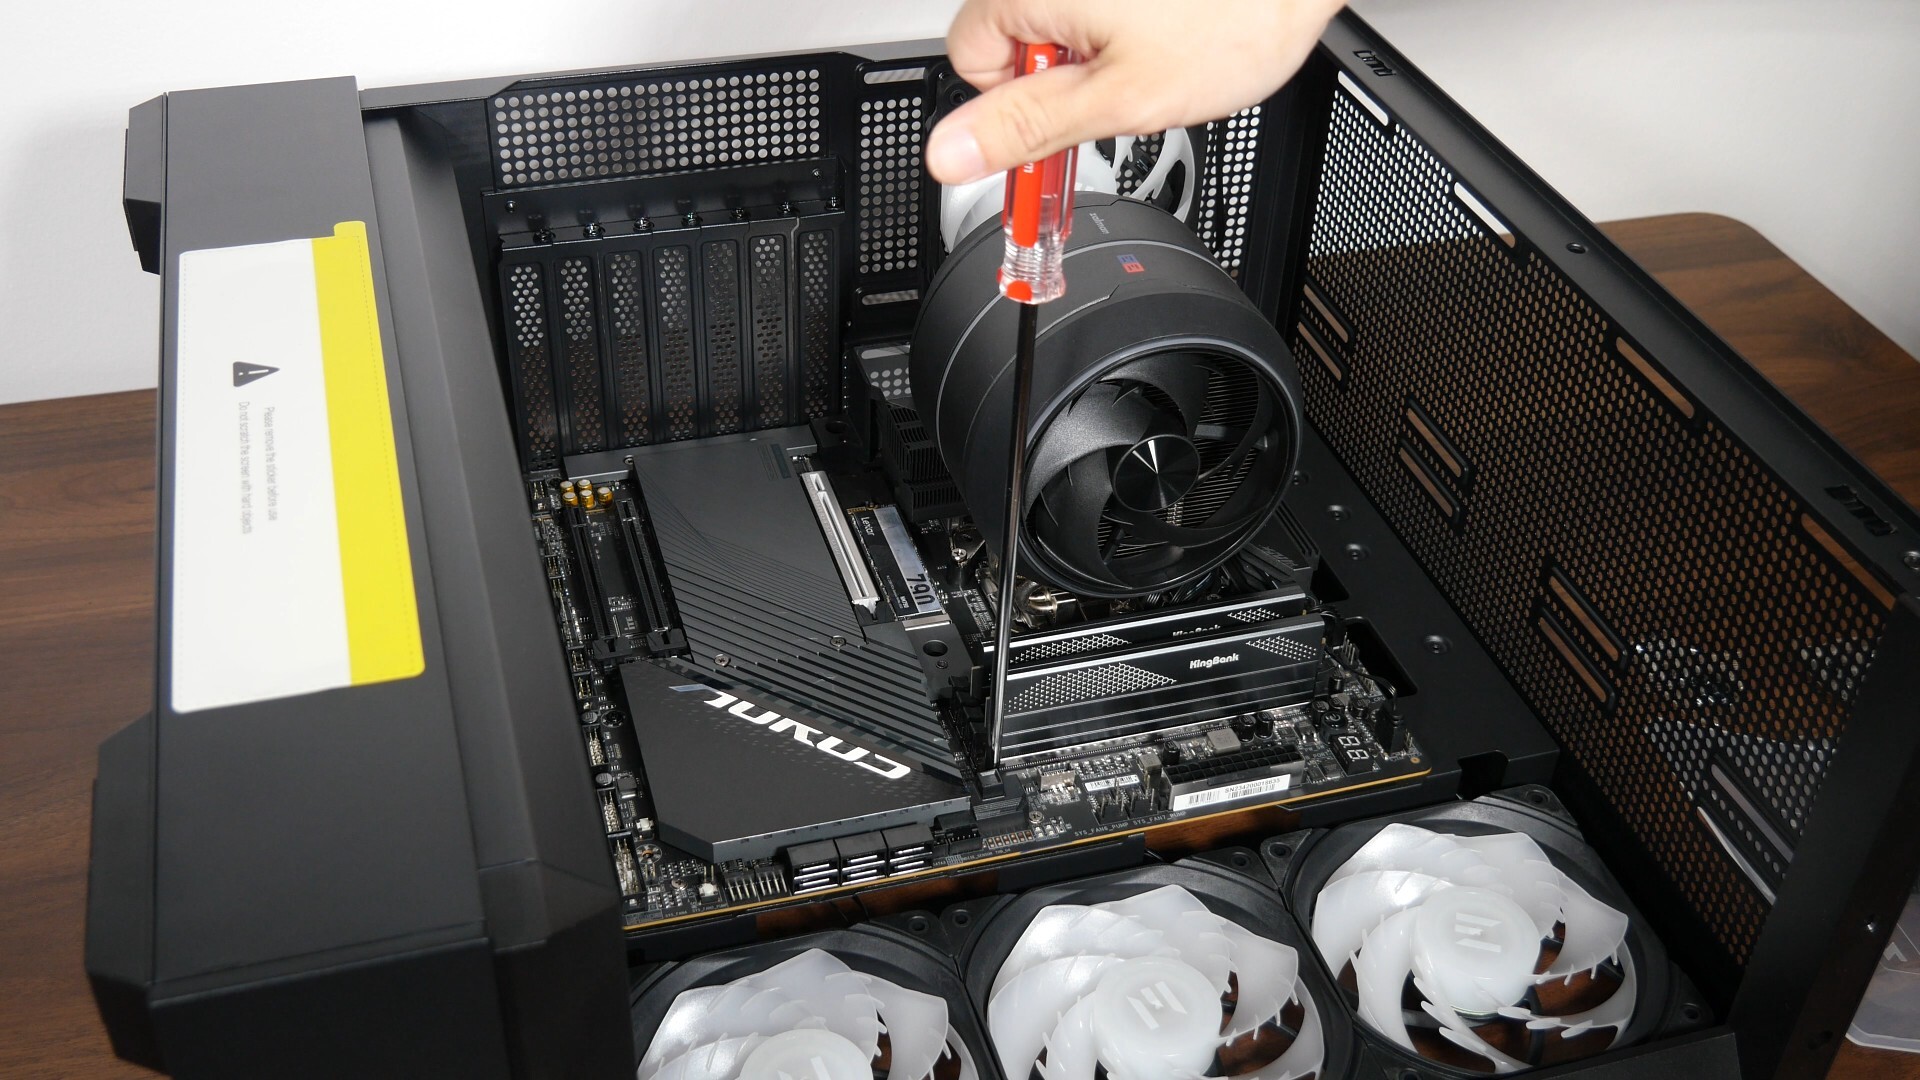
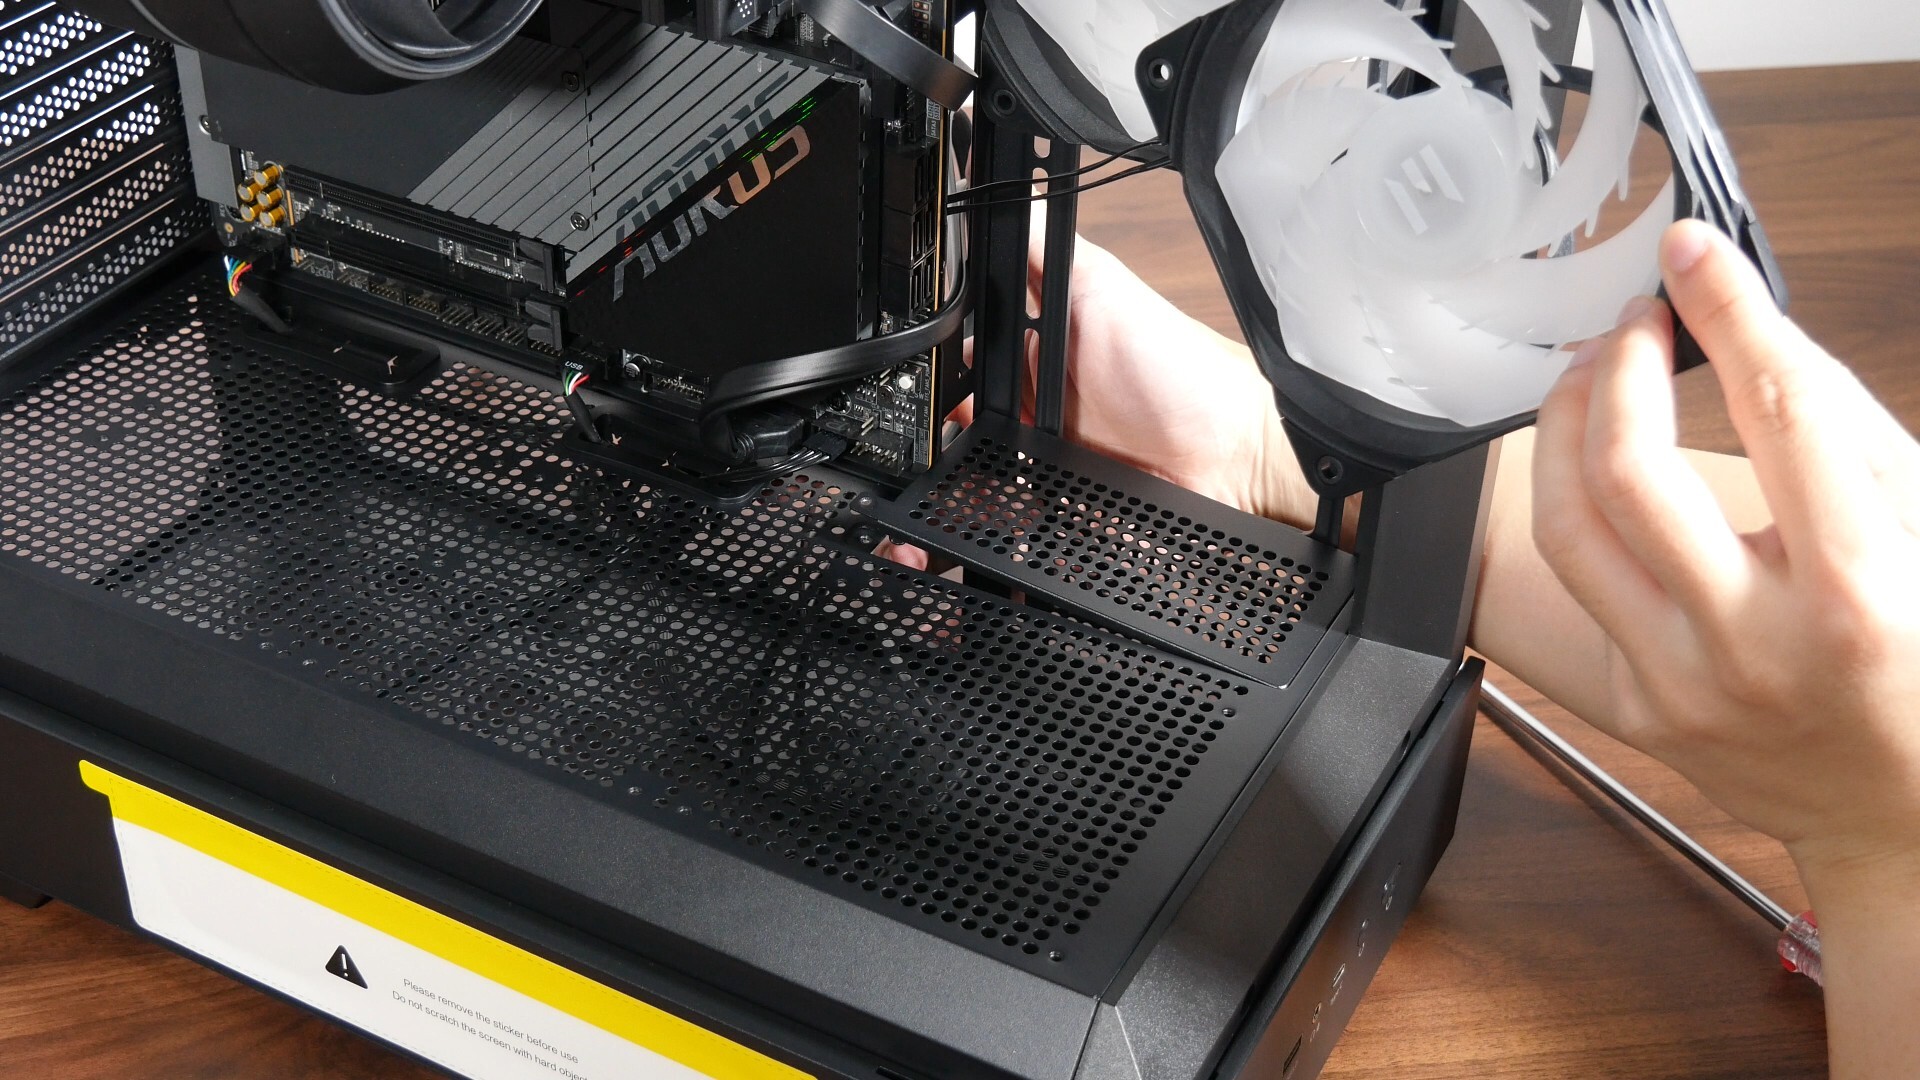
It’s also worth mentioning that to run the 24-pin ATX power cable to the motherboard from the lower chamber, I’ve had to remove the middle 120mm side intake fan, so as to create space to thread the cable through the appropriate cable routing opening that’s found on the side of the motherboard tray. With that done, I could then reinstall the middle 120mm intake fan.
Zalman’s also included a removable cover in the form of a rectangular grate pictured above that I’m guessing is for cable management purposes where needed, or to create additional clearance for side mounted AIO radiators or fans. To remove the cover properly, you’ll want to ensure that your motherboard isn’t installed yet so that you can get the cover out of the way without any hindrance.
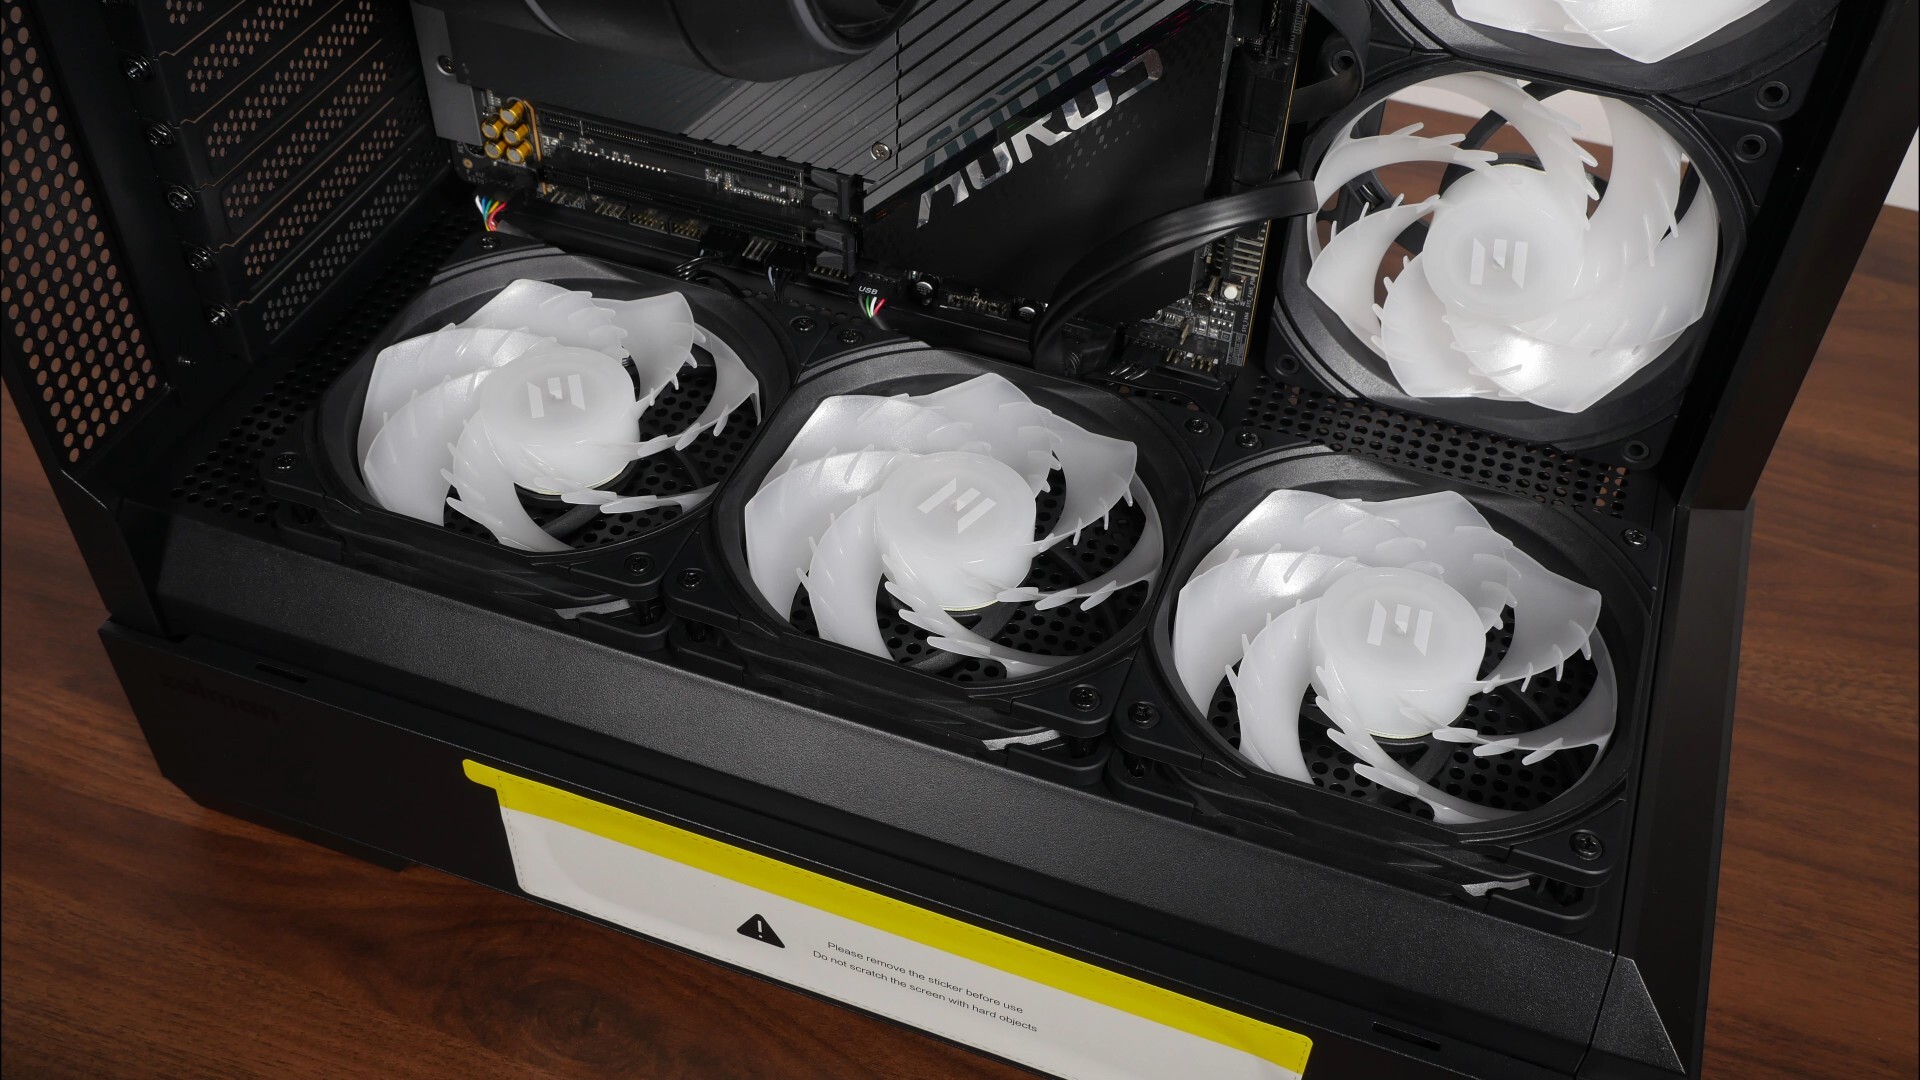
For this demo build, I’ve installed another three reverse blade Zalman ZM-AF120R fans as intake fans on the bottom panel. It’s worth noting that if you’re using a motherboard that has its USB 3.2 Gen 1/USB 3.0 Type-A headers located along the bottom edge of the motherboard (like I have for this demo build), you might encounter clearance issues where the P40 DS’s front panel USB 3.0 connector could come into contact with the frame of the bottom intake fan that you’d be installing. As pictured above, I managed to get both the middle bottom intake fan and USB 3.0 connector set up properly, but it was a really tight fit.
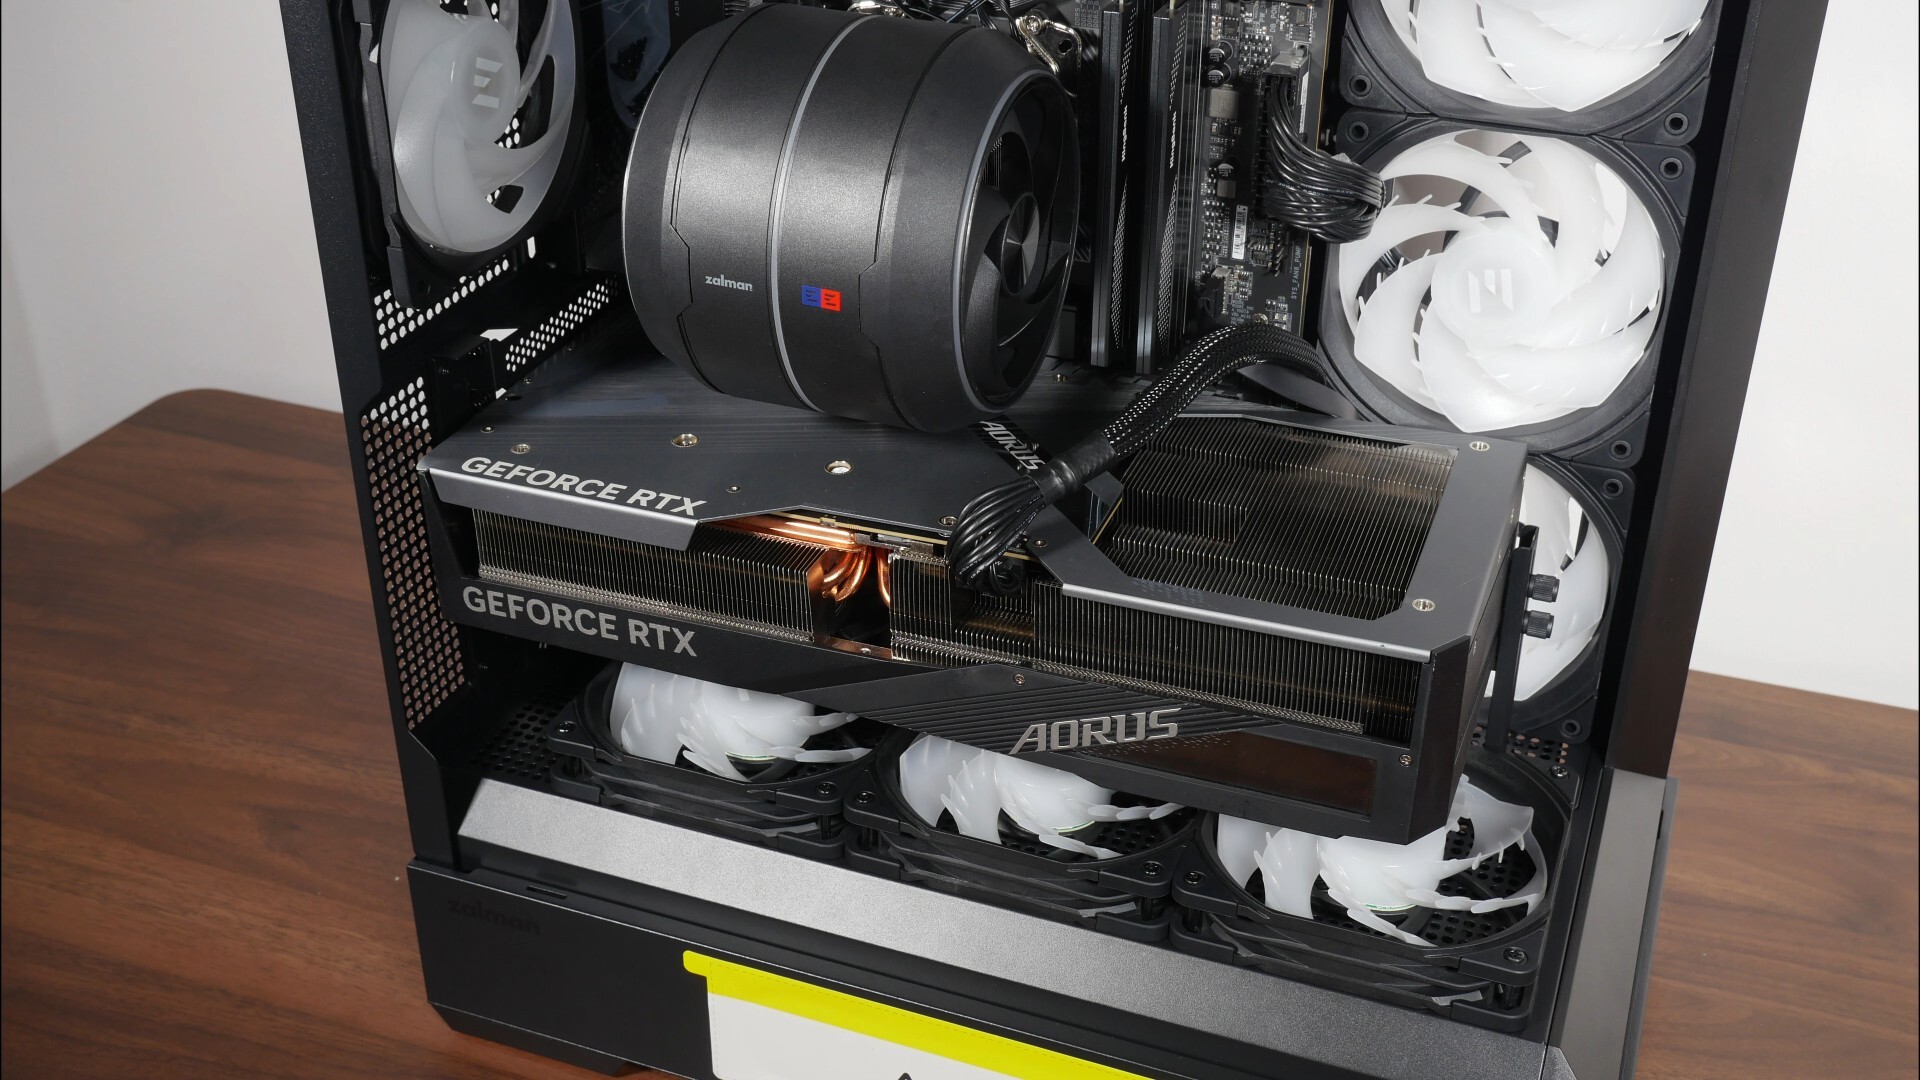
The graphics card for this demo build’s a Gigabyte GeForce RTX 4090 AORUS MASTER 24G that’s a real chonker, where it measures in at a sizeable 358.5mm x 162.8mm x 75.1mm – this is one of the largest, if not THE largest graphics card I’ve come across till date. In any case, it fits perfectly inside of the P40 DS, and I was able to use the included GPU support stand as well without any issues.
.jpg)
With the demo build nearly completed, it’s a good time to talk about cable management. The P40 DS comes with all the expected openings in the right places for cable management purposes, where we get large openings on the motherboard tray and strategically placed rubber grommets on the top cover of the bottom chamber.
.jpg)
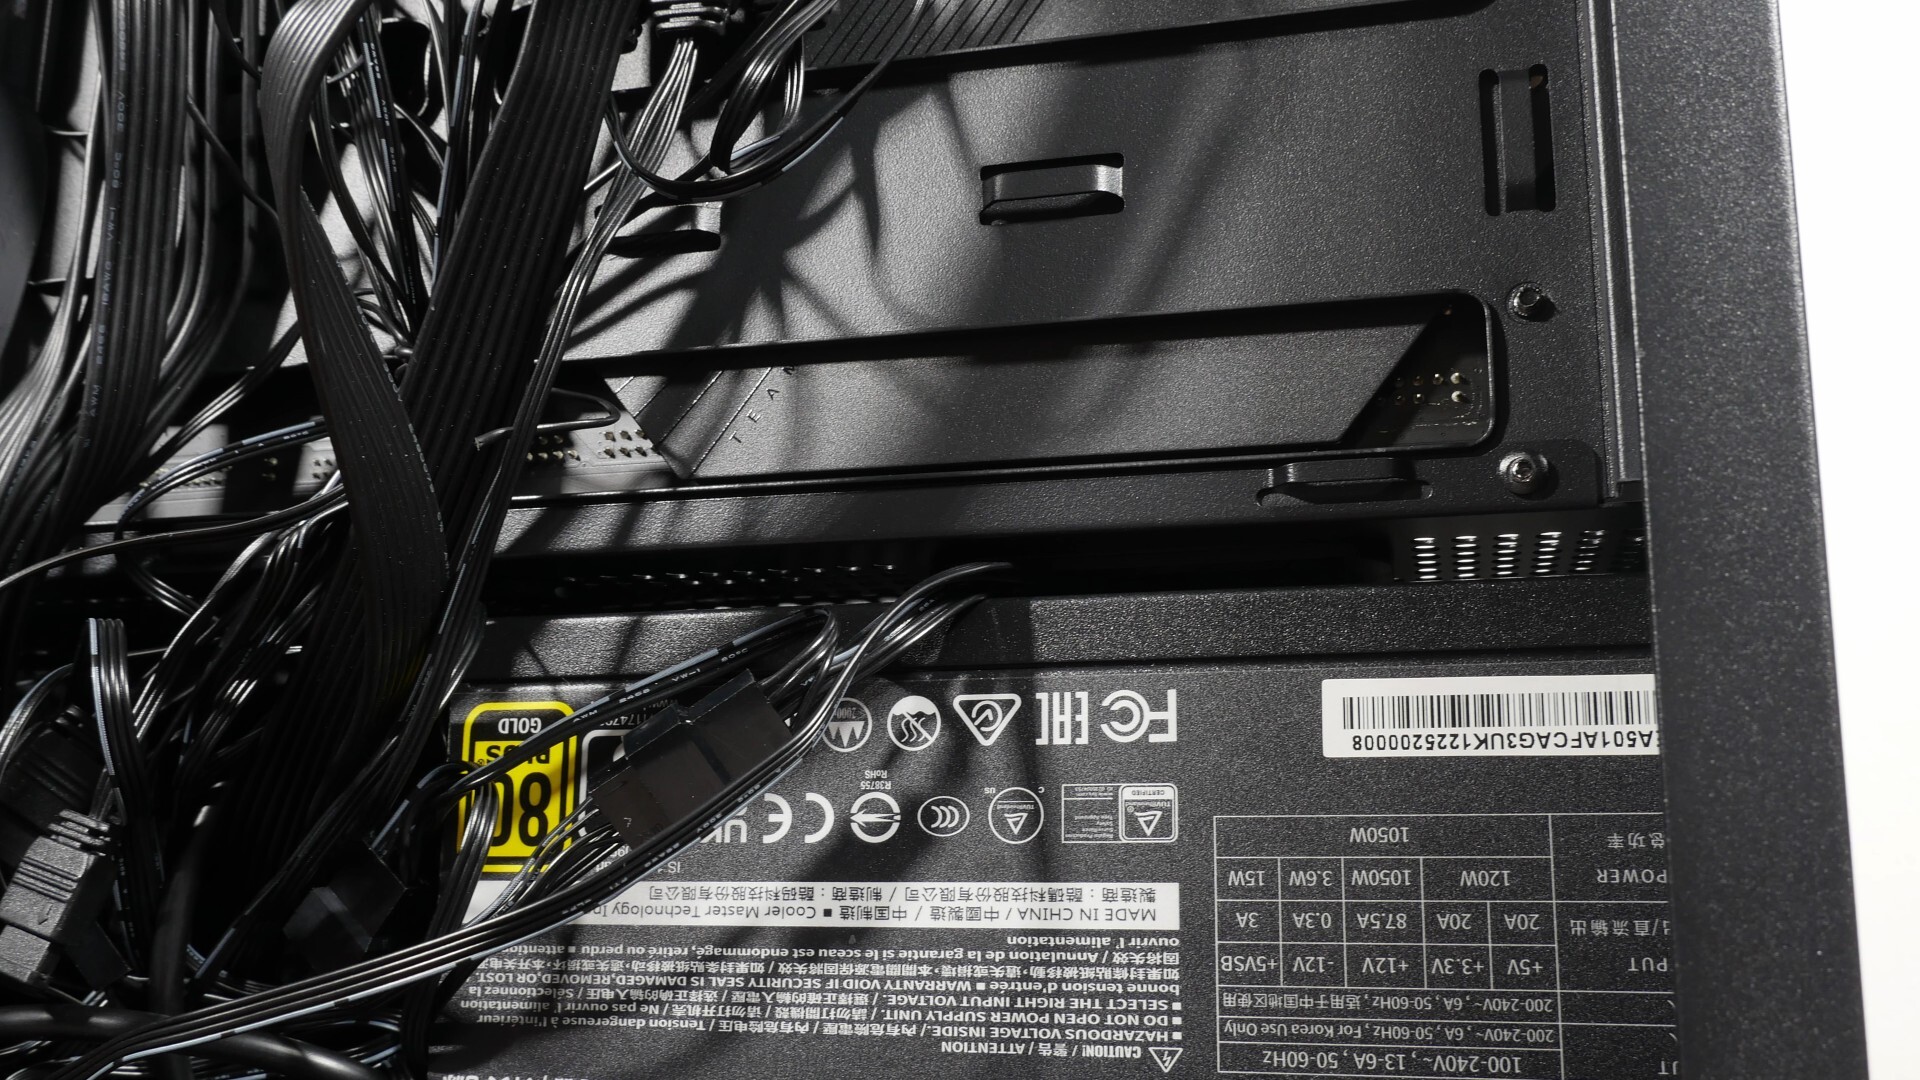
Taking a quick peek behind the motherboard tray, I didn’t do much cable management for this demo build, but I think it still looks pretty decent all things considered. Seeing as I didn’t have a storage drive installed in the bottom chamber, I could easily stuff all the excess cables into the space right next to the power supply unit.
Completed Demo Build Aesthetics
.jpg)
.jpg)
.jpg)
.jpg)
.jpg)
.jpg)
9.1" LCD Screen & OZ Wide App Walkthrough
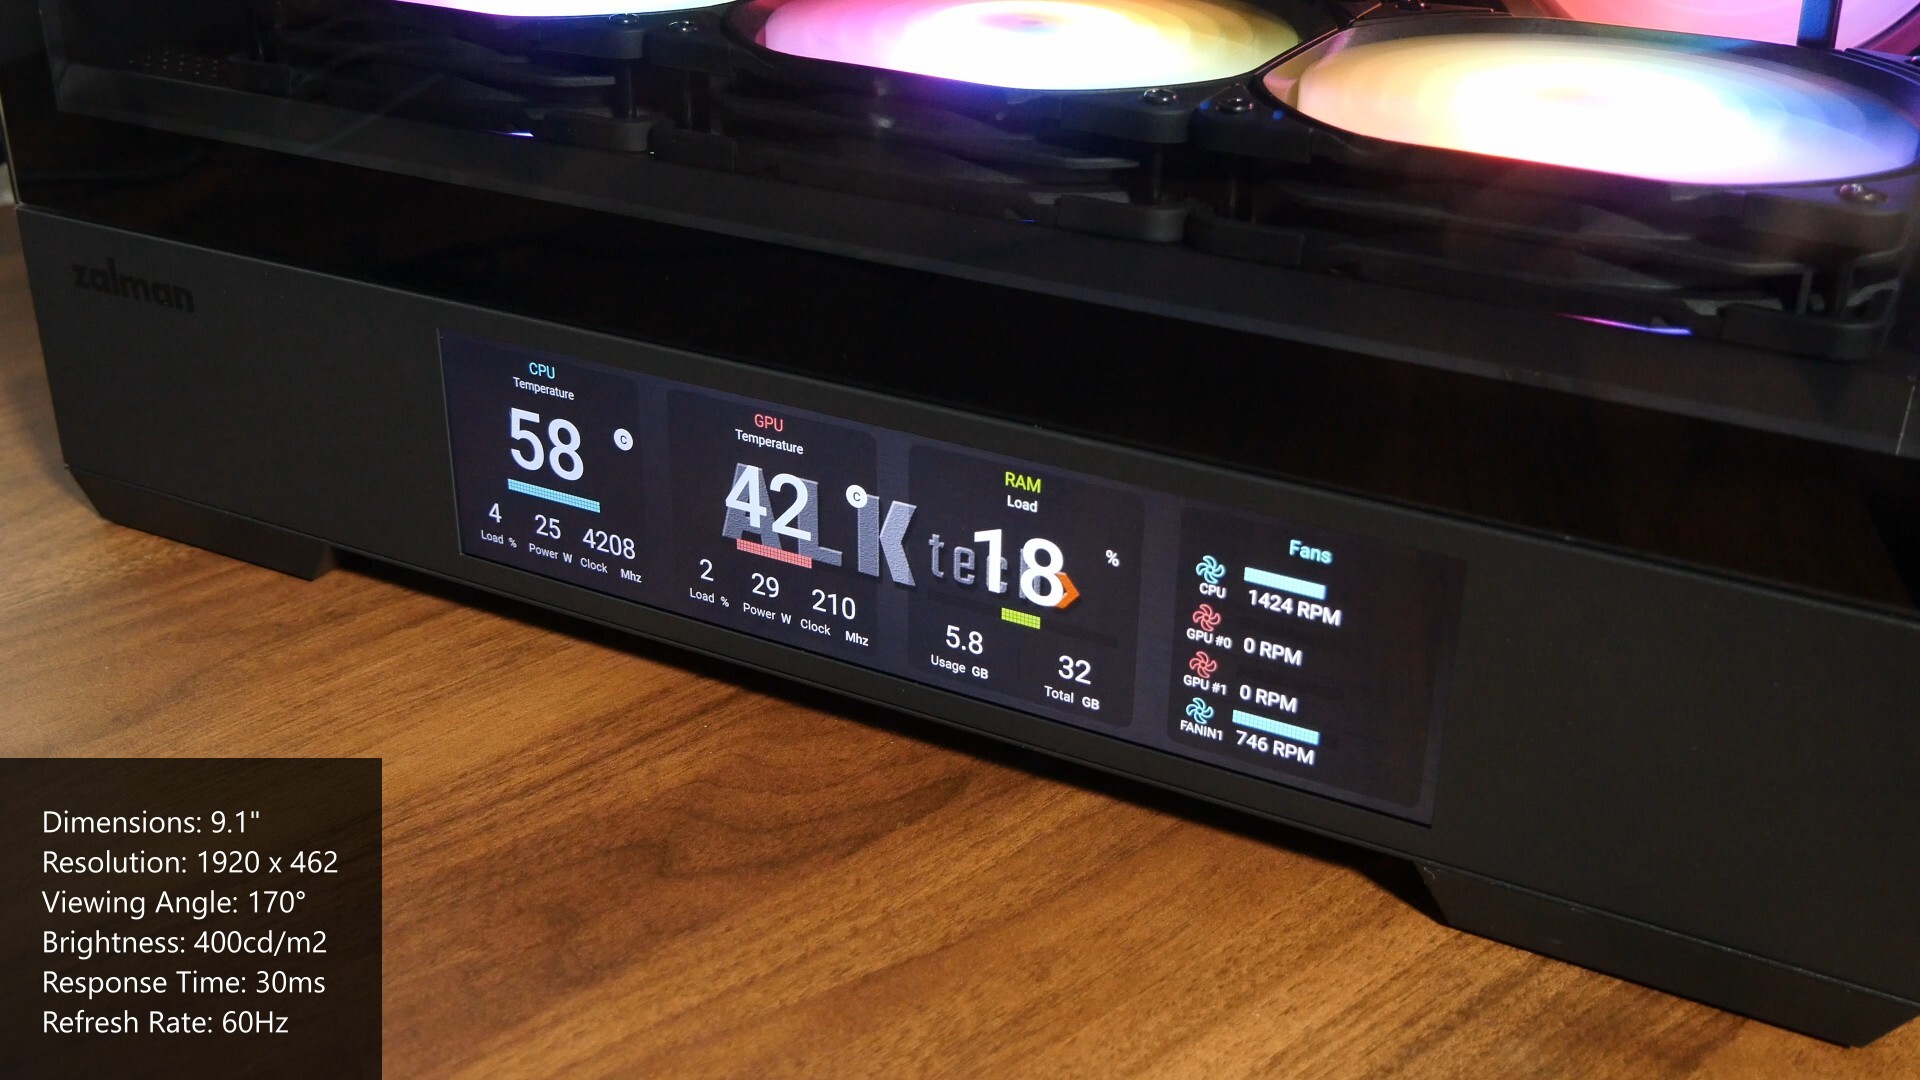
The P40 DS's key feature has got to be its 9.1" LCD screen, which features a display resolution of 1920x462 and a refresh rate of 60Hz. In order to customise what's displayed on the screen, you’ll have to download the Zalman “OZ Wide” app.
.jpg)
In terms of app usage experience, I found the app somewhat straightforward to use, where on the main page, we get a section that has a mockup of the screen, and 10 widgets that you can select from to be displayed on the screen.
.jpg)
The OZ Wide app allows you to upload your own image, animation or video into the app, where to do so, you’ll first have to create your own template, select the "Media Overlay & Photo Album" widget and then customise away – it’d be good if you have your image or video cropped to the screen’s resolution of 1920x462 first, before uploading it into the app for best results.
.jpg)
Within the "Upload Media" section, we catch a glimpse of the 12 pre-loaded backgrounds that come included with the app; as can be seen, any media that you’ve uploaded into the app will show up in this section as well.
.jpg)
.jpg)
Rounding off this app walkthrough section, we get a "Status" tab that shows the specs and status of your PC, as well as a "Settings" page that allows you to tweak stuff such as brightness, app language, update the LCD screen’s firmware and so on.
Test Setup & Thermal Performance
- CPU: AMD Ryzen 7 7800X3D (stock settings, PBO & Curve Optimiser disabled)
- CPU Cooler: Zalman ZET 5
- CPU Thermal Paste: Zalman ZM-STC10
- Motherboard: Gigabyte X670E AORUS MASTER
- Memory: 32GB (2x16GB) KingBank DDR5 Dark Heatsink UDIMM 6000MHz (DDR5 6000 CL28-35-35-76 1.45V)
- Storage: Lexar NM790 1TB NVMe SSD
- Graphics Card: Gigabyte GeForce RTX 4090 AORUS MASTER 24G
- PSU: Cooler Master MWE Gold 1050 V2 ATX 3.0
- Case: Zalman P40 DS Black
- Case Fans: 6x Zalman ZM-AF120R reverse blade 120mm case fans, 1x Zalman ZM-AF120 normal blade 120mm case fan
- OS: Microsoft Windows 11 Pro
- Fan Curve: Stock standard profiles
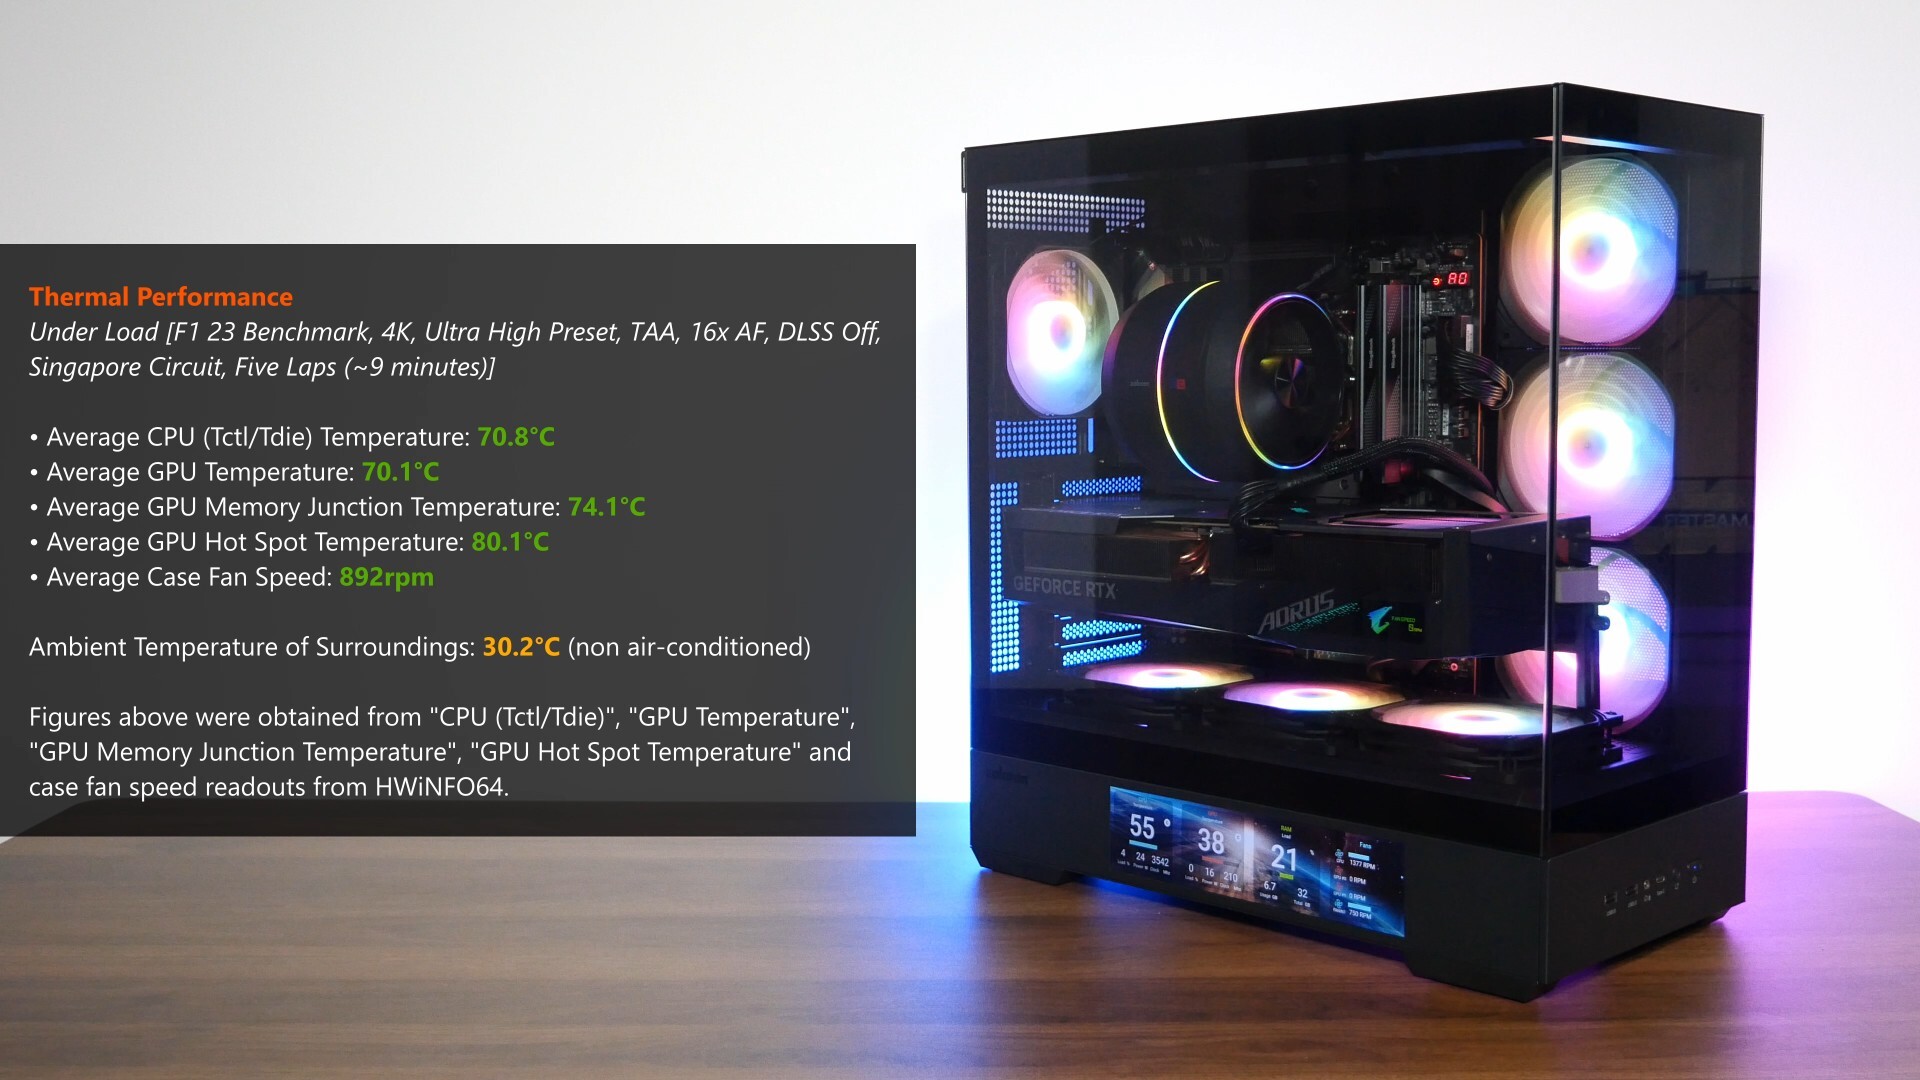
With F1 23’s in-game benchmark, where I ran a five-lap test for around nine minutes in total, the Ryzen 7 7800X3D processor in the demo build achieved an average CPU (Tctl/Tdie) temperature of around 70.8°C, while the RTX 4090 AORUS MASTER 24G achieved an average GPU temperature of 70.1°C, an average GPU memory junction temperature of 74.1°C and an average GPU hot spot temperature of 80.1°C.
These results were achieved in a non air-conditioned room with a temperature of around 30.2°C - a pretty decent set of results I must say, and I think if I had top exhaust fans installed in the demo build, the thermal performance of the case would have been better. For the benchmark test, the fan curves were left on their stock settings without any tweaks, and the case fans all ran at an average speed of around 892rpm during testing.
Conclusion & Pricing
To sum up, the Zalman P40 DS's clearly positioned as a more premium mid-tower PC case offering all thanks to its features, where its built-in 9.1” LCD screen would be the obvious star of the show. For its price, fit and finish is pretty decent, we get four preinstalled ARGB case fans and an ARGB hub, along with decent thermals and a good amount of accessories to go with the case. The Zalman OZ Wide software was relatively easy to use too, and seems to offer a decent amount of customisation options for the built-in LCD screen.
For you international viewers, as of the time of publishing this review, the P40 DS Black is available to purchase from Newegg for a price of US$140, while the P40 DS White is going for US$145. For folks based in Singapore, CDL Trading is the official distributor for Zalman in Singapore, and the P40 DS Black has a sticker price of around $189 Singapore dollars from PC hardware retailers in Singapore.
Get this PC case from Amazon: https://amzn.to/42yII3e (affiliate link)
Get this PC case from Lazada Singapore: https://s.lazada.sg/s.XH1fa (affiliate link)
Get this PC case from Shopee Singapore: https://s.shopee.sg/1qTImezkFo (affiliate link)
ALKtech may earn commissions from qualifying purchases made using affiliate links, at no extra cost to you as a customer. These commissions go a long way in supporting the platform!
The PC case and CPU cooler featured in this video were marketing samples provided on loan from CDL Trading Pte Ltd, the authorised distributor for Zalman in Singapore.