%20500x1200.png?width=200&height=83&name=ALK%20Tech%20Logo%20(TransparentTextured)%20500x1200.png "ALK Tech Logo (TransparentTextured) 500x1200")
If you're a fan of the monolithic three-sided tempered glass aesthetic of the Phanteks Evolv X2, the new Evolv X2 Matrix should appeal to you with its 900-LED matrix display feature and use of fabric finishing on certain parts of the case.
When the Phanteks Evolv X2 first launched for sale back in January 2025, it captured the attention of the DIY PC community all thanks to its eye-catching monolithic three-sided tempered glass aesthetic, which allowed owners of this case to showcase the components of their gaming PC build in their full glory. One year on, Phanteks has taken the design of the Evolv X2 a step further, by incorporating a 900-LED matrix display feature into the case, and using a polyester fabric material in place of the brushed aluminium accents that were found on some internal surfaces of the original X2 - enter the new Evolv X2 Matrix.
Available in black or white, the Evolv X2 Matrix is a premium full-sized ATX PC case offering that's priced around $315 Singapore dollars (from PC hardware retailers in Singapore) or US$199.99 from international e-commerce sites such as Newegg. For this price, you get an attention-grabbing PC case design that almost makes your graphics card seem as if it's suspended in mid-air within your PC case, coupled with great build quality and no shortage of quality-of-life features. As a PC case that favours the use of AIO CPU coolers thanks to its chimney-stack airflow design, the Evolv X2 Matrix represents an aesthetic upgrade over the original Evolv X2, where its 900-LED matrix display certainly helps it to stand out in the field of premium PC case offerings. Read on to learn more about this PC case, and to see it as part of a demo build!
Summary of Specifications
- Colour: Black or white
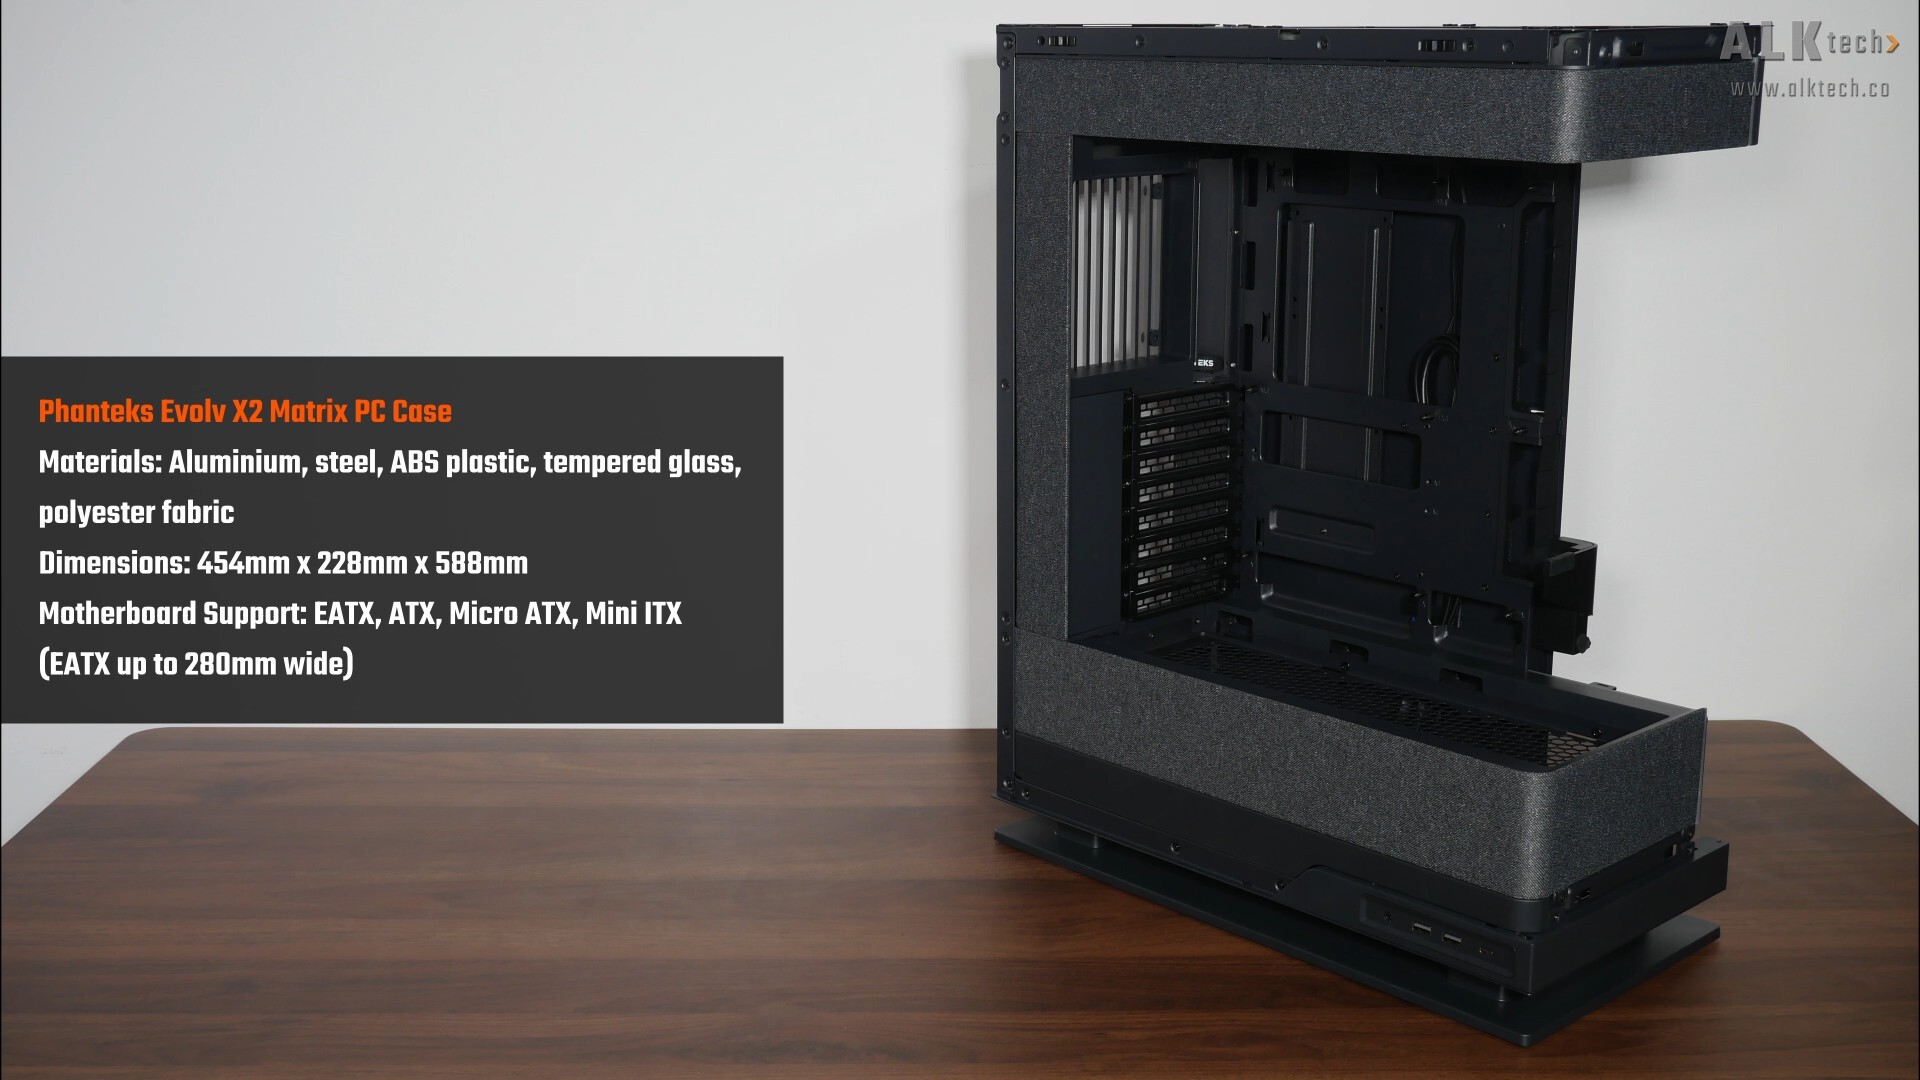
- Materials: Steel chassis, ABS plastic, tempered glass, aluminium panels
- Dimensions: 454mm x 228mm x 588mm
- Motherboard Support: EATX, ATX, Micro ATX, Mini ITX (EATX boards of up to 280mm width supported)
- Expansion Slots: 8
- Drive Support: up to 5x 2.5" SSDs with 1x 3.5" hard drive, or up to 2x 3.5" hard drives with 3x 2.5" SSDs
- Front I/O: 1x USB 3.2 Gen 2x2 Type-C, 2x USB 3.0 Type-A. 1x 3.5mm microphone/headphone combo jack
- Included Fans: None
- Top Panel Cooling Support: up to 3x 120mm fans or up to 1x 360mm radiator (radiator max dimensions 415mm x 130mm x 32mm)
- Front Panel Cooling Support: N/A
- Side Panel Cooling Support: N/A
- Bottom Panel Cooling Support: up to 3x 120mm fans
- Rear Panel Cooling Support; up to 1x 120mm fan
- Official Product Page: https://phanteks.com/product/evolv-x2-matrix-black/
Packaging & Accessories
.jpg?width=1920&height=1080&name=Packaging%20(1).jpg)
.jpg)
As can be seen, the Evolv X2 Matrix ships in a brown cardboard box with your usual product illustrations and descriptions on all sides.
.jpg)
.jpg)
.jpg)
Make no mistake, the Evolv X2 is a large case, and when you take into consideration that it has three tempered glass panels, it's no wonder that the case is very well-protected within the box. We get no shortage of foam dividers, cardboard corner protectors as well as silicone protectors for the edges of the tempered glass panels.
.jpg)
.jpg)
We get a cardboard box of accessories with the case too, and it comes taped to the back of the case where the expansion slots are.
Within the said box of accessories, we get the following:
- Quick start guide
- Matrix LED manual
- RMA information leaflet
- Microfibre cleaning cloth
- 6x cable ties
- 1x motherboard standoff installation/remover tool
- 30x motherboard/SSD screws
- 4x power supply screws
- 8x hard disk screws
- 1x spare motherboard standoff
- 3x vertical GPU bracket screws
- 1x D-RGB motherboard connection cable
Do note that the motherboard standoffs come preinstalled on the motherboard tray of the case.
Exterior Walkthrough
.jpg)
.jpg)
We’ve got the black version of the Evolv X2 Matrix on hand for this review, and for those of you thinking of building a white-coloured PC, Phanteks also has a white variant of the X2 Matrix available as well. If you’re familiar with the design of the original Evolv X2, the Matrix is pretty much exactly the same, save for the matrix LED feature that I’ll cover in a bit, and the use of a fabric material (instead of brushed aluminium as with the OG Evolv X2) as finishing for certain interior bits of the case.
.jpg)
For those of you who are unfamiliar with the Evolv X2’s design language, we get a unique aesthetic that’s created by removing the front panel frame and having a tempered glass panel in its place instead – this results in a see-through chassis frame in the shape of the letter "C", which when coupled with tempered glass panels on the sides, we get a case that’s perfect for showcase PC builds.
.jpg?width=1920&height=1080&name=Aesthetics%20(Fabric%20Finishing%201).jpg)
Materials wise, the case is made of a combination of aluminium, steel, ABS plastic as well as tempered glass panels, alongside some polyester fabric finishes for the interior of the case – it’s worth mentioning that the fabric finishing is done up pretty nicely, and I don’t see creases of any sort.
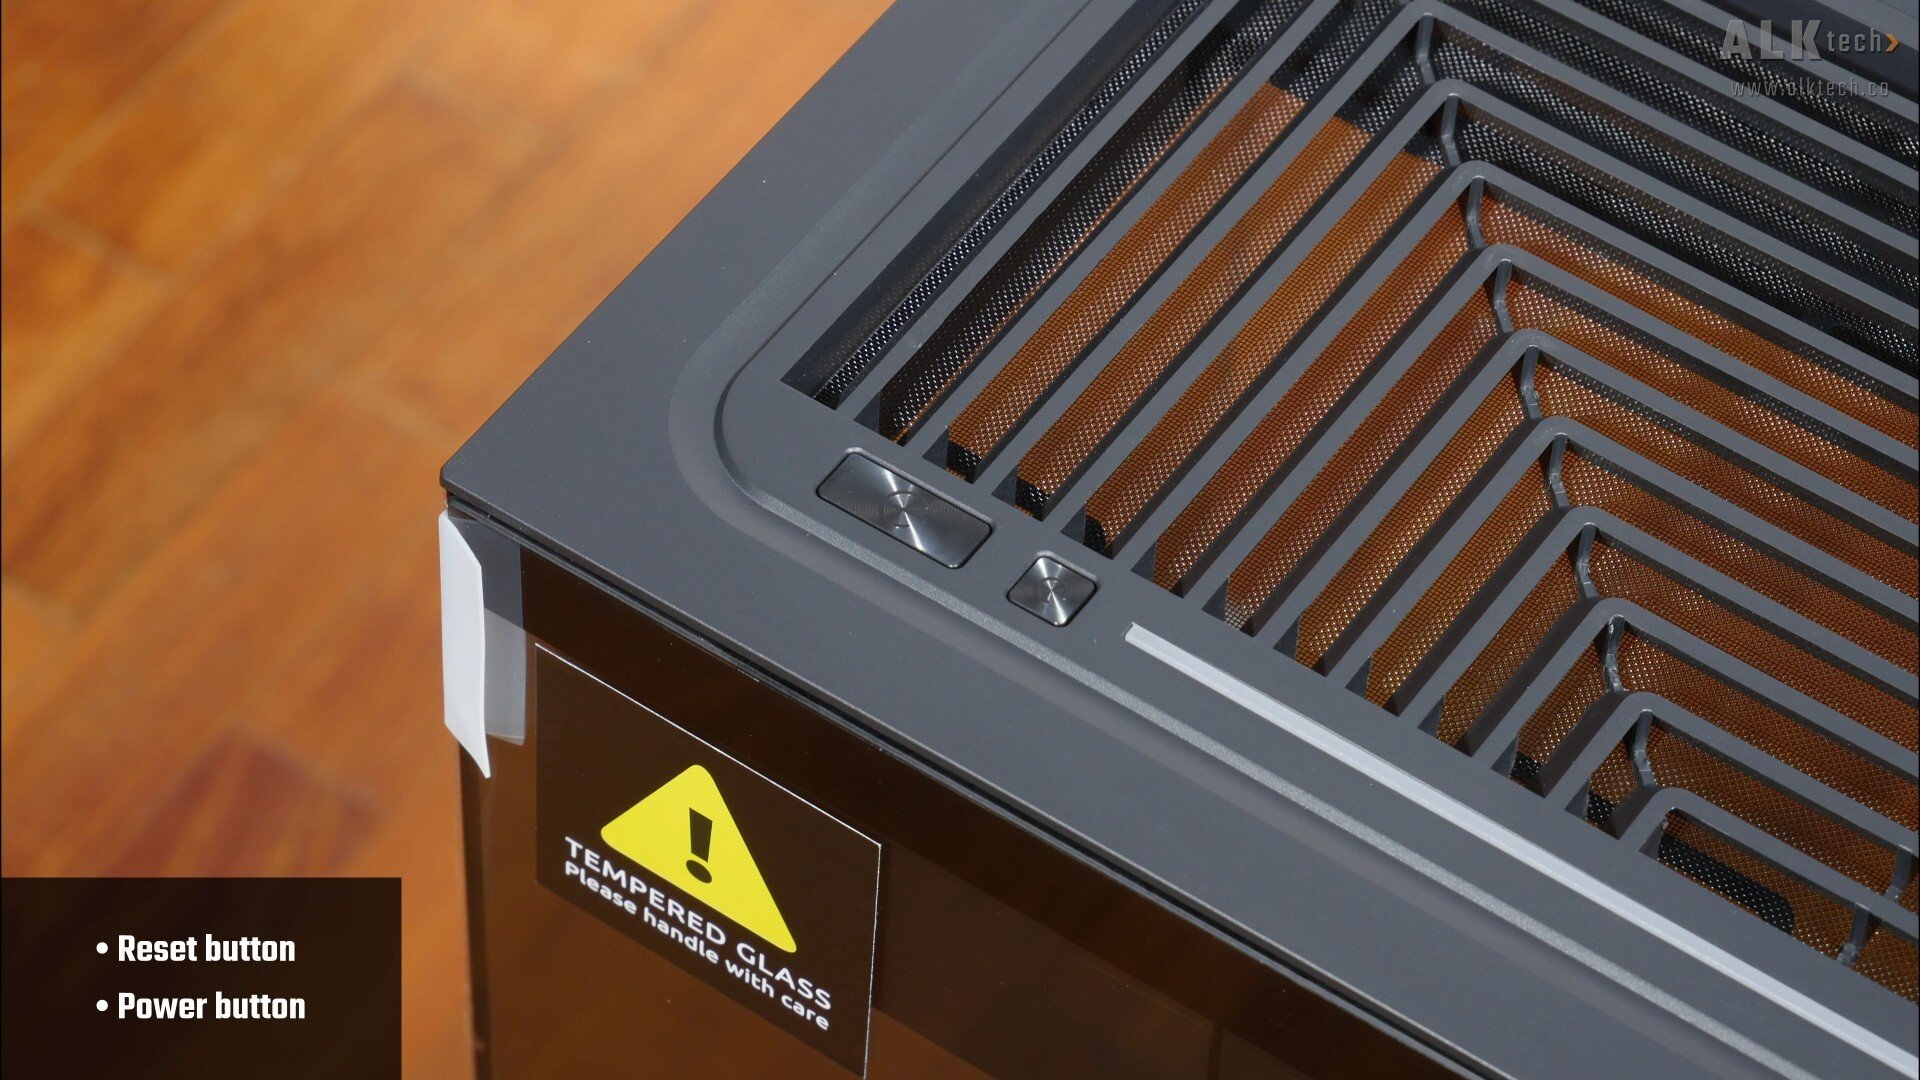
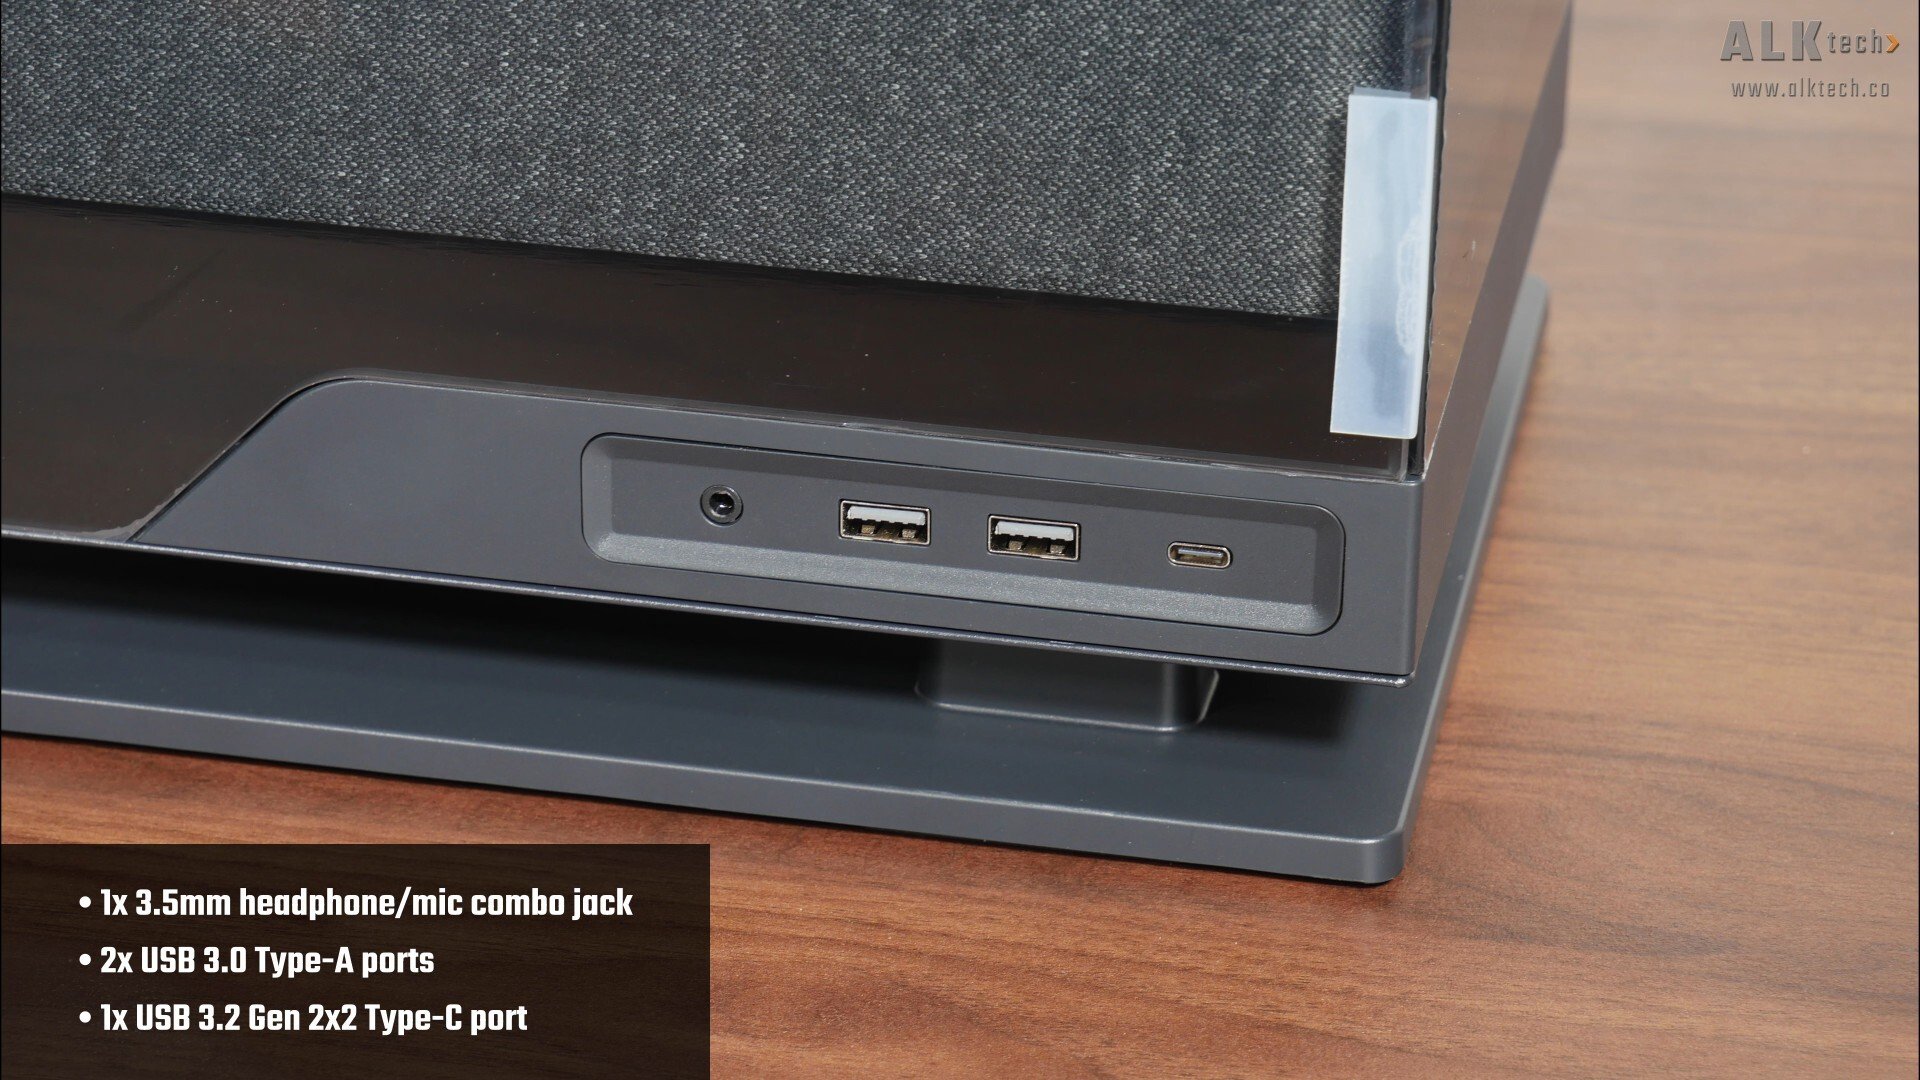
The power and reset buttons of the case are located on the top panel, and in terms of front panel connectivity, we get a 3.5mm headphone and microphone combo jack, two USB 3.0 Type-A ports as well as a USB 3.2 Gen 2x2 Type C port situated beneath the bottom edge of the left tempered glass side panel. Do note that the case does not come with a hard disk activity indicator light.
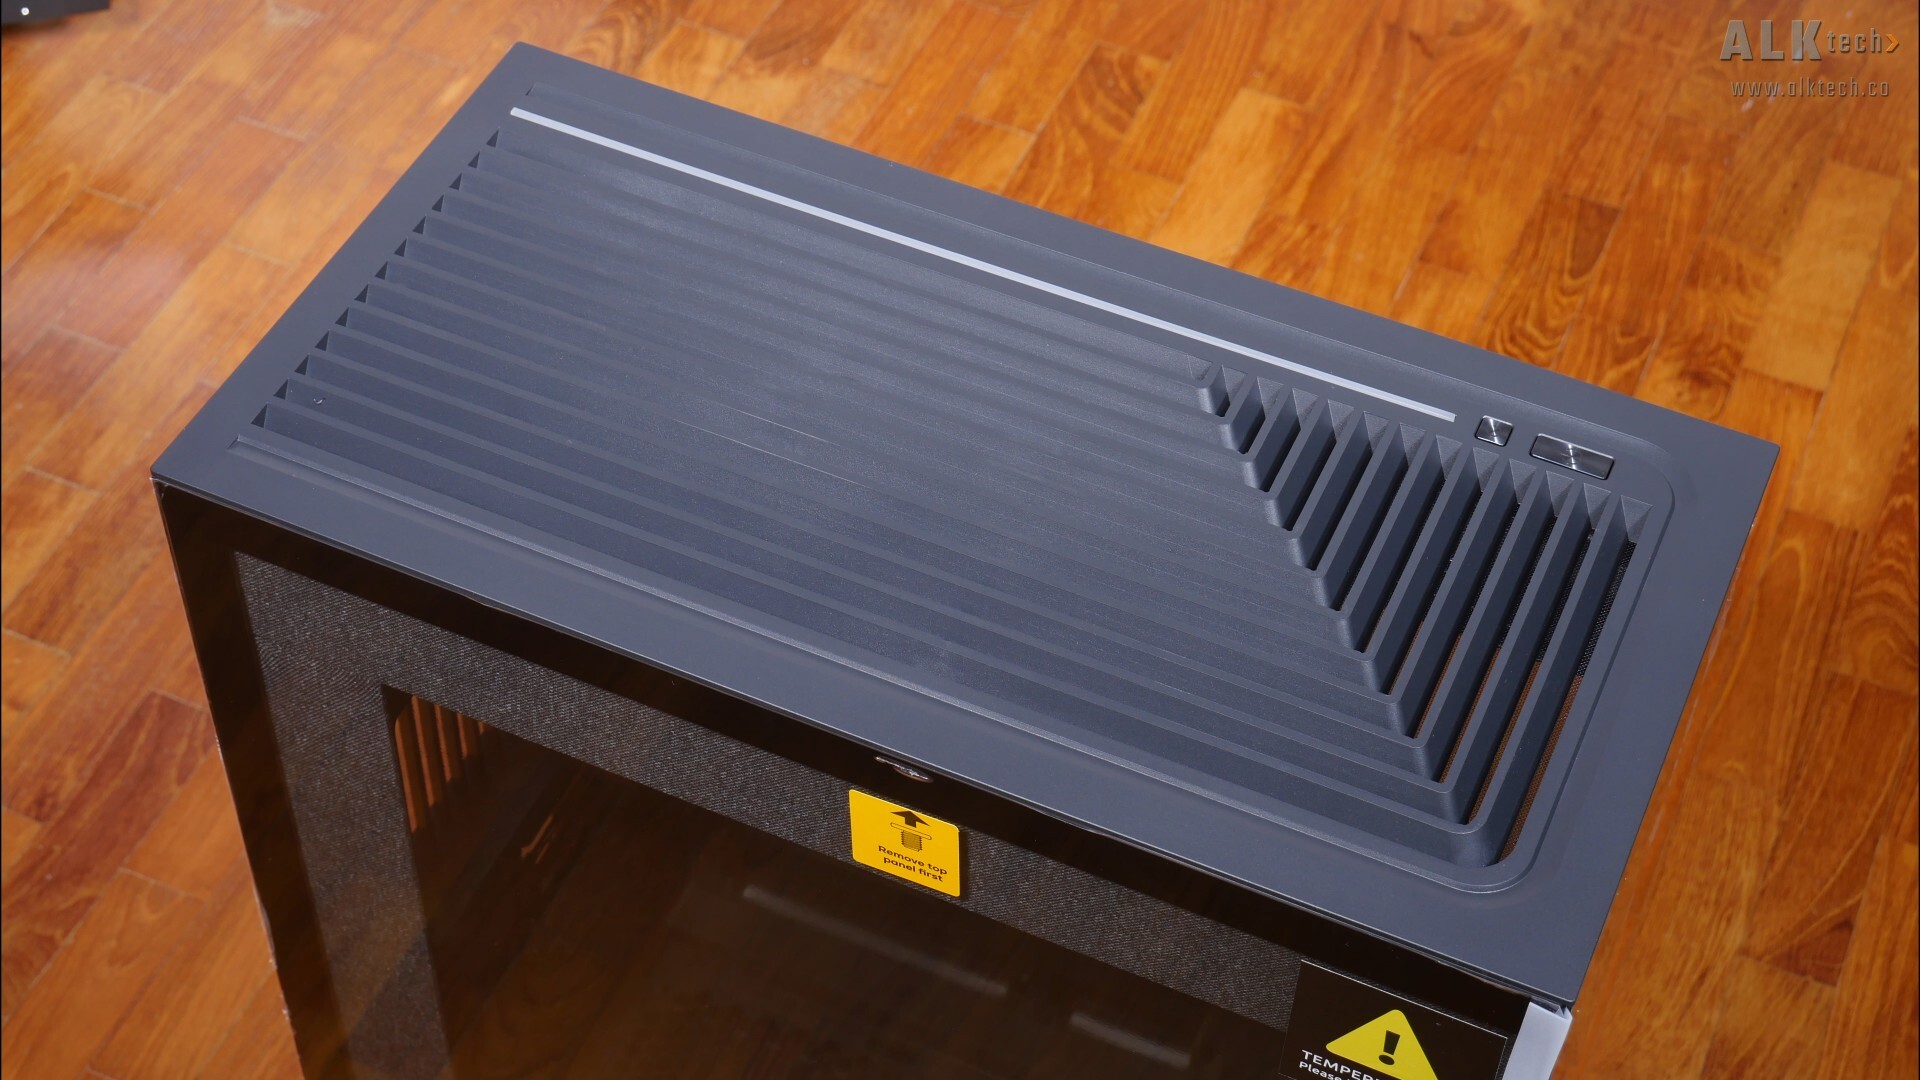
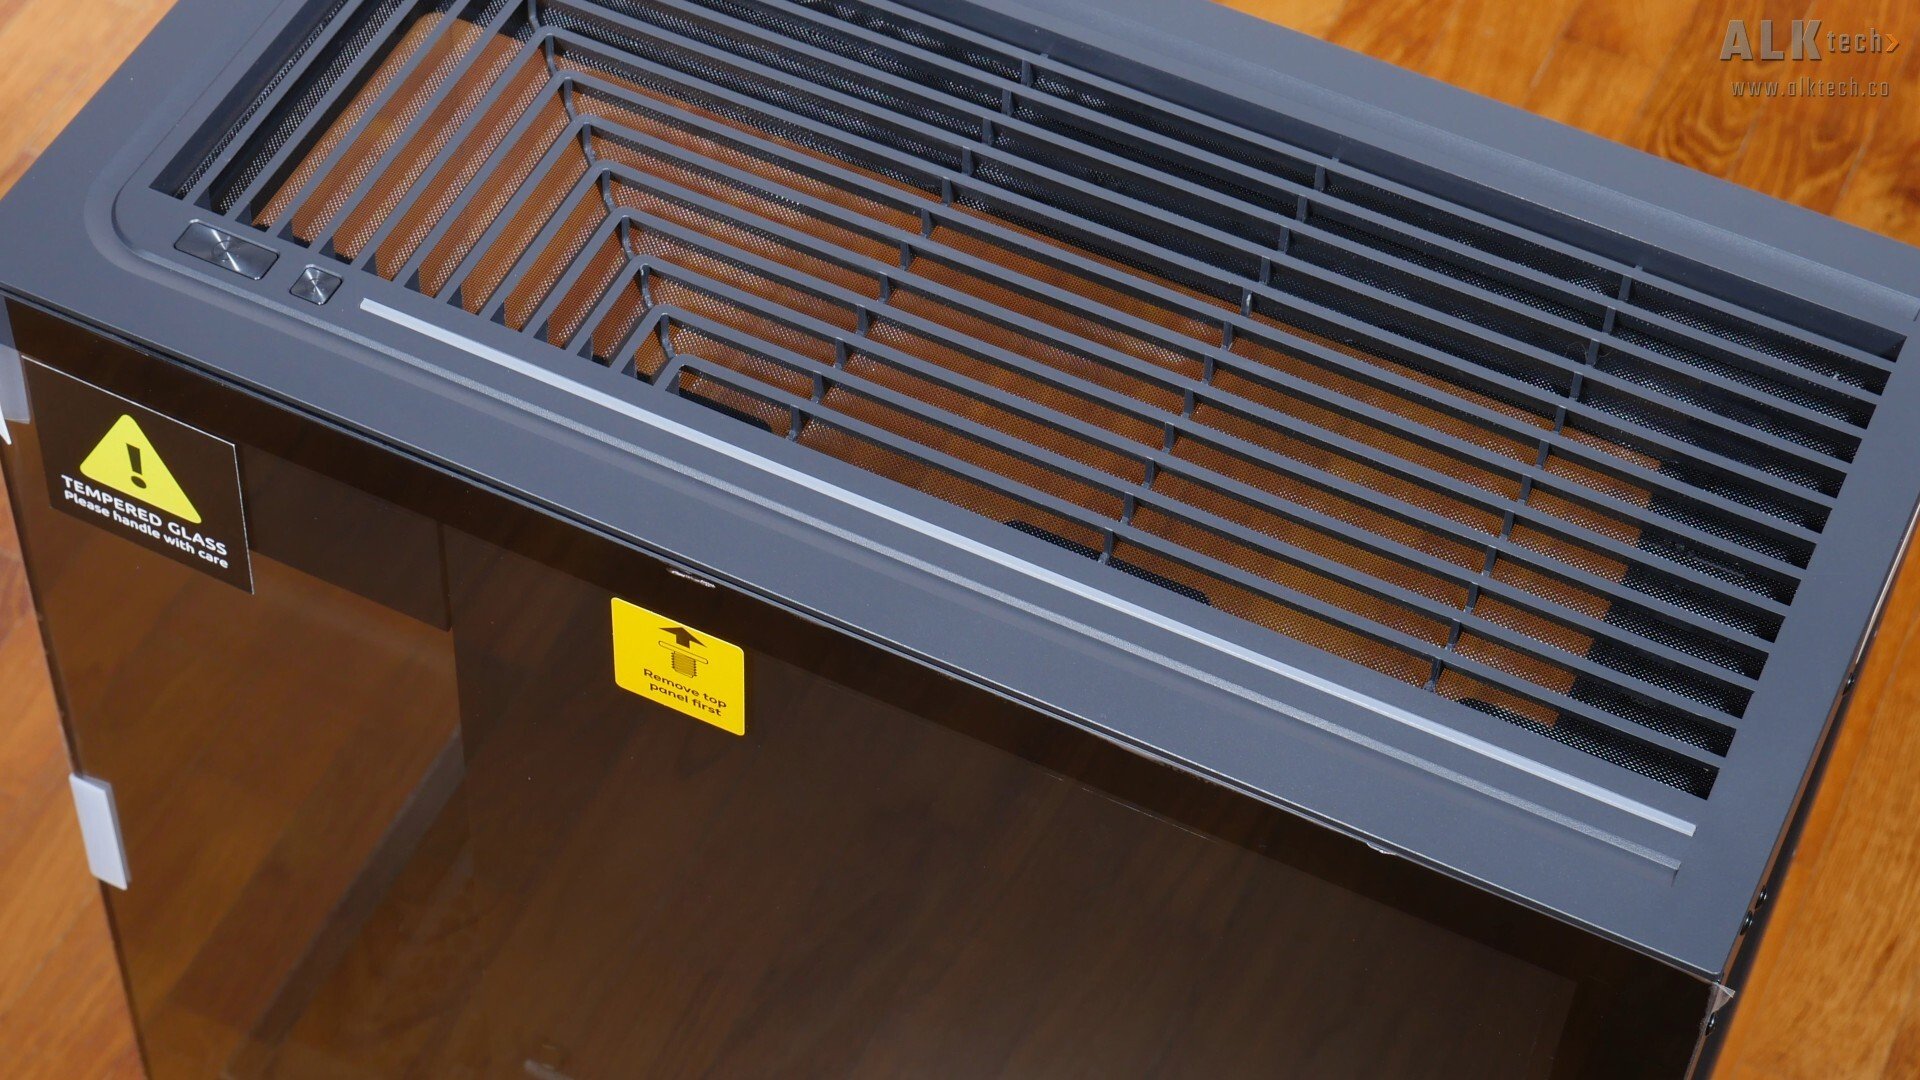
Like the original Evolv X2, the Evolv X2 Matrix has L-shaped ventilation openings for a top mounted radiator or fans, where these slats have been angled in a way to direct any hot exhaust air away from the end-user (assuming that you have the PC placed on your right). Phanteks has also included an illuminated RGB strip that runs along the long edge of the top panel and terminates where the reset and power buttons are.
.jpg)
.jpg)
Over on the bottom of the case, we get plastic feet on all four corners of the case that terminate in a rectangular slab of plastic, which makes the Evolv X2 Matrix look as if it’s standing on stilts. Such a design helps airflow along, by creating space for the bottom intake fans to suck fresh air into the case.

To that end, we get a removable filter for the bottom intake that slides in and out of place.
.jpg)
.jpg)
Moving to the rear of the case, we catch a glimpse of some pre-installed Velcro cable ties that are visible from the rear – these cable ties are used to cable manage the cables running behind the motherboard tray.
.jpg)
.jpg)
The expansion slot openings have slot covers that are reusable, and to install any expansion cards, you’ll have to pop off a plastic trim with fabric finishing (pictured above) that’s accessible once the tempered glass side panel is removed, where this said piece of trim's held in place magnetically. Removing it from the chassis then gives you access to the screws of the expansion slot covers.
.jpg)
.jpg)
.jpg)
With that, let’s get the panels off the Evolv X2 Matrix. First things first, you’ll have to remove the top panel, which can be pried off easily from the chassis. This then reveals the single screws that each hold the side tempered glass panels in place. With these screws undone, you can then pry off the left and right side tempered glass panels from the chassis.
.jpg)
.jpg)
.jpg)
Removing the front panel involves the removal of two screws, with one located at the top and the other located near the bottom of the case. To get access to the bottom screw, you’ll first have to remove the plastic shroud that covers the bottom chamber drive mounting location of the Evolv X2 Matrix - before doing so, you'll also have to open the metal panel that covers the rear of the motherboard tray.
.jpg)
With the screws undone, the front glass panel then slides out of place pretty easily.
.jpg)
One cool feature of the Evolv X2 Matrix is its use of a grey fabric material (at least with the black variant of this case - the white variant uses a light grey shade of fabric instead), so as to add some visual interest to the case.
.jpg)
The star of the show’s got to be the matrix LED that’s found beneath the fabric layer on the bottom section of the case, we’ll run through the matrix LED in-depth later in this review. With the vanilla Evolv X2, these surfaces have a brushed aluminium finish instead.

On the rear of the removable top panel, we see that it comes with an integrated dust filter that unfortunately, isn’t removable, and Phantek’s has also integrated the top panel ARGB LED accent into the top panel itself, where the electrical contacts to power the said ARGB LED accent are visible.
.jpg)
.jpg)
While still on the topic of ARGB lighting, we do also get ARGB LED accents on the top and bottom sections of the case as shown on the screen, we’ll see these LEDs in action later on in this article.
Cooling Hardware Support
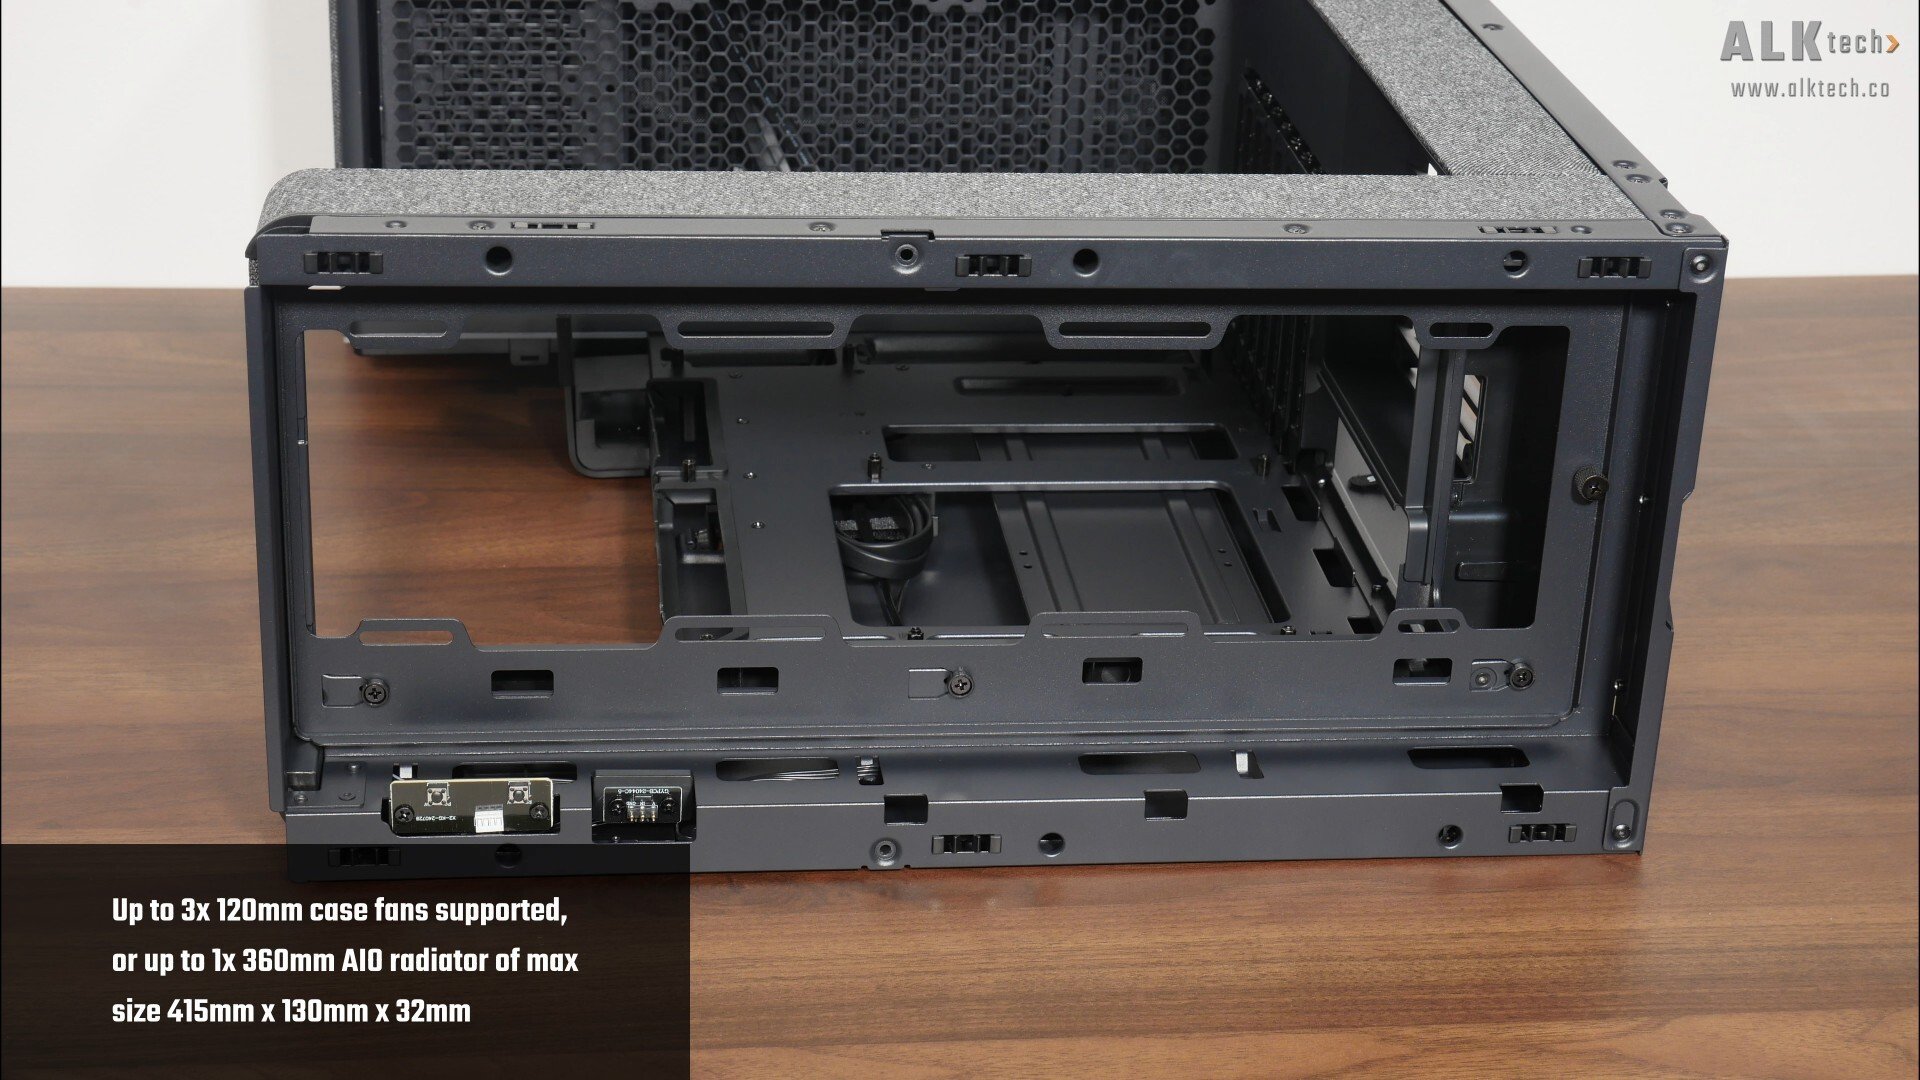
With that, let’s talk about the cooling hardware support for the Evolv X2 Matrix. In case you’re unaware, this case doesn’t come shipped with any preinstalled fans, and over on the top panel of the case, we get support for up to three 120mm fans or a 360mm AIO radiator with dimensions no more than 415mm x 130mm x 32mm.
To make the installation of top-mounted cooling hardware really easy, we get a removable bracket that’s held in place by a single thumb screw, and with the bracket removed, we see that there’s some space for your AIO radiator tubes to be concealed for a cleaner-looking build.
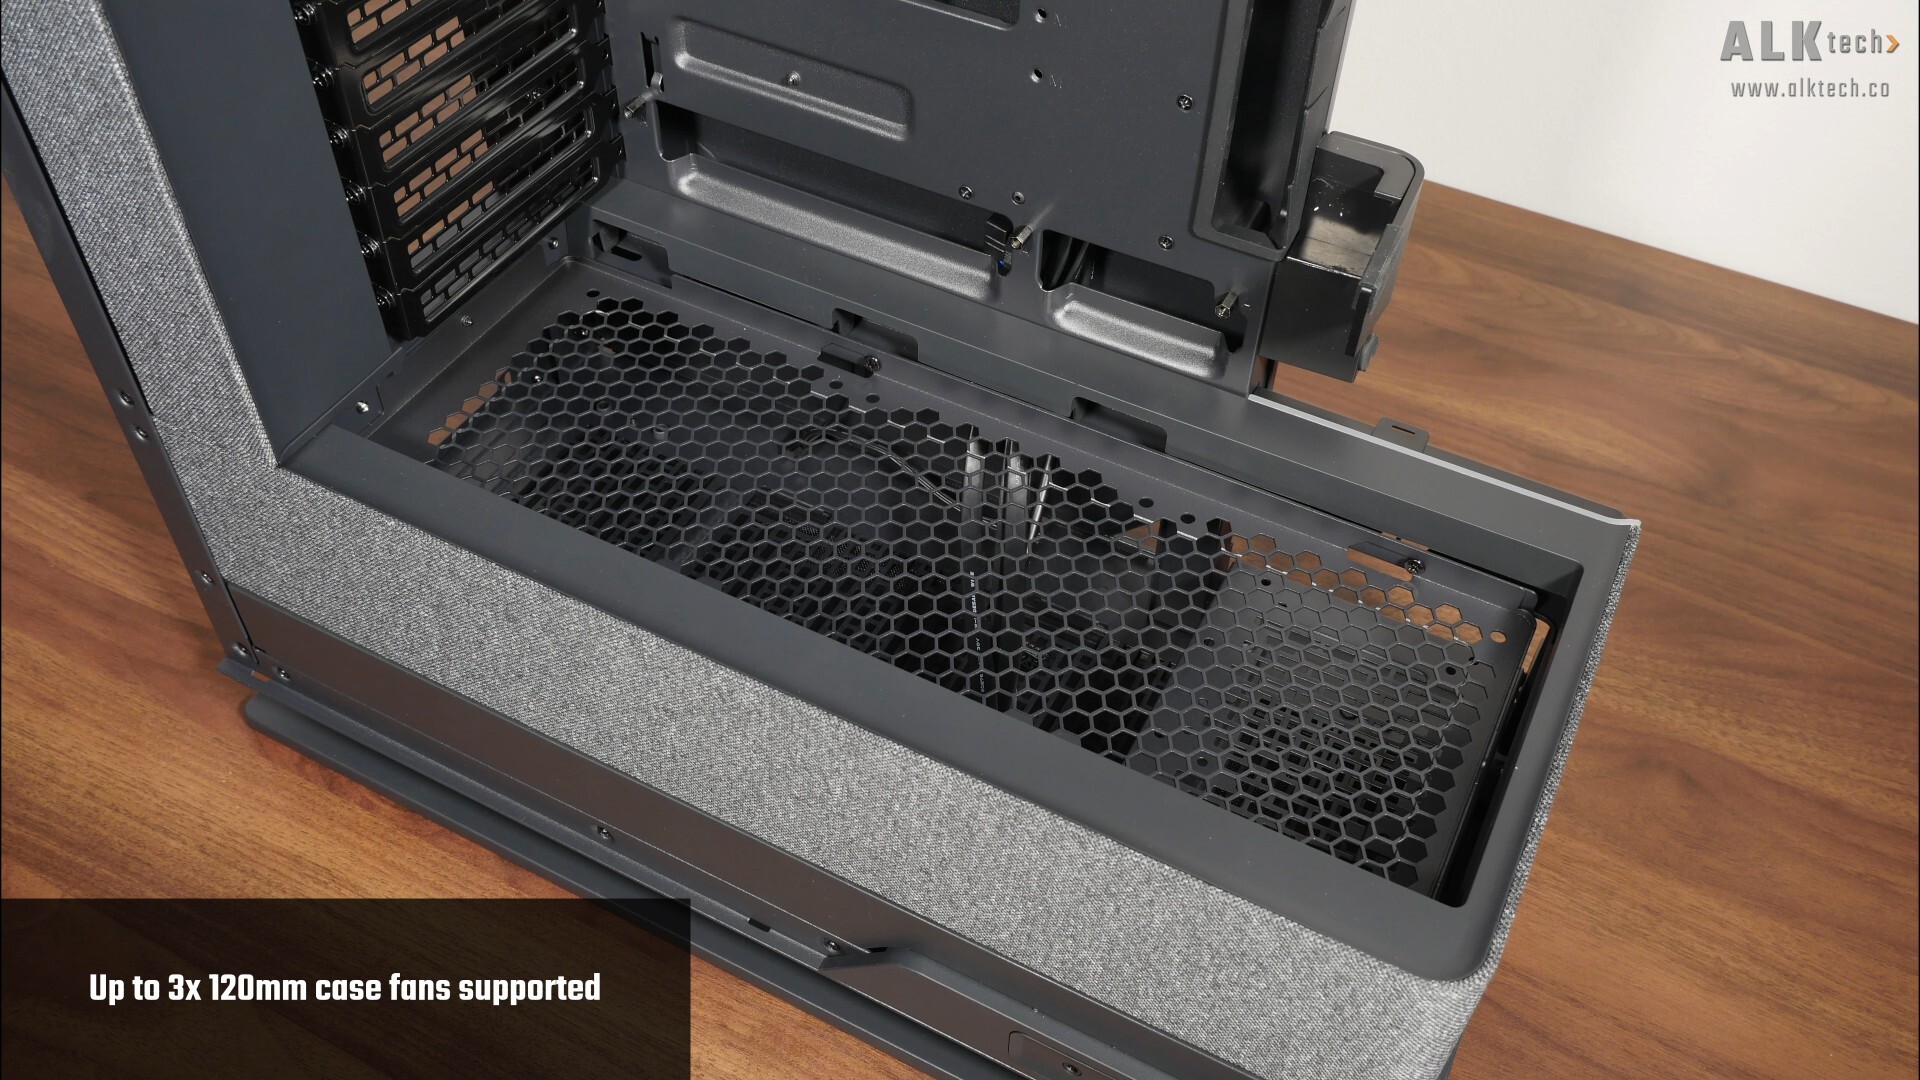
Over on the bottom panel, we get support for up to three 120mm fans.
.jpg)
Similar to the top panel, we get a removable bracket that’s held in place by a single thumbscrew – this certainly facilitates the installation of fans on the bottom panel.
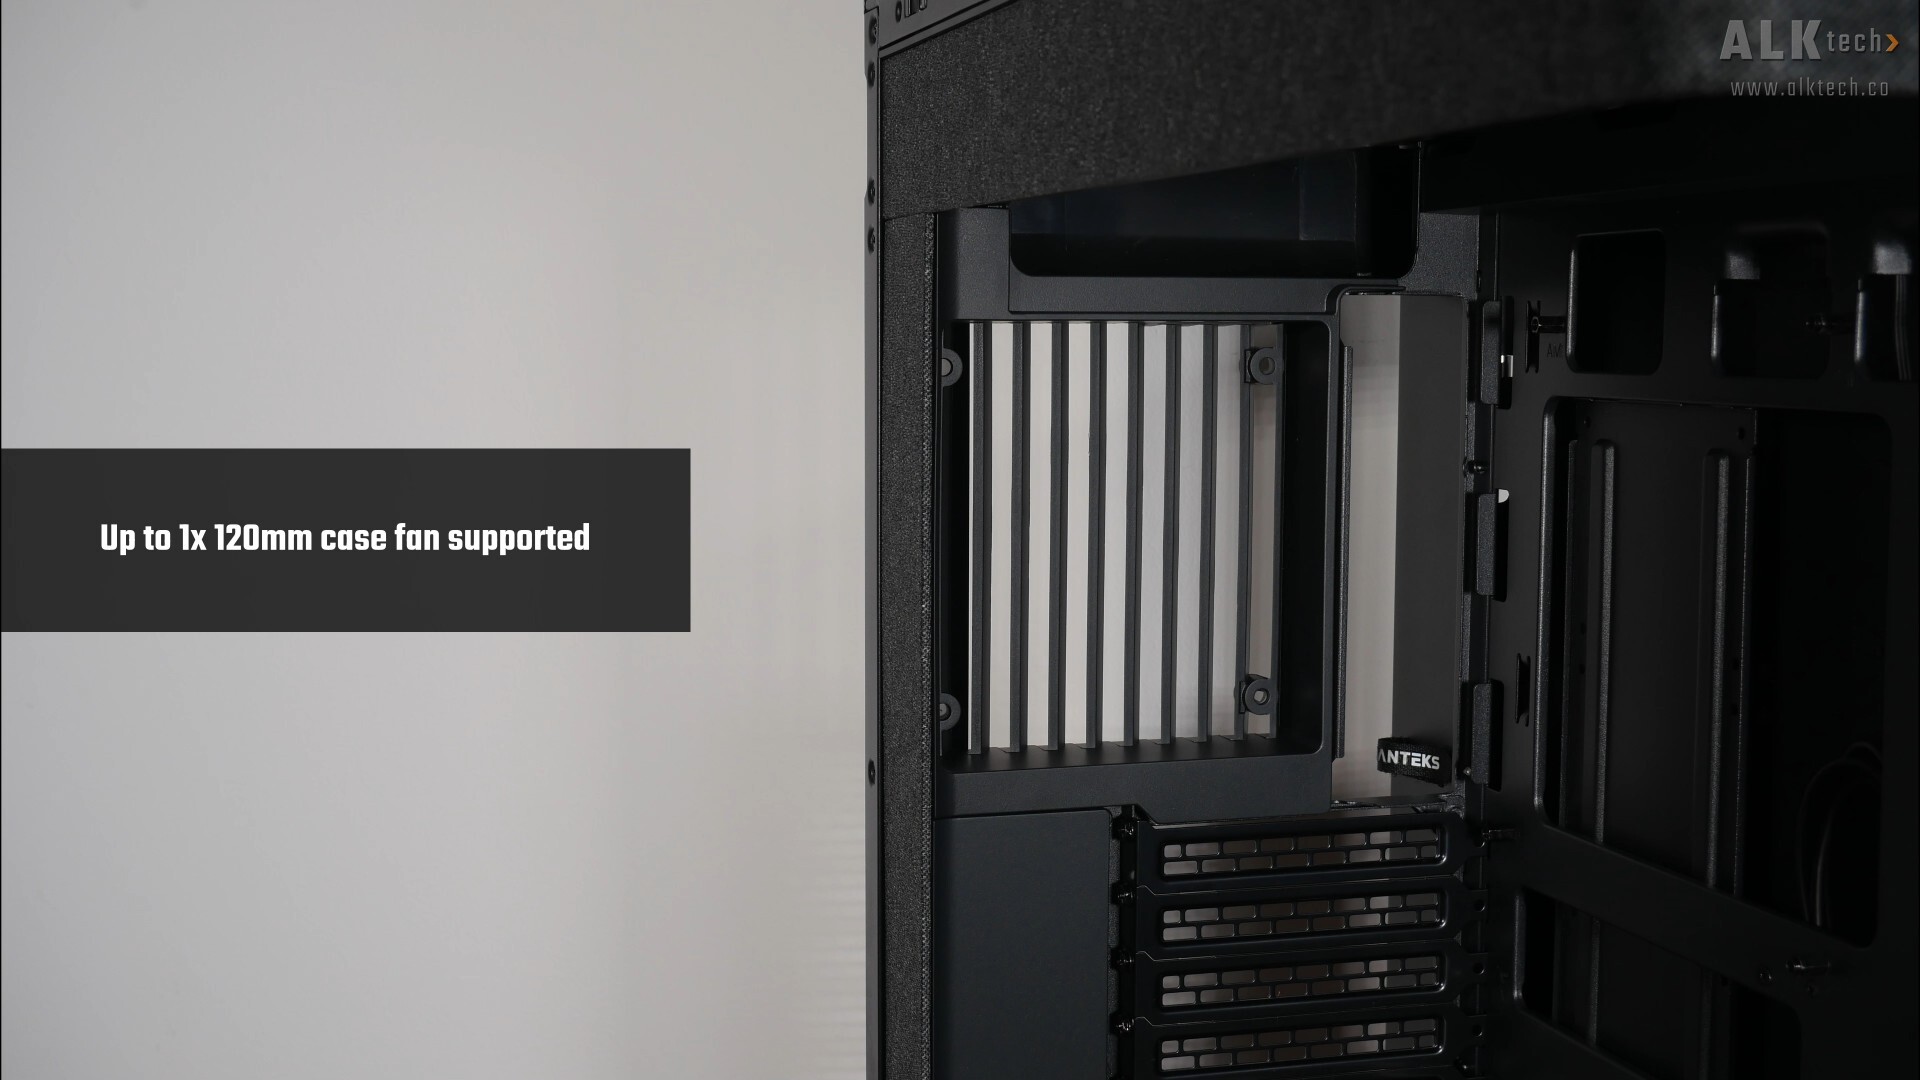
Finally, over on the rear, Phantek’s included a single opening that supports a 120mm fan.
Physical Dimensions & Clearances
Make no mistake, the Evolv X2 Matrix is a large and hefty case, measuring in at 454mm x 228mm x 588mm.

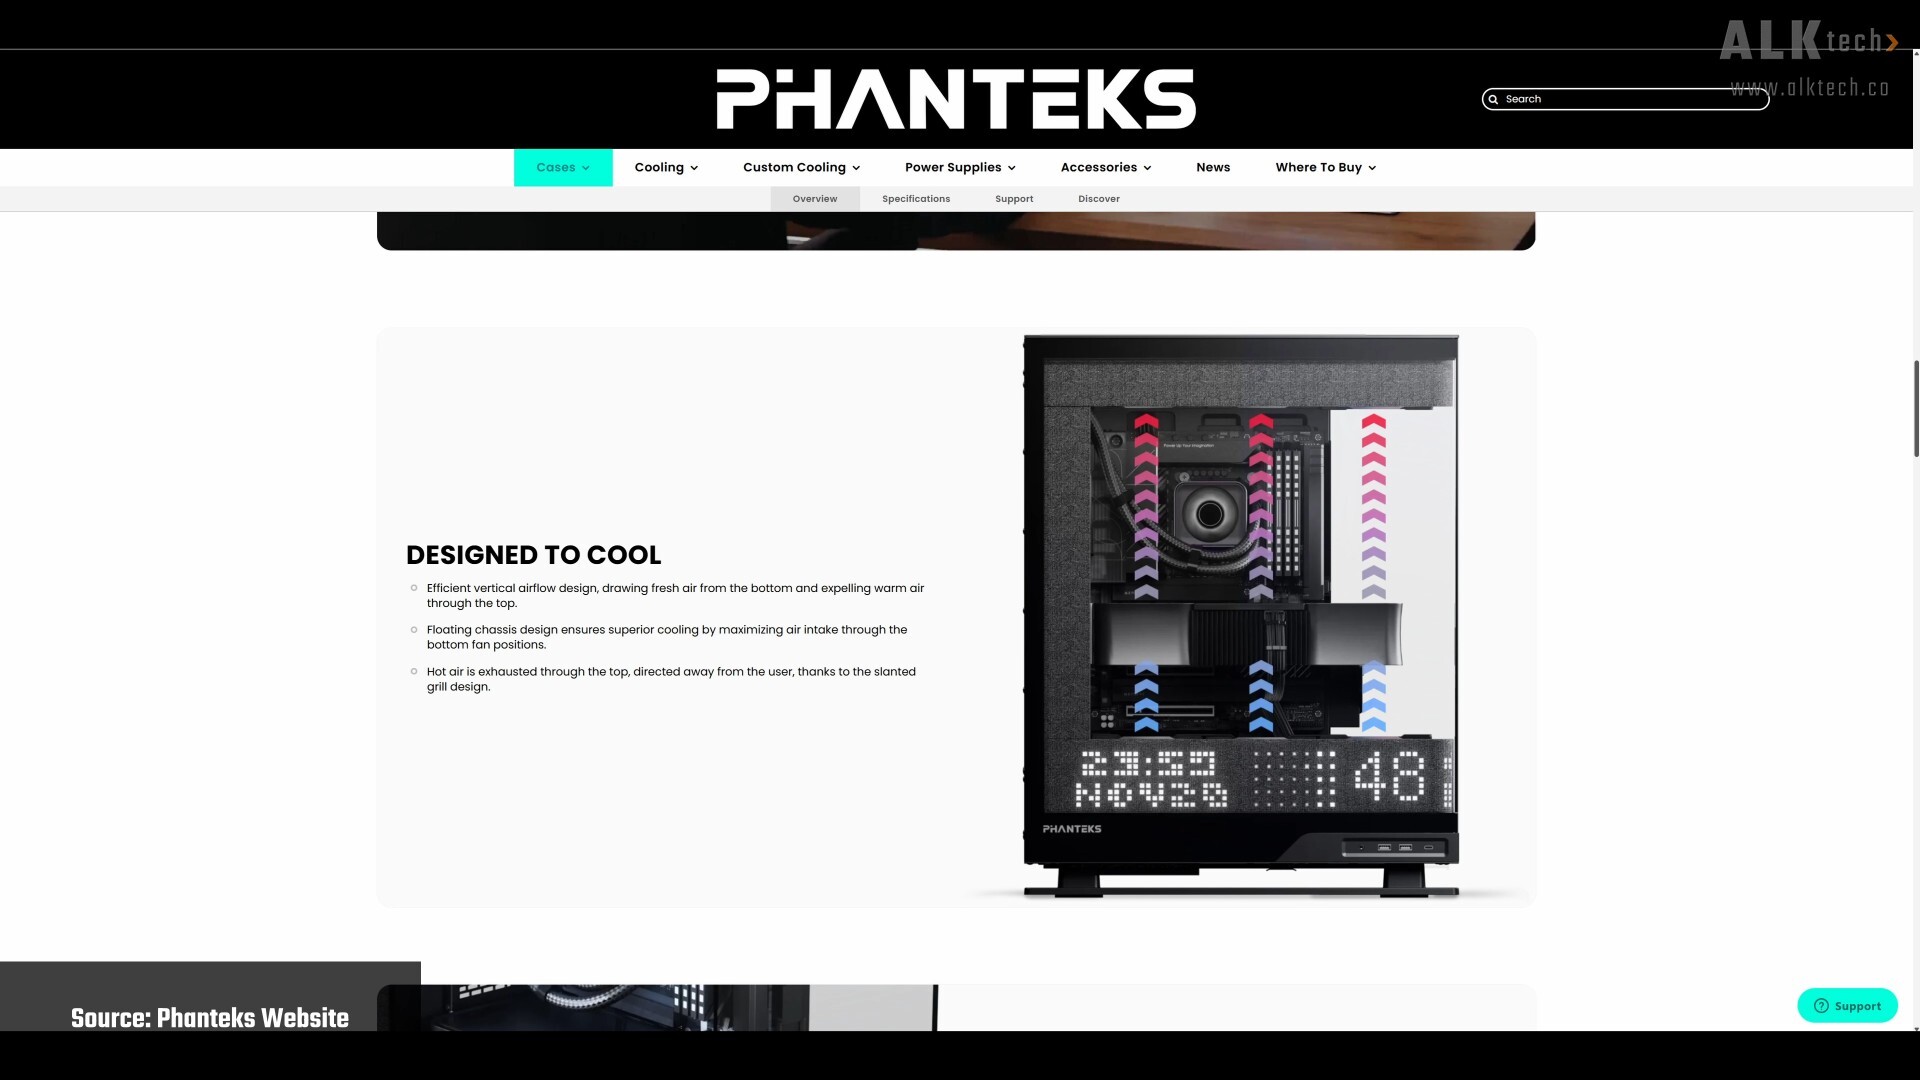
For you folks intending to use an air cooler for your processor, do note that the case supports CPU coolers of heights no more than 170mm according to the specs sheet for this case. It’s worth noting though, that the Evolv X2 line-up was designed with AIO CPU cooler usage in mind, due to its airflow design that's very much reminiscent of a chimney stack.
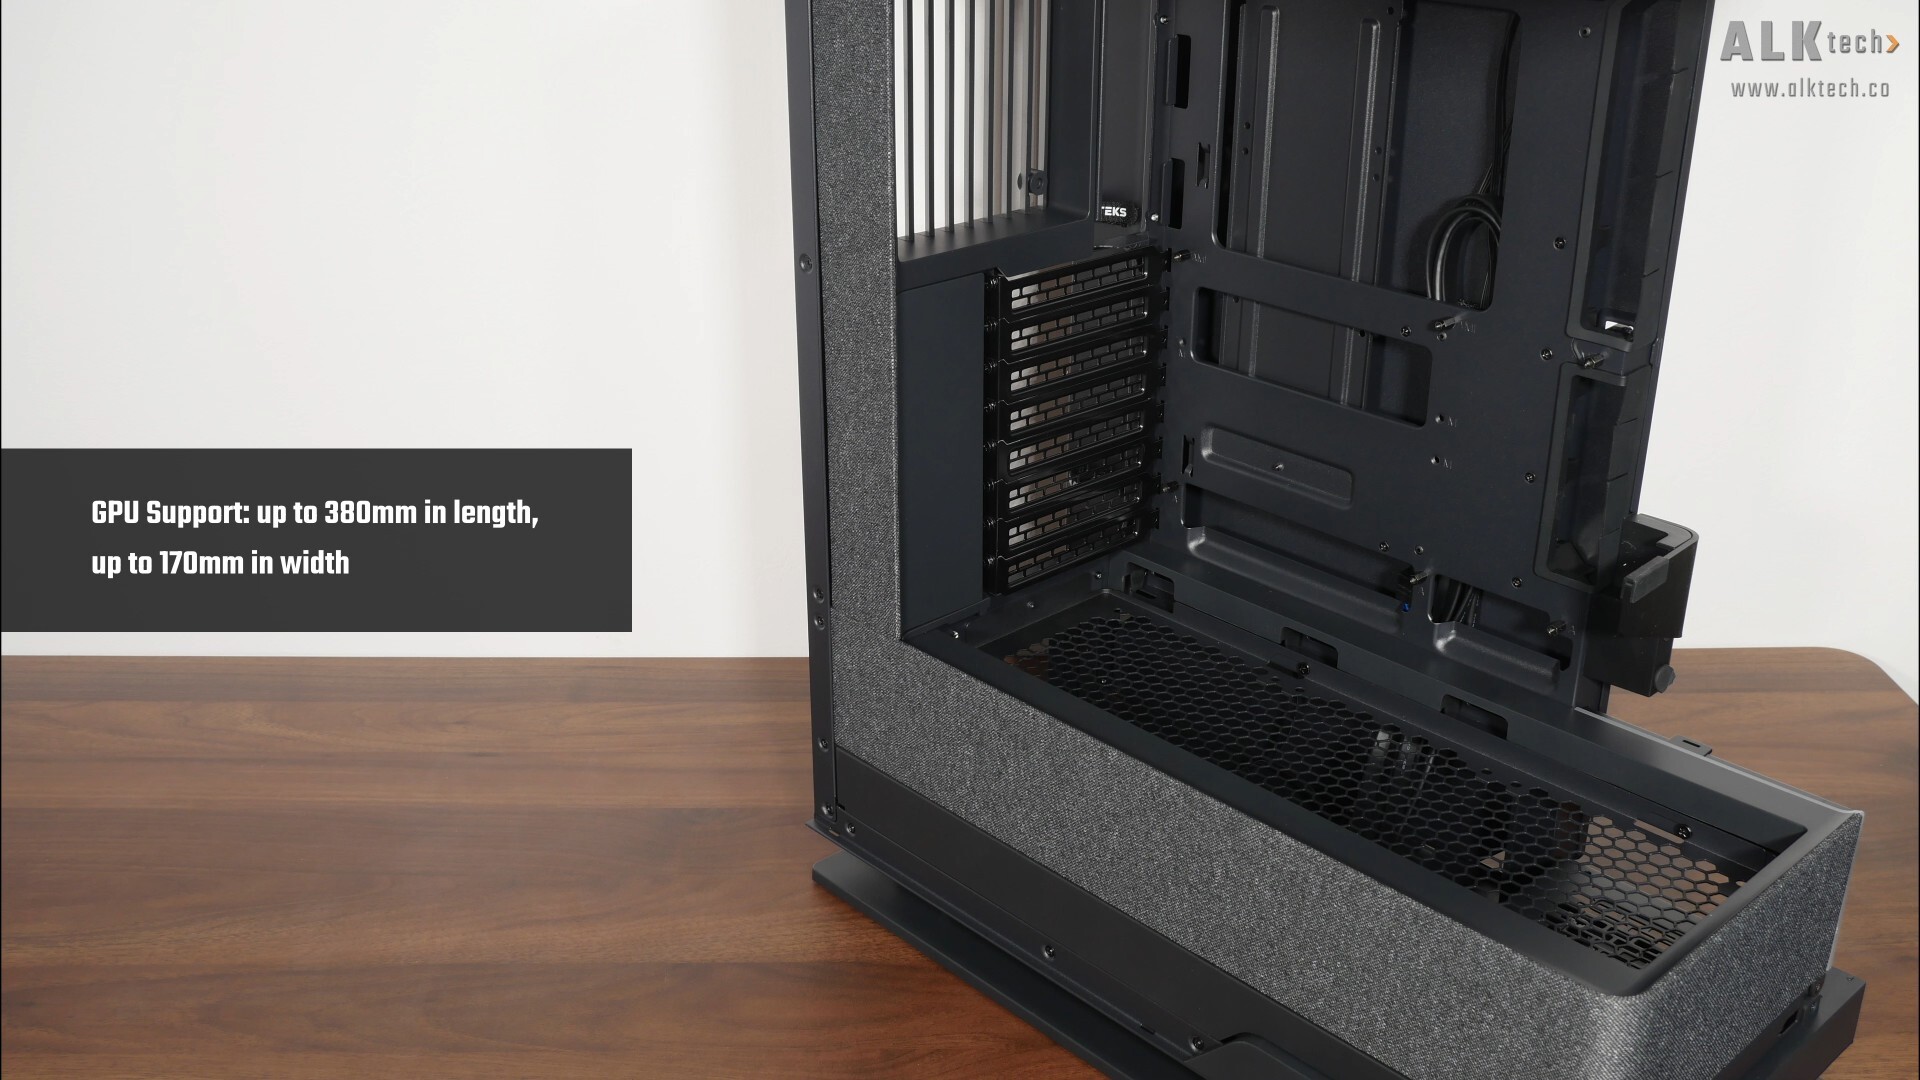
For your graphics card, the Evolv X2 Matrix comes with support for graphics cards with lengths of up to 380mm and widths of up to 170mm.
.jpg)
.jpg)
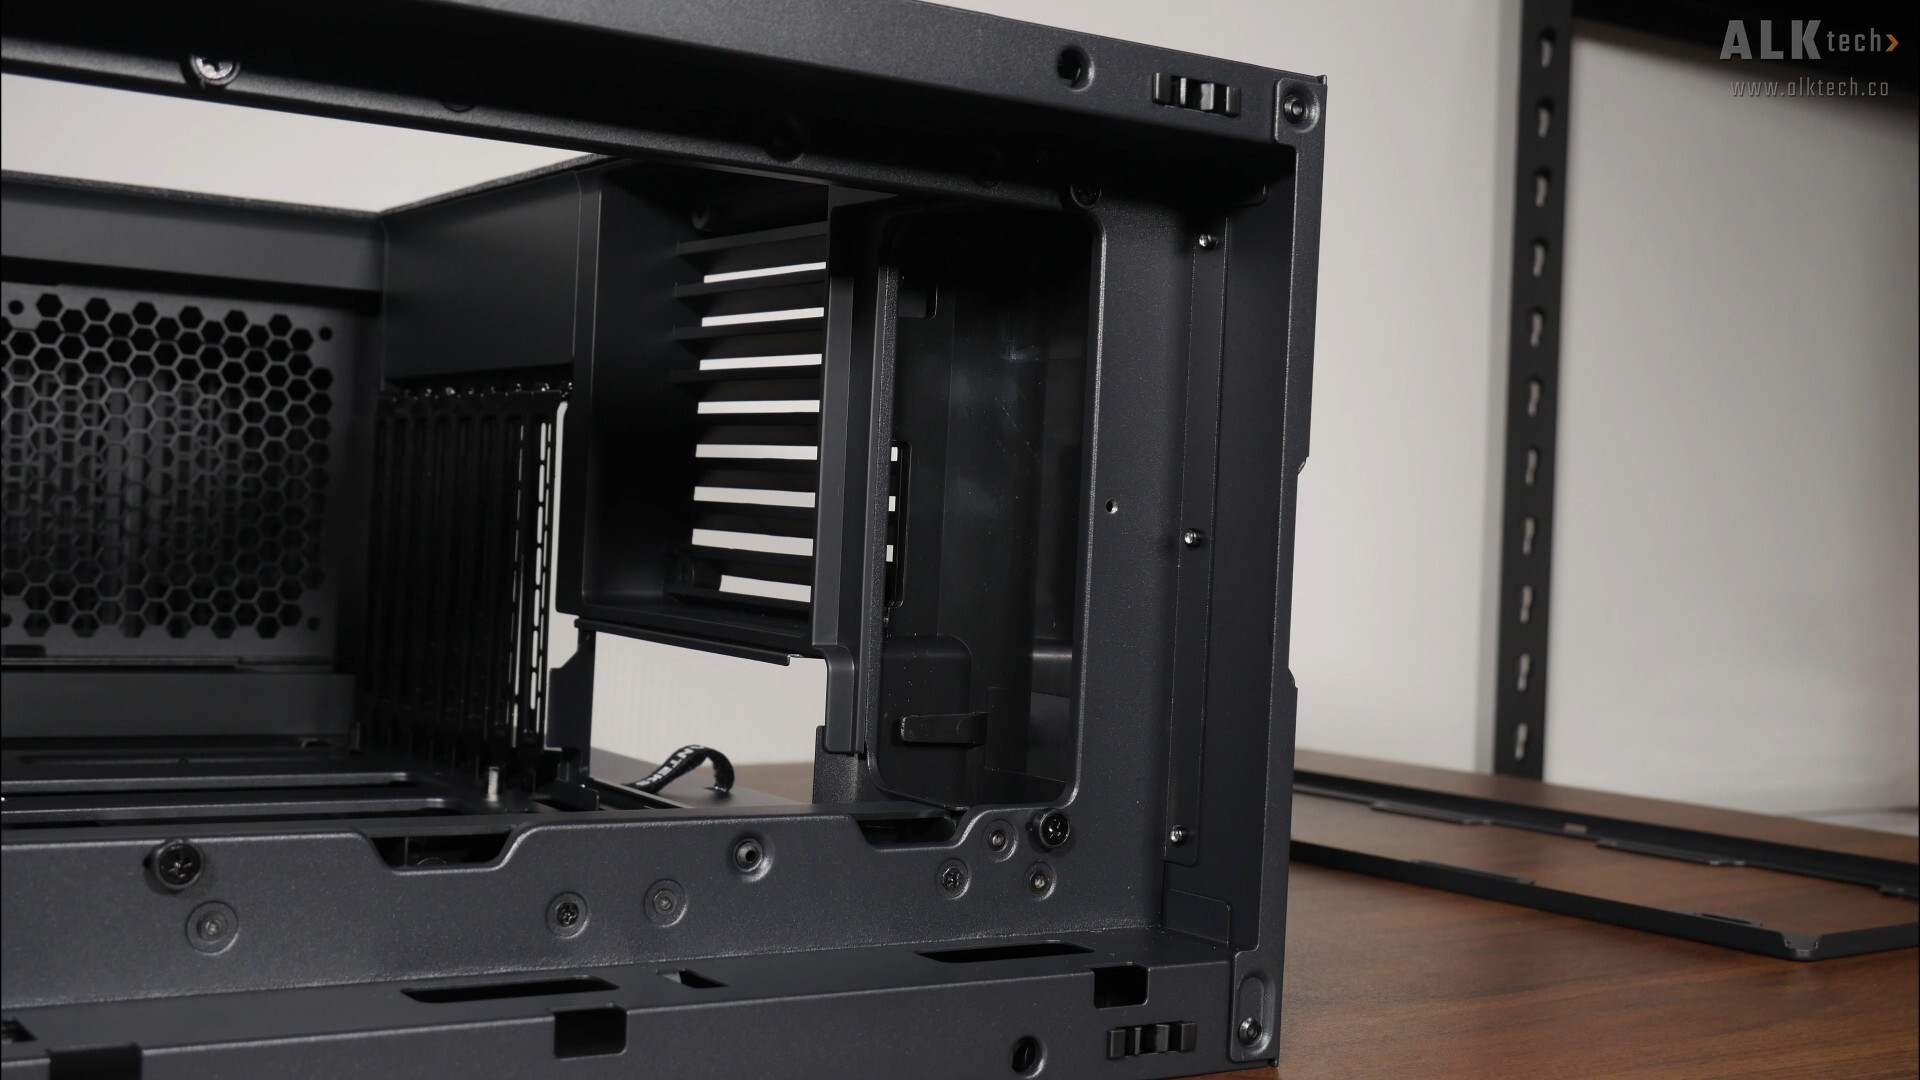
We also get an integrated graphics card support bracket that can be adjusted for height. To do so, simply undo two screws at the back of the said bracket, adjust its height and thereafter, tighten the screws.
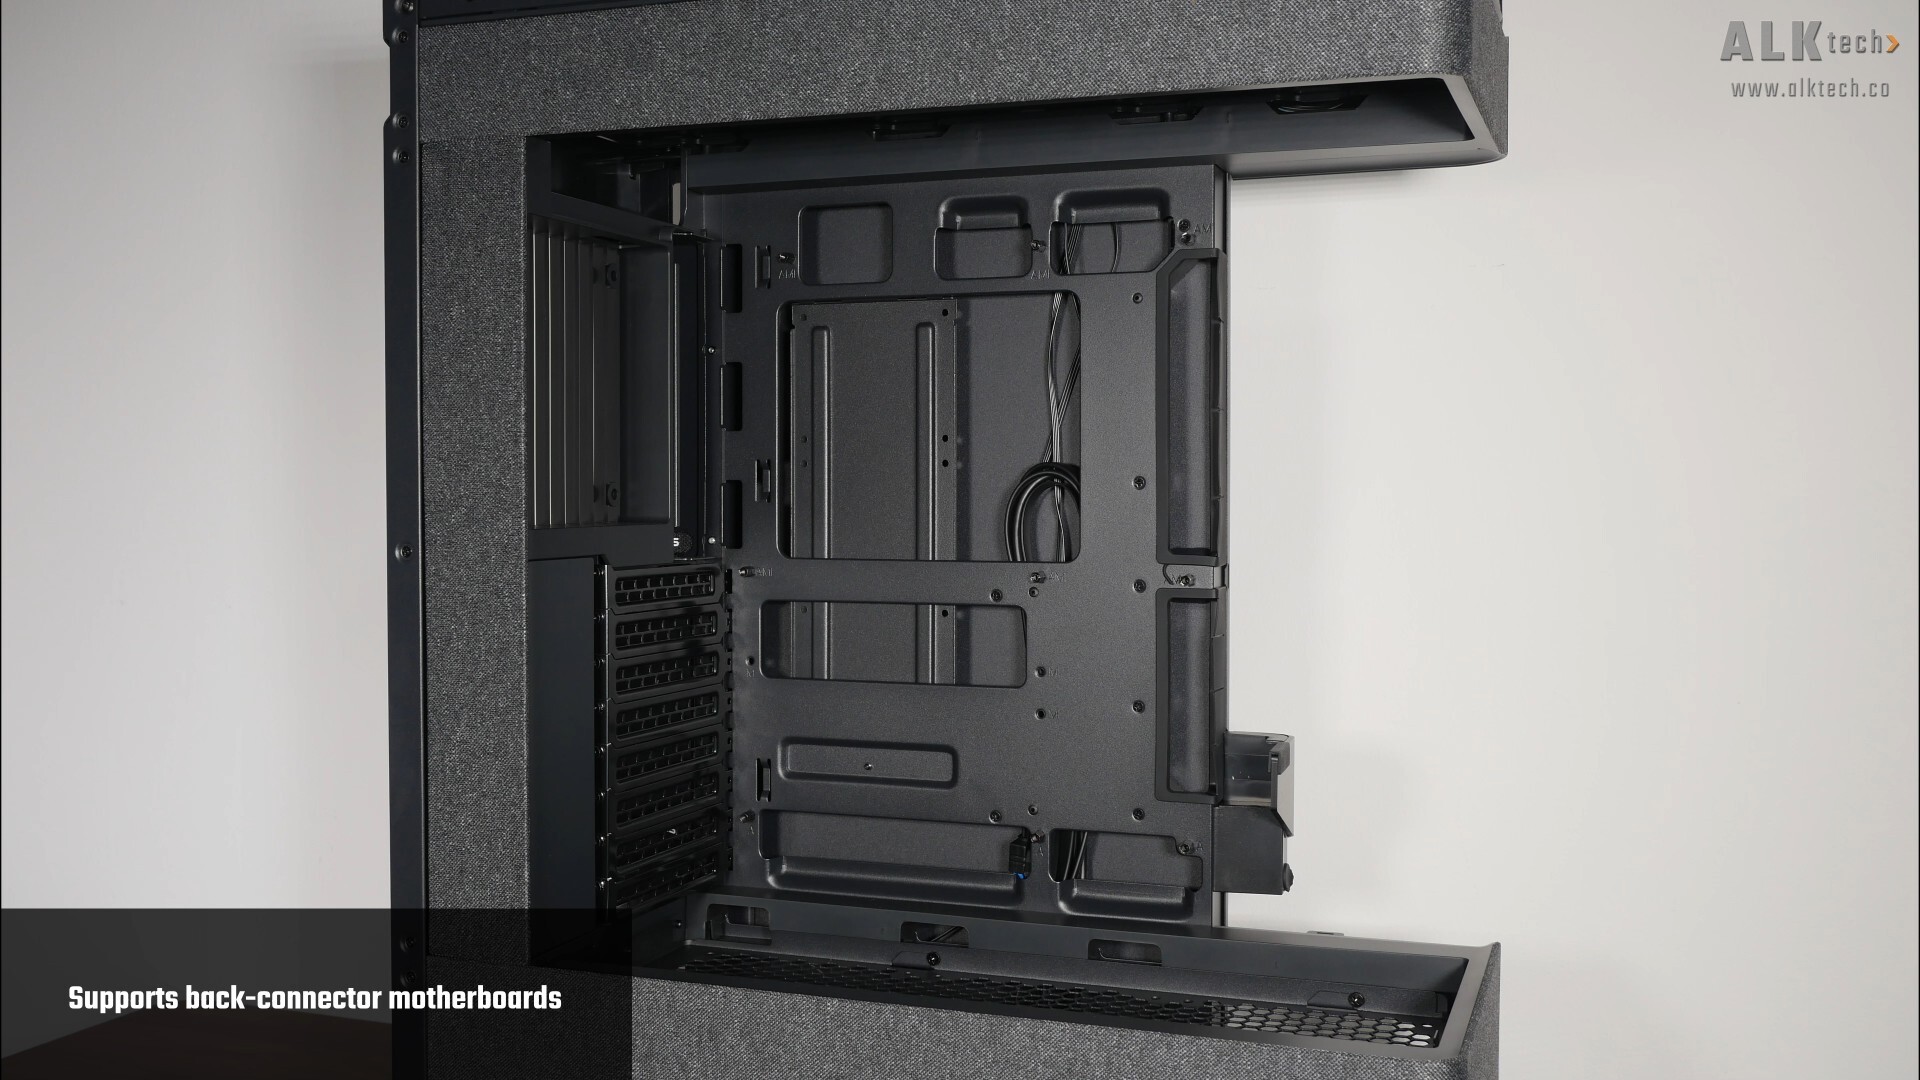
In terms of motherboard support, this case comes with support for motherboards with rear connectors, so ATX motherboards from say, ASUS’s BTF line-up, Gigabyte’s Stealth series or MSI’s Project Zero line-up should be compatible with this case.
.jpg)
.jpg)
The back of the motherboard tray is obscured by a metal panel on hinges, where this said panel can be removed from the chassis very easily too.

With the panel out of the way, we get full access to the bottom chamber of the case, which houses the power supply unit. In case you’re wondering, the Evolv X2 Matrix has 250mm of depth clearance for a PSU.
Storage Drive Support
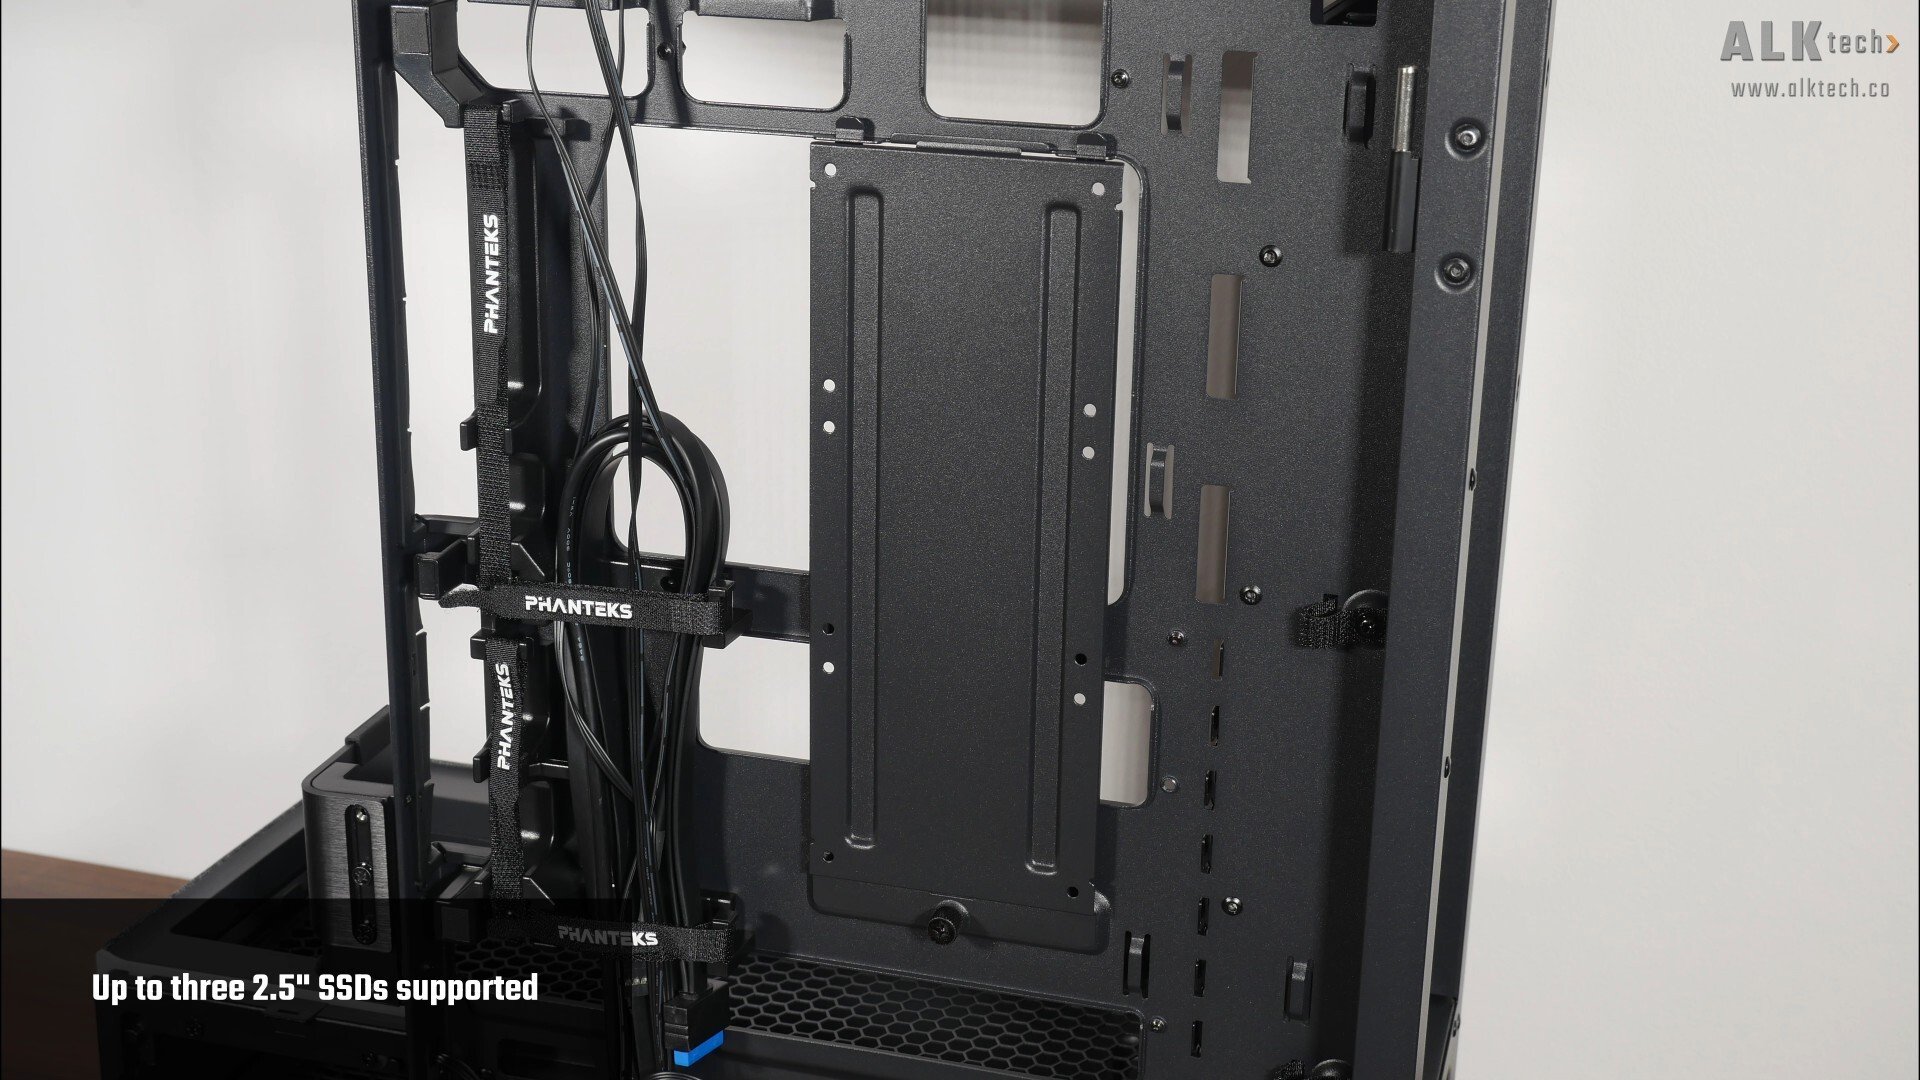
For you folks intending to install 2.5” and 3.5” drives for your PC build, the Evolv X2 Matrix comes with a removable bracket on the back of the motherboard tray that’s held in place by a thumbscrew. This bracket comes with support for up to three 2.5” SSDs.
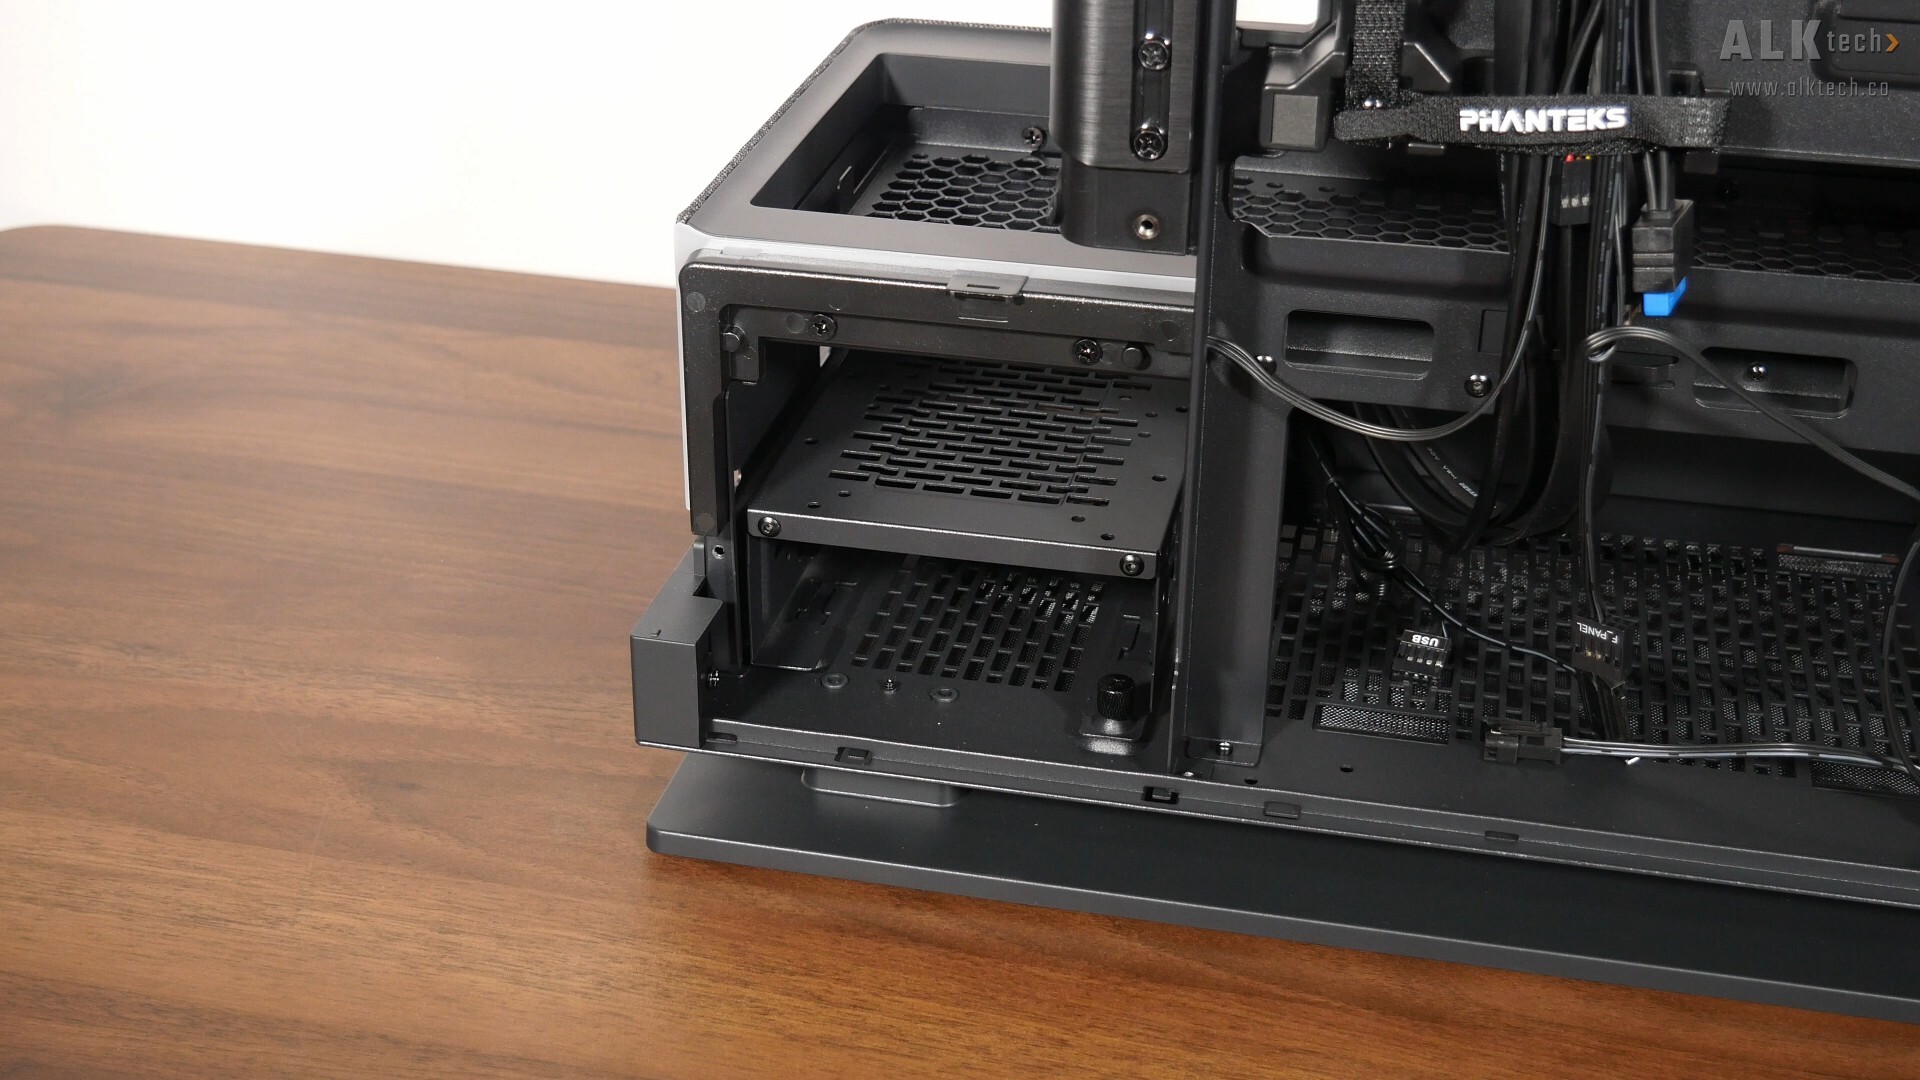

Over in the bottom chamber of the case that houses the power supply, we get a removable drive cage that’s held in place by a thumbscrew – we get a number of permutations of drives that’s supported by this drive cage, as shown by the illustration above taken from the Evolv X2 Matrix’s manual.
In total, we get support for up to five concurrent 2.5" SSDs (three on the back of the motherboard tray and two on the bottom chamber drive cage) and a single 3.5" hard disk drive (mounted within the bottom chamber drive cage), or three concurrent 2.5" SSDs (on the back of the motherboard tray) and two 3.5" hard disk drives (in the bottom chamber drive cage).
Building a PC with the Phanteks Evolv X2
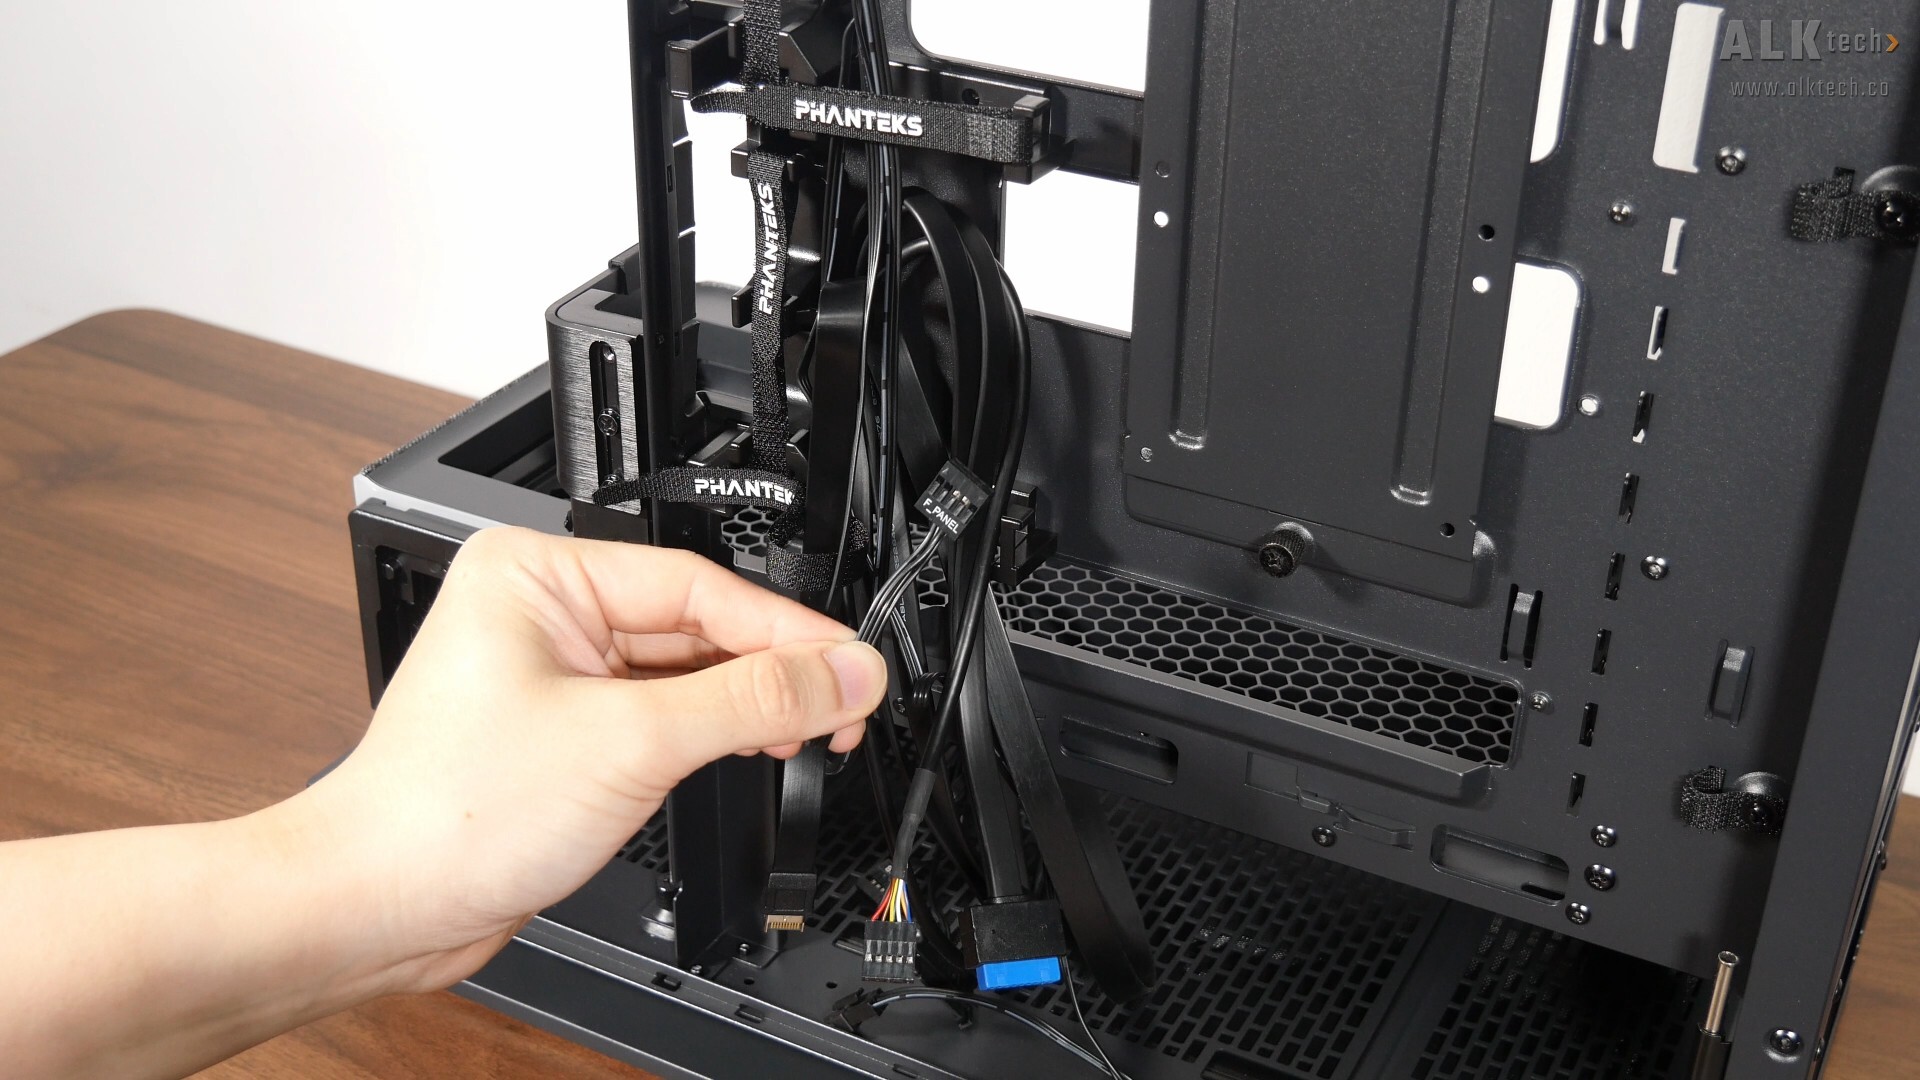
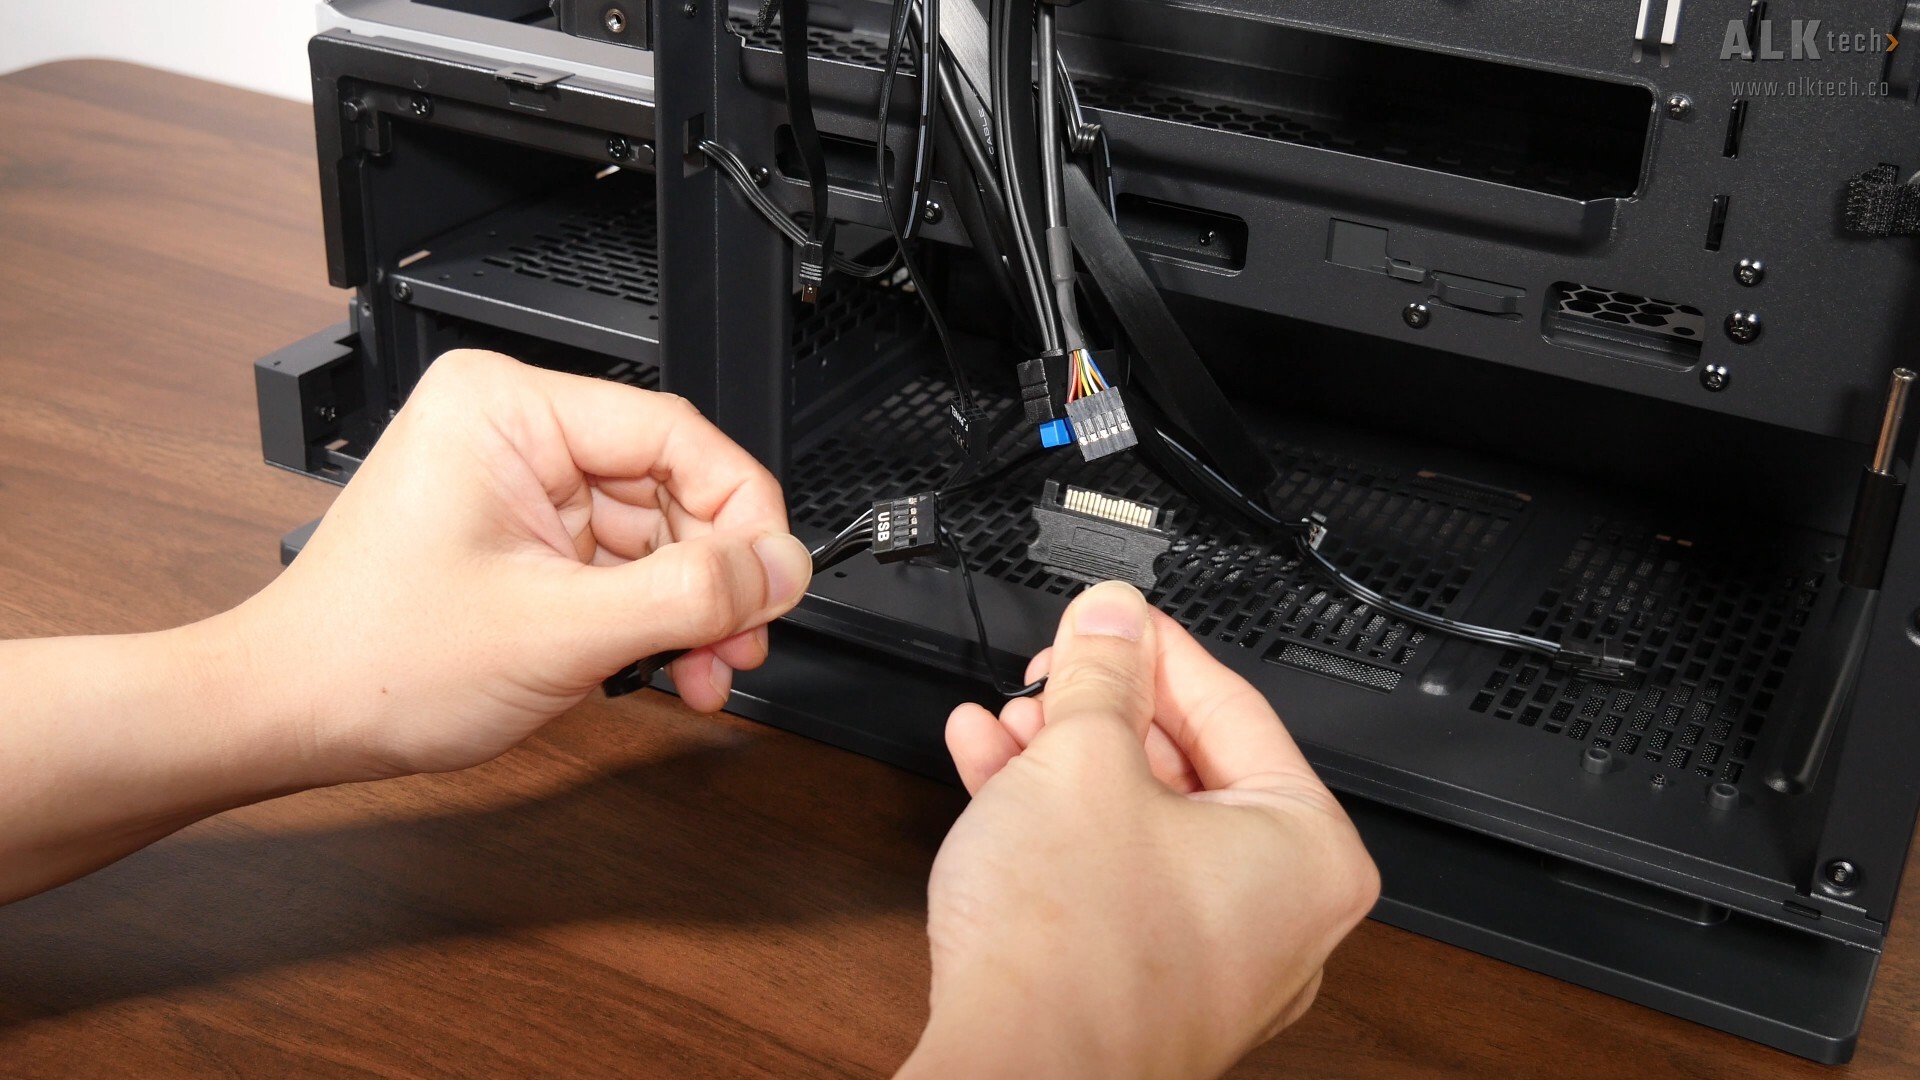
The front panel connectors of the case are pretty standard, where we get a front panel USB 3.2 Gen 2x2 Type-C connector, a front panel USB 3.0 Type-A connector, a front panel audio connector, as well as a nine-pin front panel connector for the power switch and reset switch.
For the front panel power and reset buttons, I appreciate the fact that Phanteks has gone with a nine-pin connector rather than dual two-pin standalone connectors, which can be more fiddly to hook up to your motherboard. This is a nice quality-of-life feature to have for sure.
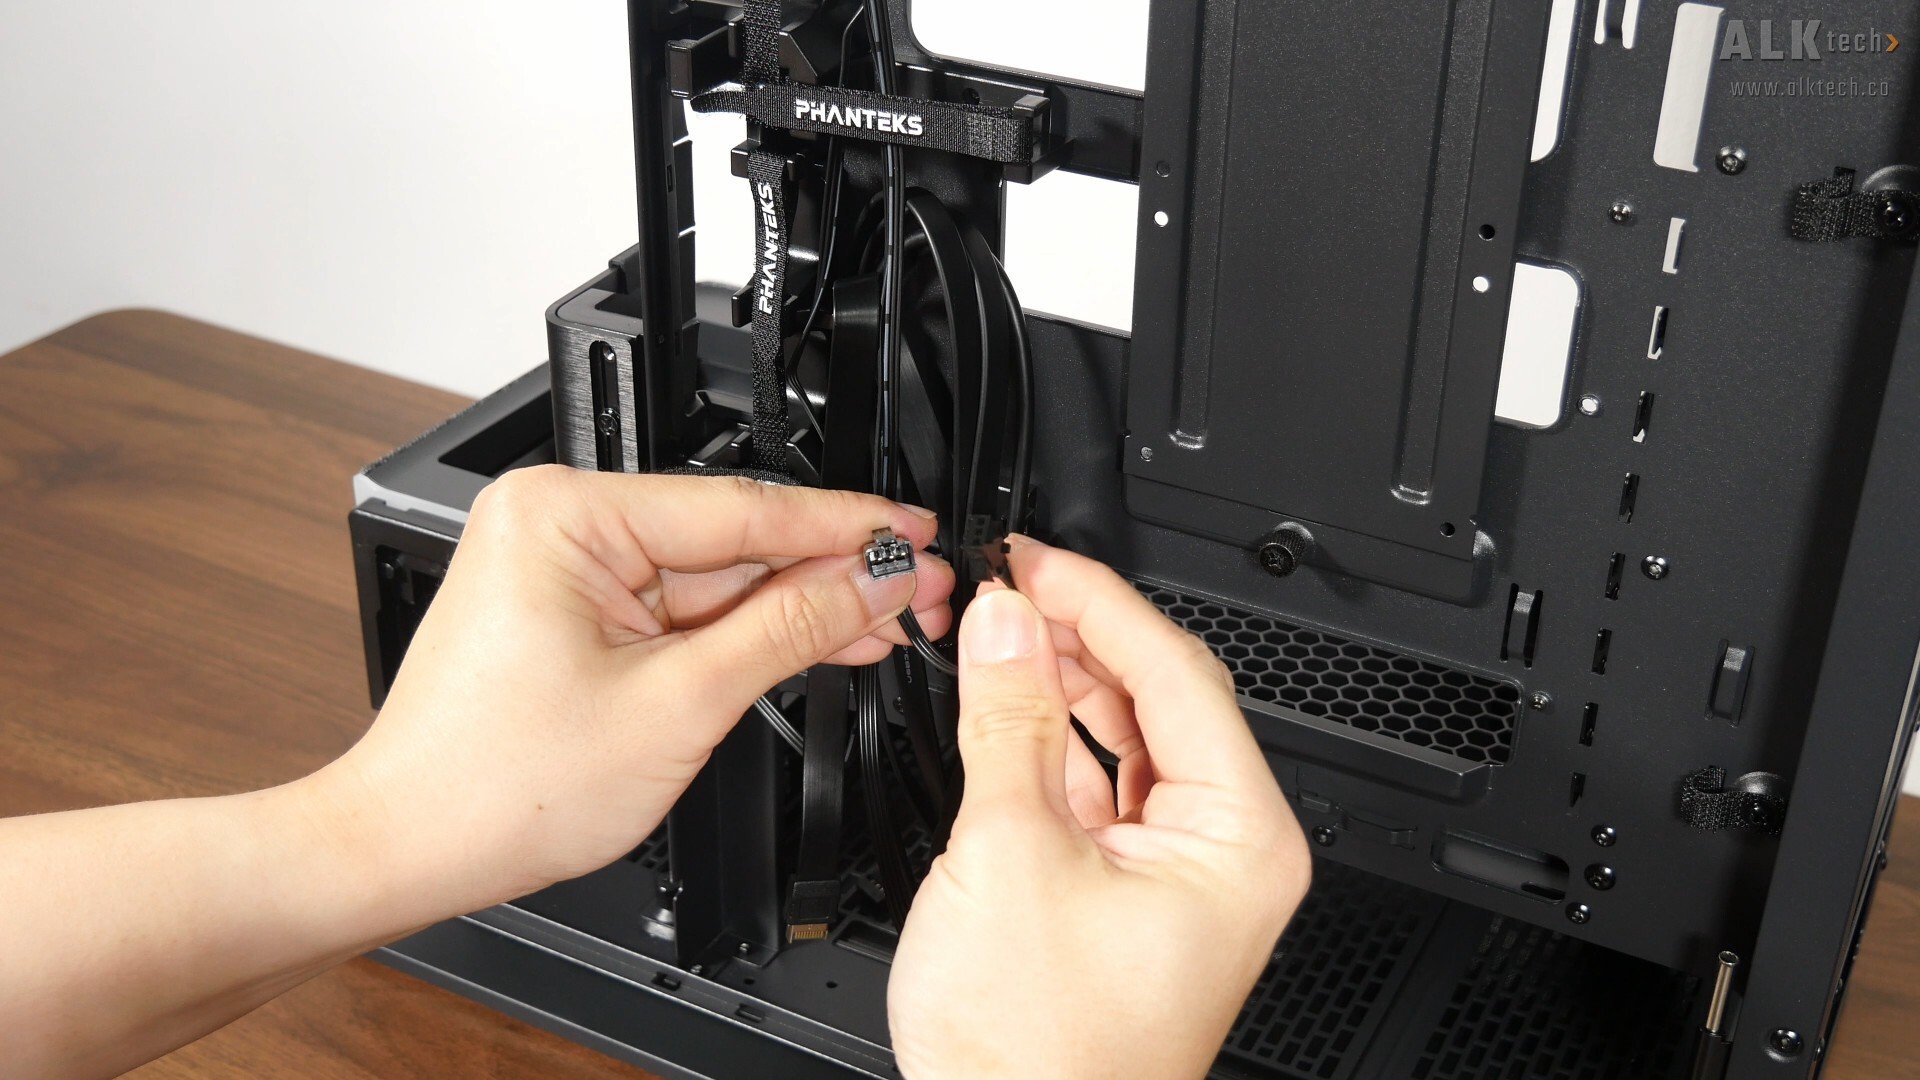
Moving on, we also get male and female three-pin D-RGB connectors for the ARGB LED accents of the case, which can either be daisy-chained to compatible Phanteks case fans, or to your motherboard’s ARGB header via the included adapter cable.
Finally, the matrix LED feature of the case requires you to hook up a USB 2.0 connector to your motherboard’s onboard header, and power for the matrix LEDs is drawn via a SATA power connector as pictured above.
With that, let’s do up a demo build with the Evolv X2 Matrix. Getting an ATX motherboard into the case was a pretty easy, where the motherboard standoffs come pre-installed on the motherboard tray.
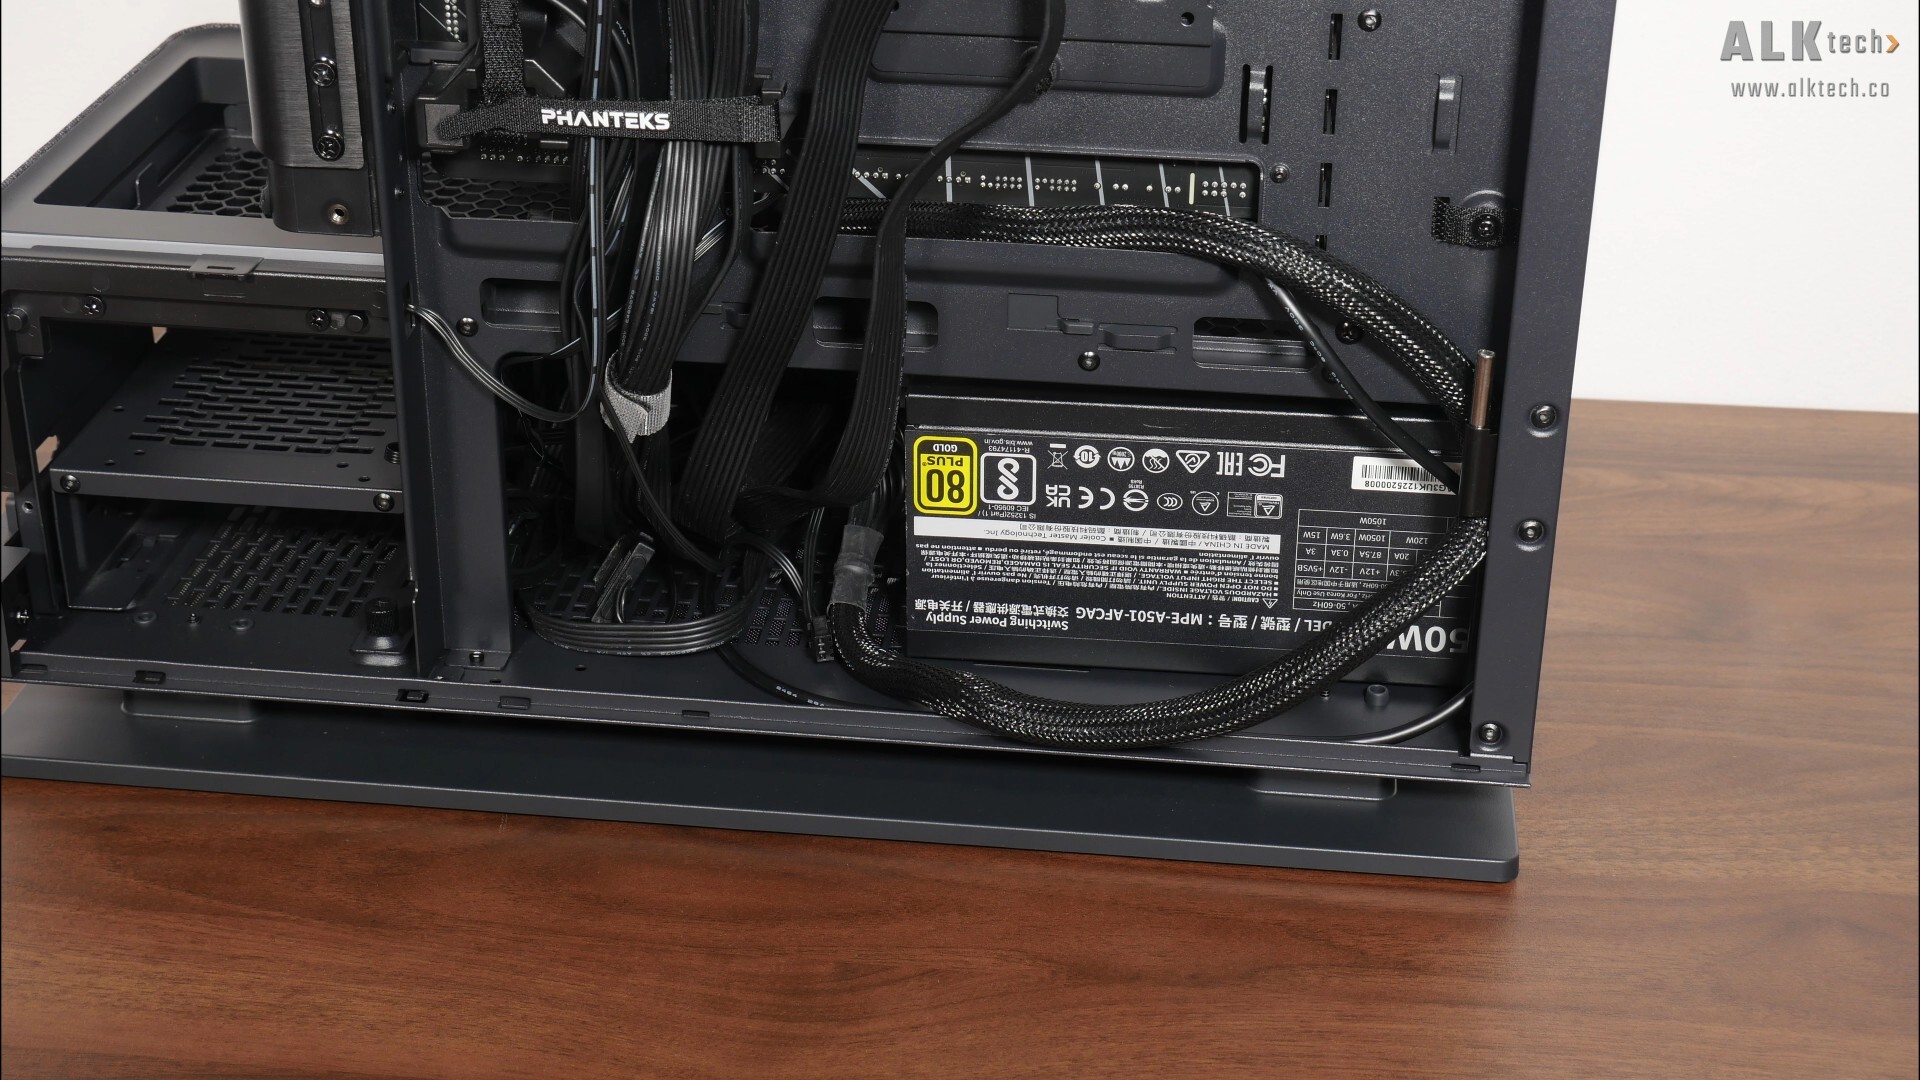

The PSU installation process was as smooth as it gets, where we’ve got lots of space to manoeuvre a PSU into the bottom chamber of the Evolv X2 Matrix, and run the respective PSU cables to where they’d need to go.
.jpg)
.jpg)
CPU cooling wise, I’ll be using a Phanteks Glacier One 360M25 G2 360MM AIO CPU cooler, where getting the radiator mounted on the top panel involves sandwiching the said top panel in between the AIO radiator and the cooling fans.
.jpg)
.jpg)
In this regard, having a removable mounting bracket certainly helps the installation process along for sure.
.jpg)
Over on the bottom panel, I've installed a three-pack of reverse blade Phanteks M25-120 G2 120mm case fans. Again, installing the fans on the bottom panel was pretty easy with the removable mounting bracket.
.jpg)
.jpg)
For the demo build, I managed to install one of the largest flagship graphics cards around, a Gigabyte AORUS GeForce RTX 4090 MASTER 24G, where this very card measures in at a whopping 358.5mm x 162.8mm x 75.1mm! Seeing as this is very tall card, I wasn’t able to run the 12VHPWR power cable from the bottom of the motherboard tray to the graphics card, as the power connector would get in the way of the tempered glass panel. Instead, I’ve run the cable from the top to the bottom, and this works and looks great too.
.jpg)
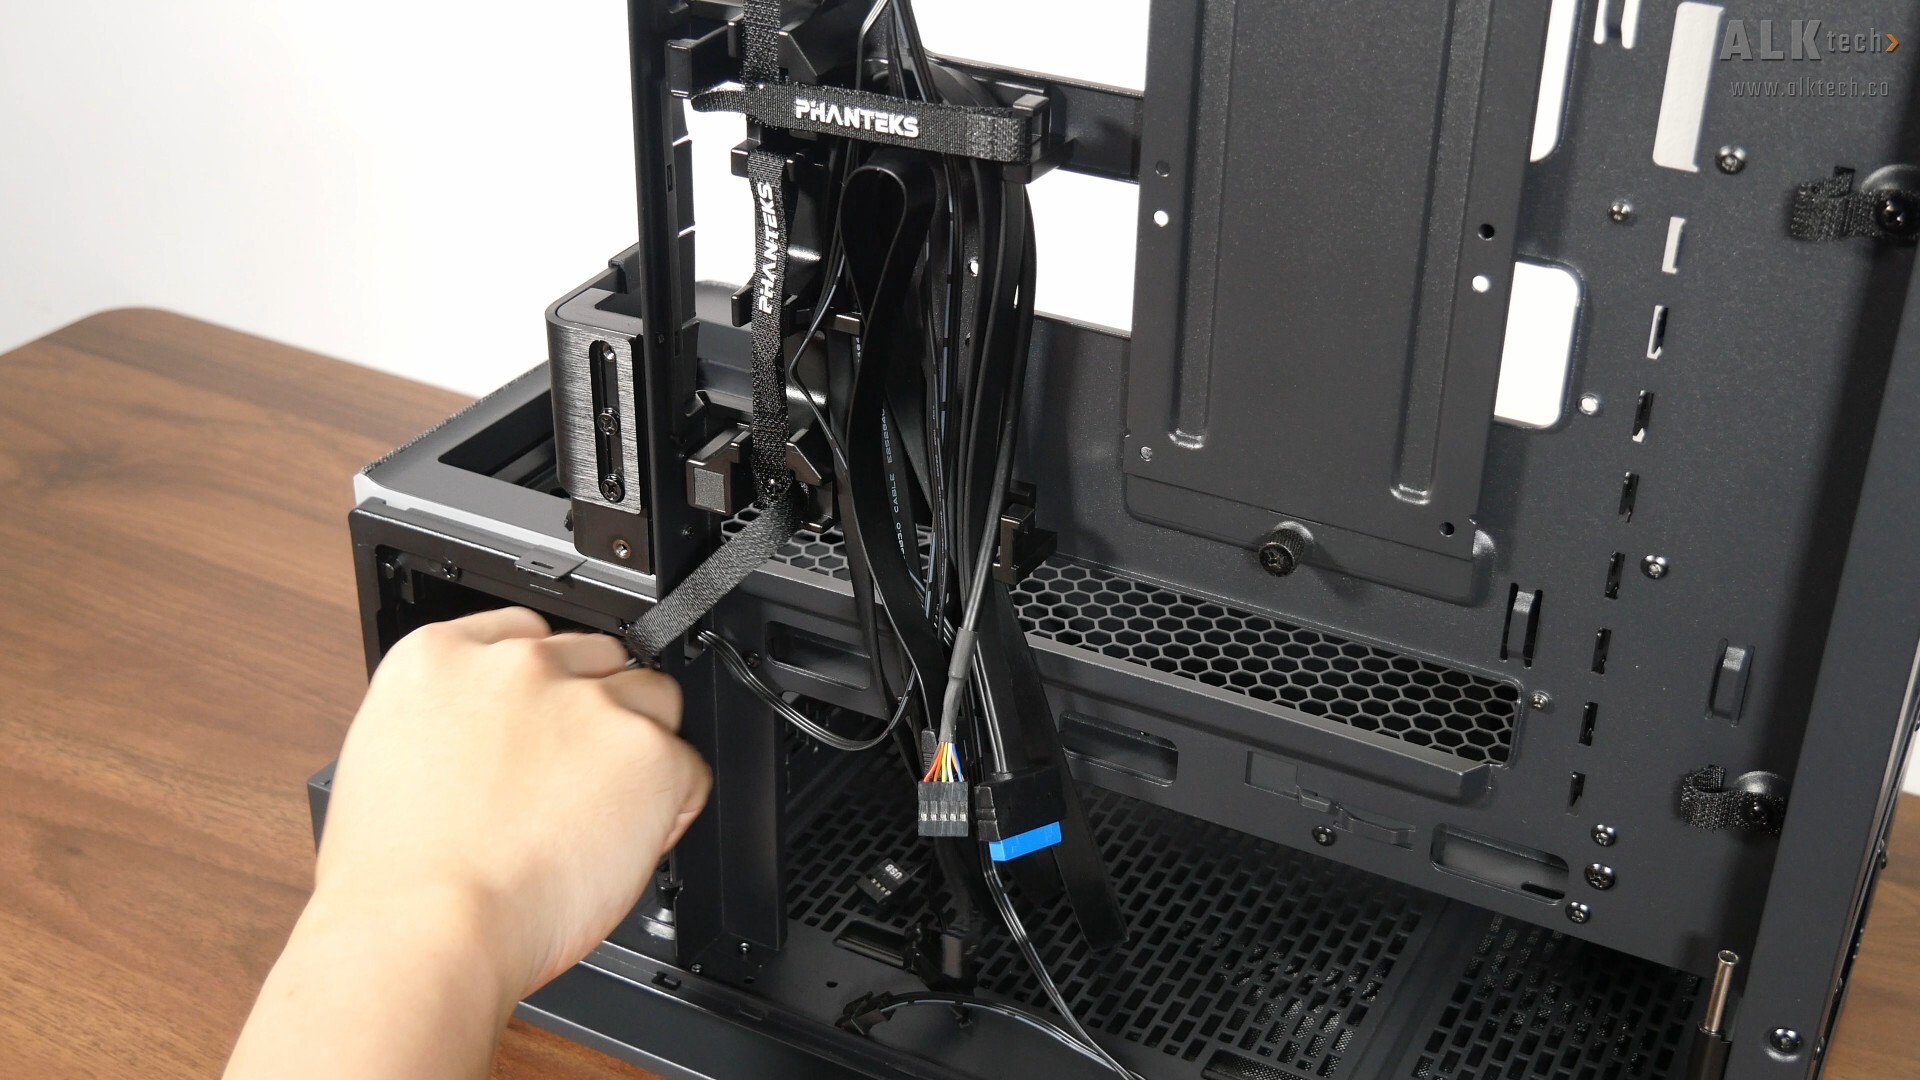
With the demo build nearly completed, let’s talk about cable management. I appreciate the fact that Phanteks has provided Velcro straps that are located in strategic positions to help guide your cables to where they need to be.
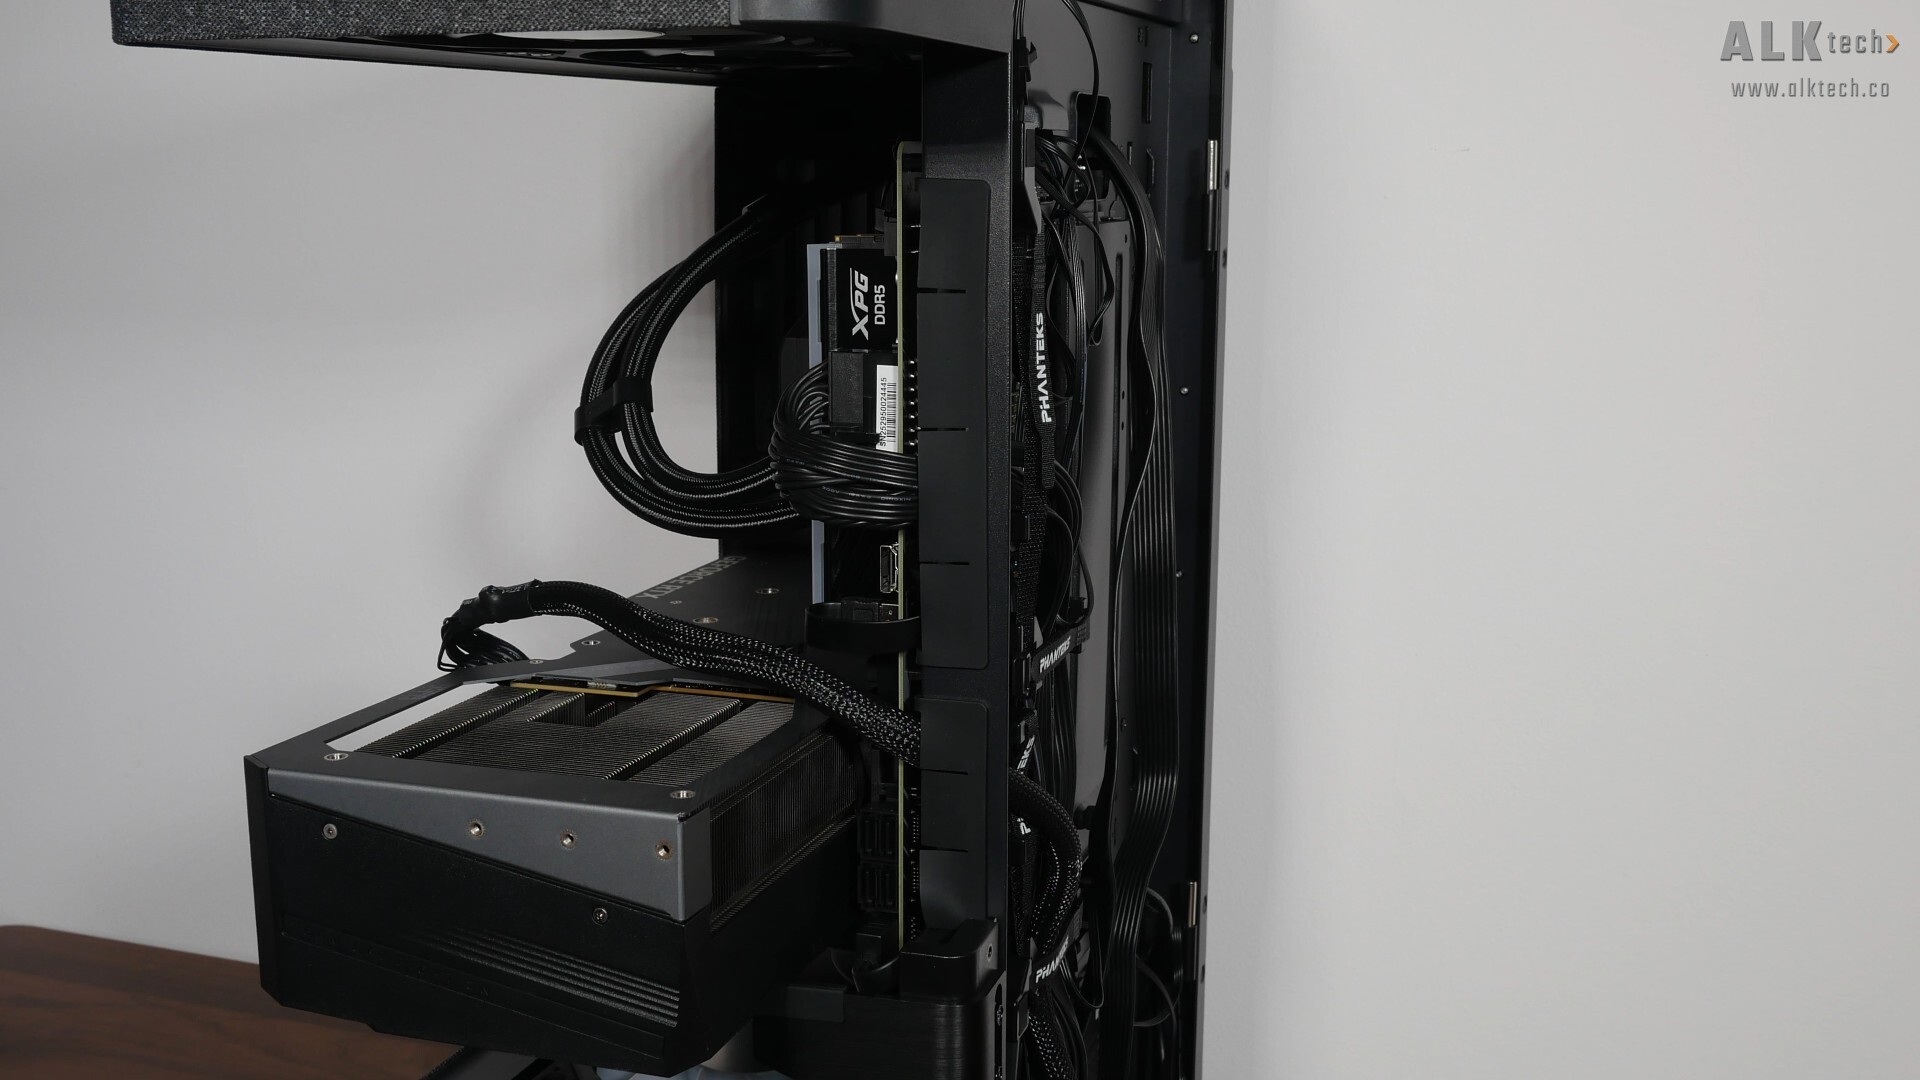
In addition, we also get these rubber grommets located along the side of the motherboard tray, which definitely help with ensuring a clean-looking aesthetic.
.jpg)
The good thing about the Evolv X2 Matrix is that it has a large metal cover that totally obscures the area behind the motherboard tray where you’d run your cables. This is important, seeing as we’ve got tempered glass panels on both sides and you’d want as clean an aesthetic as possible, by obscuring the cables at the back of the motherboard tray entirely.
.jpg)
All in all, the demo build with this case is shaping up really nicely in my opinion!
Completed Demo Build Aesthetics
.jpg)
.jpg)
.jpg)
.jpg)
.jpg)
.jpg)
.jpg)
.jpg)
.jpg)
Matrix LED Display Walkthrough
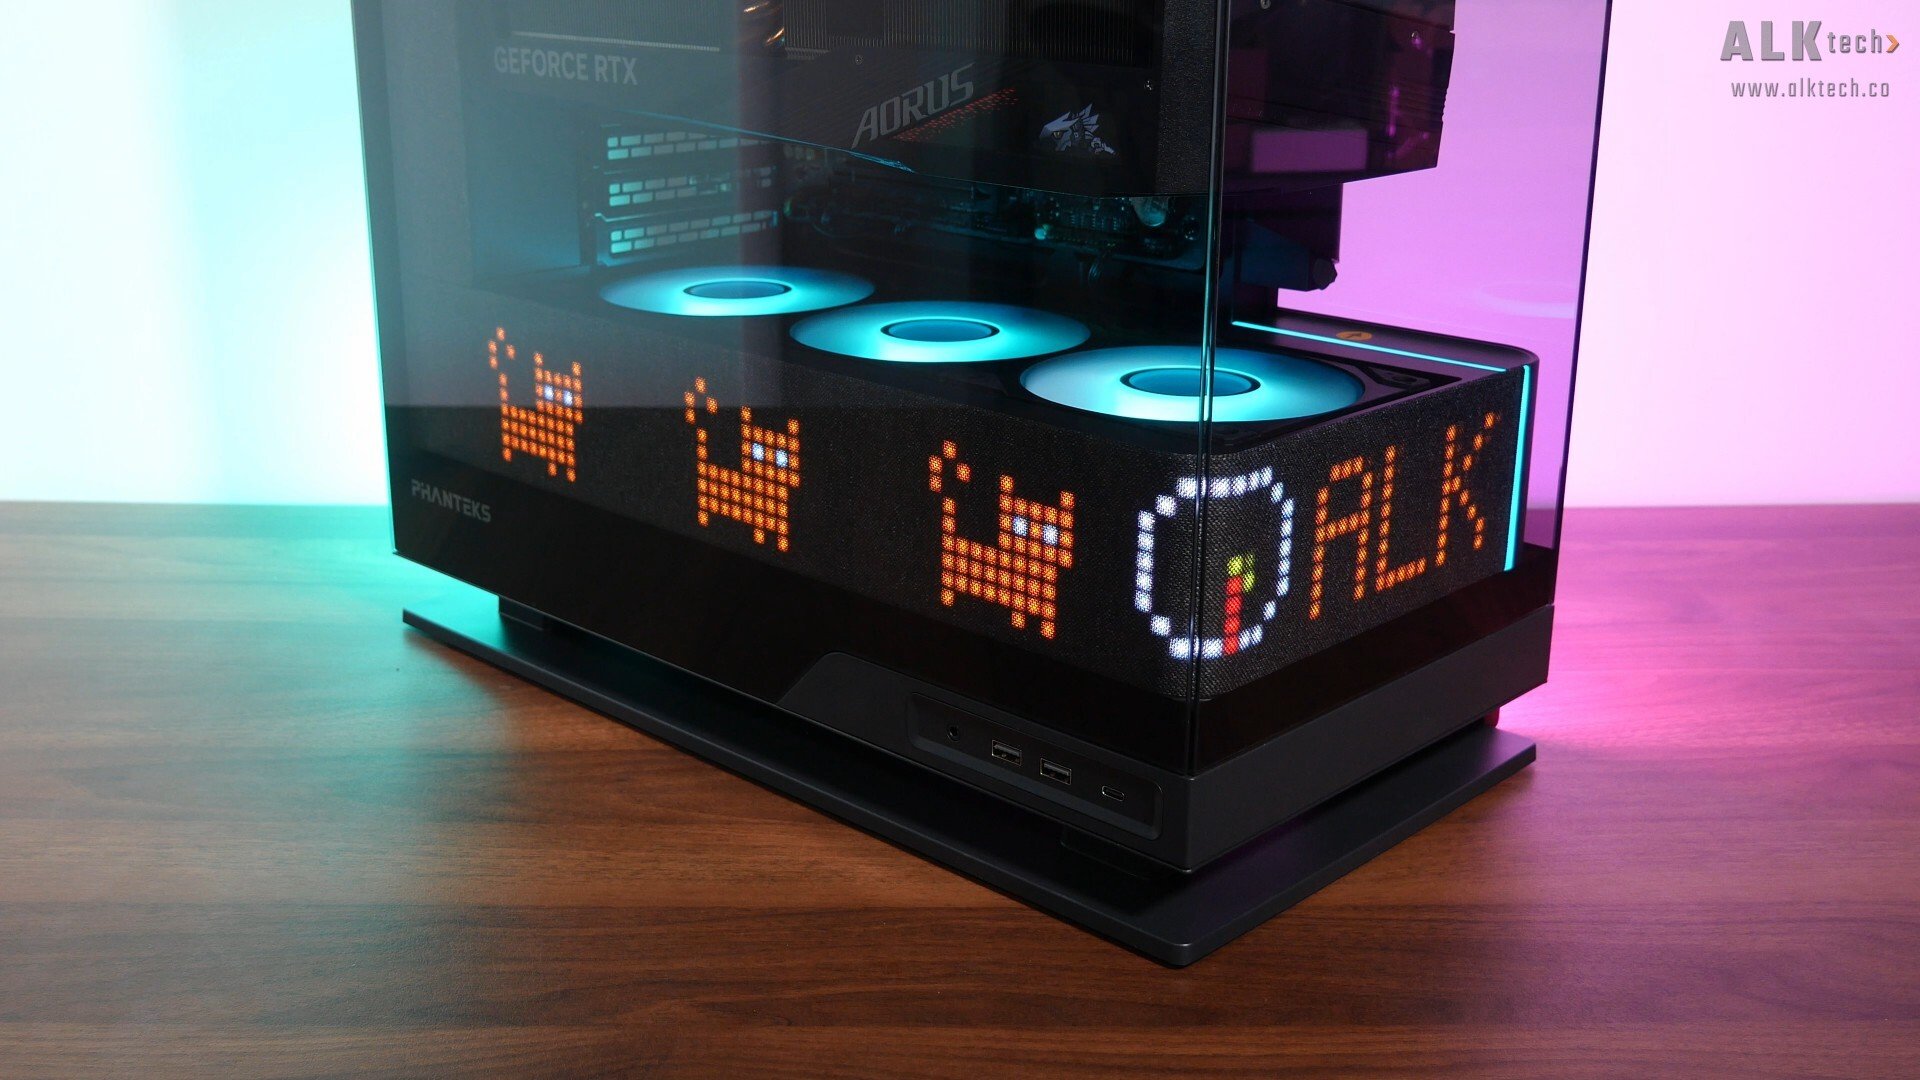
The lighting effects of the matrix LED look really good – the colours are vibrant, and the whole effect of not being able to see the LEDs behind the fabric finish until you’ve switched on the PC is really cool in my opinion.
.jpg)
Let's spend some time to talk about the software control for the matrix LED feature. To customise what appears on the LED panel, you'll need to download and install the Phanteks NexLinq app, and under the "Screen Control" tab, we get a "Preview" card that mocks up how the display will look like with your customisations, and a "Layout Library" consisting of 12 preset layouts. The matrix LED panel is divided into three distinct sections for widgets, and within each section, you can further divide it into two layers, such that you can have up to six widgets in total across the whole panel.
.jpg?width=1920&height=1080&name=NexLinq%20App%20(2).jpg)
Once you've selected a layout of choice, for instance the layout above that gives you two small widget sections and two large widget sections, you can then select the section to customise via the "Preview" card, select the widget of choice from the widget library, and customise the widget to your heart's content under the "Widget Settings" card.
.jpg)
.jpg?width=1920&height=1080&name=NexLinq%20App%20(4).jpg)
In the widget library, we get four types of widgets to choose from, "Time & Date", "System Data", "Media" and "Creator". We get four types of time and date widgets to choose from, where you can customise settings such the colour of the text and the background colour of the said text. "System Data" on the other hand, allows you to display system status statistics pertaining to your CPU and GPU temperatures, and fan speeds. Under "Media", we get four preset animations to choose from, and finally, under "Creator", we get the ability to customise text of your choice, and if you'd like to create you own custom graphic, you can do so via an Editor function. Seeing as there are only four preset options under the "Media" tab, here's hoping that Phanteks will release additional preset and custom options for the Widget Library with future NexLinq app updates.
.jpg)
To put the matrix LED through its paces, I've created the layout above using the NexLinq app, and the outcome looks like this in real life:
.jpg)
Thermal & Acoustic Performance
To benchmark the thermal and acoustic performance of the Phanteks Evolv X2 Matrix PC case, I've put together a demo build with the following specifications:
- CPU: AMD Ryzen 5 7600
- CPU Cooler: Phanteks Glacier One 360M25 G2
- CPU Thermal Paste: Stock Phanteks thermal paste
- Motherboard: Gigabyte X870 AORUS ELITE WIFI7
- Memory: 32GB (2x16GB) XPG Lancer Blade RGB DDR5 6000 CL30
- Graphics Card: Gigabyte AORUS GeForce RTX 4090 MASTER 24G
- PSU: Cooler Master MWE Gold 1050 V2 ATX 3.0
- Case: Phanteks Evolv X2 Matrix
- Case Fans: 3x Phanteks M25-120 G2 (reverse blade)
- OS: Microsoft Windows 11 Pro (25H2 with all latest updates installed)
- Fan Curve: Stock standard profiles
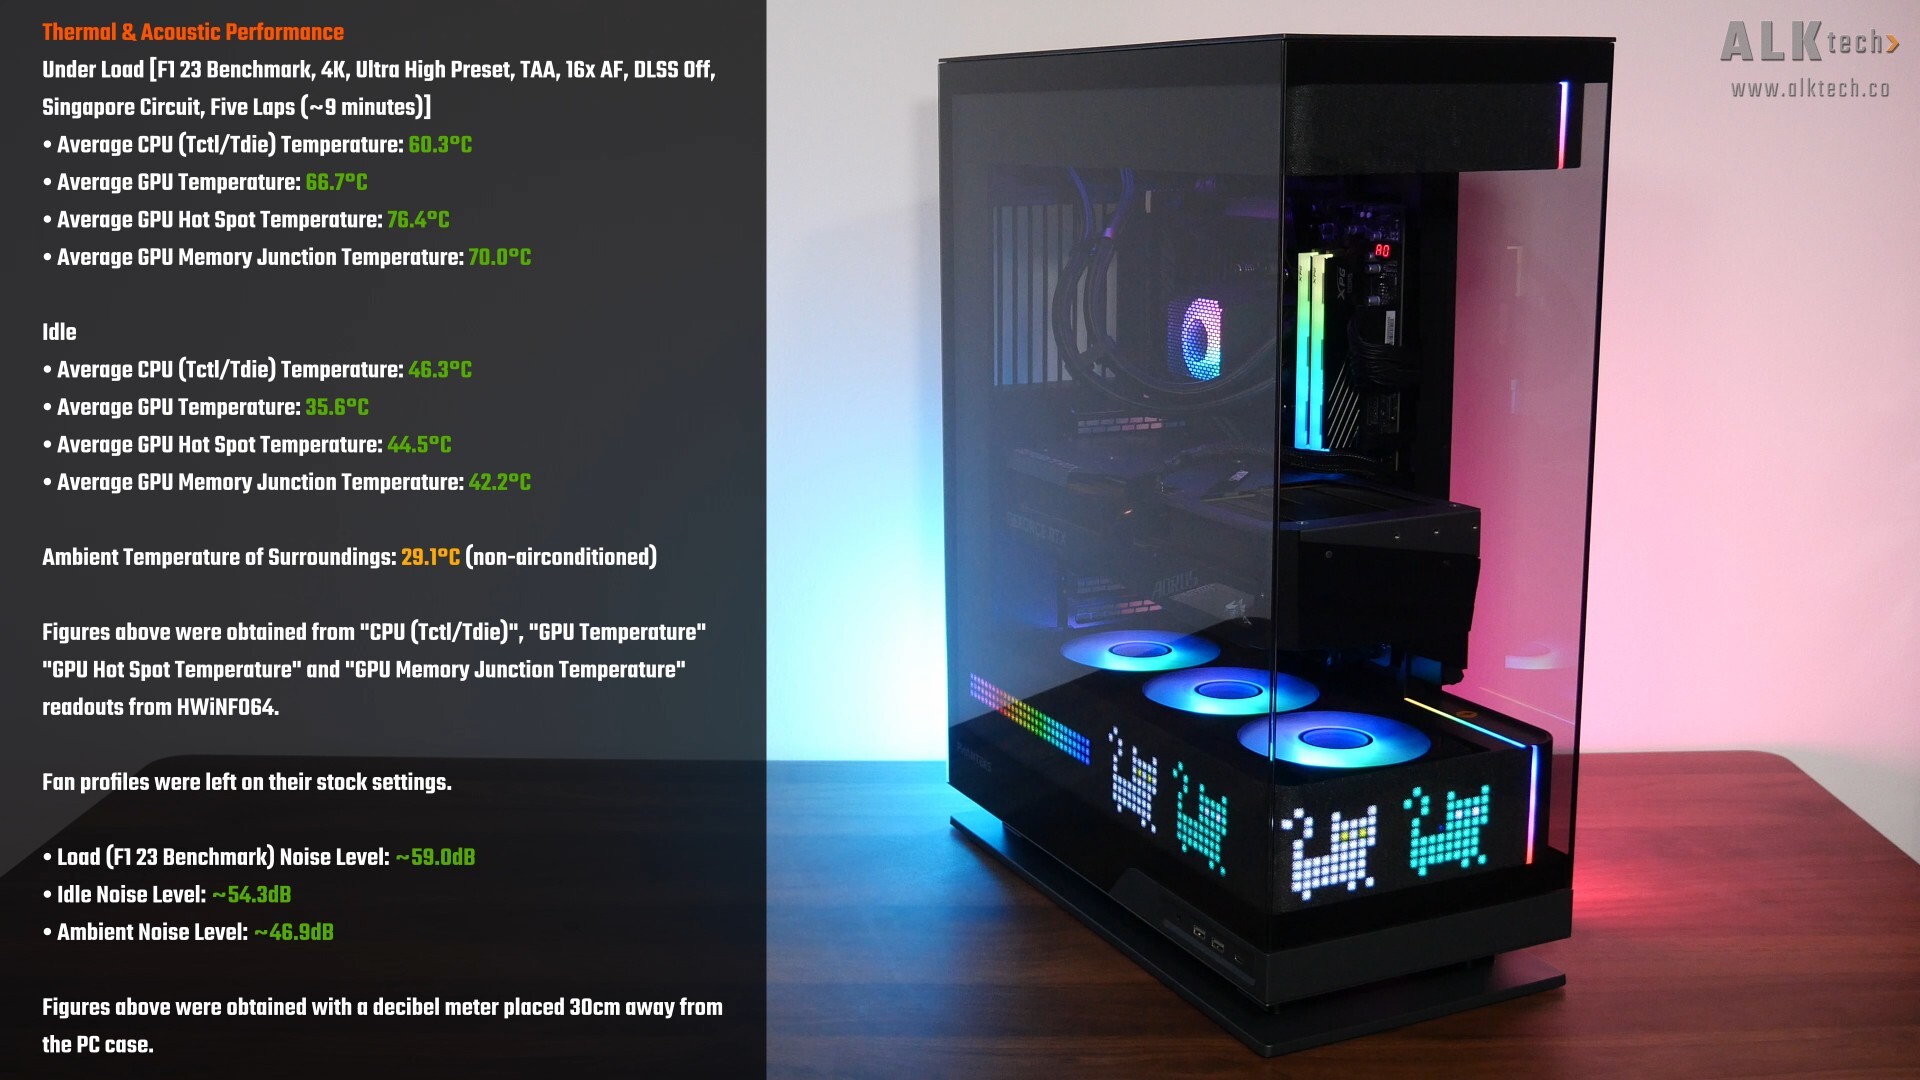
With F1 23’s in-game benchmark, where I ran a five-lap test for around 9 minutes in total, the Ryzen 5 7600 processor in the demo build achieved an average CPU temperature of around 60.3°C, while the AORUS GeForce RTX 4090 MASTER 24G by GIGABYTE achieved an average GPU temperature of 66.7°C and an average GPU hotspot temperature of 76.4°C. These results were achieved in a non-airconditioned room with an ambient temperature of 29.1°C. A decent set of results on the whole, and you’ll notice that I didn’t install a rear exhaust fan too. That said, it's worth noting that the Phanteks Glacier One AIO CPU cooler is pretty overkill for a Ryzen 5 7600, and the AORUS RTX 4090 MASTER 24G has a beast of a GPU cooler as well.
The idle temperatures and estimated noise levels with the demo build are as per what you see on the screen, and for the thermal tests, I left the fan curves on their stock settings without any tweaks. Naturally, your thermal performance with this case will vary especially, if you’re going to be using different hardware from the demo build in this review.
Conclusion & Pricing
To sum up, I think that the Phanteks Evolv X2 Matrix reinforces the Evolv X2 line-up's position as a PC case that’s great for showcase builds – the original Evolv X2 in itself is already quite the breath of fresh air given its monolithic three-sided tempered glass aesthetic and the floaty graphics card appearance that’s created as a result. Throw in the matrix LED display, and you have a truly unique premium PC case offering in the market that’s going to look great as part of a no-holds-barred showcase PC build.
Like the original Evolv X2, fit and finish of the Evolv X2 Matrix is good, and the PC building experience with this case was pretty smooth as well. Thermal performance wise, it should perform identically to the Evolv X2 non-matrix, meaning to say, it’s not going to be the best in terms of thermal performance when compared to say, cases with a high-airflow design, but hey, something’s got to give for such an eye-catching design I suppose. Also, I do think that the amount of customisation that one can do for the matrix LED via the NexLinq app is still rather limited - here’s hoping that with future NexLinq app updates, Phanteks will unlock more features, widgets and customisations for owners of this PC case.
In terms of pricing, the Evolv X2 Matrix has a MSRP of US$199.99 – for comparison’s sake, the original Evolv X2 without the matrix LED goes for a price of US$129.99. In Singapore, the Evolv X2 Matrix will retail at a price of $315 Singapore dollars.
Get this PC case from Amazon: https://amzn.to/4sKDop0 (affiliate link)
Get this PC case from Lazada Singapore: https://s.lazada.sg/s.2gVgn (affiliate link)
Get this PC case from Shopee Singapore: https://s.shopee.sg/3fxQIClZIQ (affiliate link)
ALKtech may earn commissions from qualifying purchases made using affiliate links, at no extra cost to you as a customer. These commissions go a long way in supporting the platform!
The PC case featured in this article was a review unit sponsored by Corbell Technologies, the official distributor for Phanteks in Singapore.